General

A catch all category for posts that are neither specific to a Microsoft technology which has its own dedicated category or posts that aren’t based on a Microsoft technology, as rare as those are.

jQuery and WordPress No Conflict

Last night, I was doing some work on my blog as ever since I wrote the custom theme I use (and since updated it) I have neglected my mobile visitors and the mobile views not only looked awful but in some cases, depending on the device you were using made the content totally invisible due to the black wallpaper background and the black body text appearing on top of each other.

I decided I wanted to add a fixed top header that faded away as you scroll down the page and reappeared as you scroll back up as I’ve seen it on a number of sites before and the effect is both aesthetically pleasing and maximises the real estate on devices with small screens such as smartphones. I found a site which had a good reference on how to implement this using jQuery and I added the script to the site and the relevant CSS selectors but it wasn’t working.

Using the Developer Tools in Internet Explorer, I could see that my script file containing the jQuery was generating an error on line 1 with the error $ is not defined. Being that I’m just about good enough to write and tweak the jQuery for my needs, I had to resort to searching online to find the solution so I thought I would post it here in the hope that I help some other WordPress administrator out there struggling with the same issue.

The problem arises not because of a problem with jQuery but a nuance with WordPress and how it implements jQuery. With a normal site under normal conditions, you load the jQuery library to allow you to invoke jQuery on the site and in doing so, jQuery assign itself the $ symbol as a variable used for invoking jQuery. jQuery includes an optional mode called noConflict which helps to prevent conflicts with other libraries and extensions that may also use the dollar symbol as a variable. WordPress implements jQuery in no conflict mode and as a result, the dollar symbol is not available and instead, we have to invoke jQuery using the jQuery named variable.

When writing jQuery scripts for use on a WordPress site, we need to replace all instances of the dollar symbol with the jQuery notation. Below is an example line from the script I first wrote for the disappearing menu bar script referencing jQuery using the dollar symbol which causes the $ is not defined error.

$(window).scroll(function(event){
    didScroll = true;
});

To make the script function properly on the WordPress site, I had to modify this section of code to replace $ with jQuery as shown below.

jQuery(window).scroll(function(event){
    didScroll = true;
});

After changing this and all the remaining references in the script and saving it back to the site, the Developer Tools ceased to report the error and the script started to function as expected.

One Year Left for SQL Server 2005 Support

Many enterprises are still dealing with the challenges of completing Windows XP and Windows Server 2003 migrations. Whether you are moving to Windows 7 or Windows 8.1, perhaps even running the gauntlet on Windows XP and hedging your bets for Windows 10 later this year on your clients all the while, evaluating and testing your line of business applications and servers on Windows Server 2012 R2, there is a lot to deal with.

There’s nothing like a little added pressure to throw into the mix and that is why as of 12th April 2015, there is one year left on the extended support status of SQL Server 2005. This notice effects all editions of SQL Server 2005 including 32-bit and 64-bit versions, remembering of course that later versions of the Microsoft database engine are 64-bit only.

With databases and their associated servers being critical to the underpinning of your applications, making the right choices to move these databases is a big decision. If for example, your current database server is a 32-bit server then not only will you have to move that to a 64-bit version of SQL Server but also a 64-bit operating system and that may mean new hardware required if the server only has a 32-bit processor to work with. There is also the question of virtualization as back in 2005, many people wouldn’t have dreamed of virtualizing a database server but today, it’s a commonly done thing . We even have Database as a Service solutions available in the public and private cloud such as SQL Database in Microsoft Azure.

Once you’ve decided on a target architecture platfom, the talk may move on to questions such as storage types, SSDs and flash cache devices such as the Fusion-io ioDrive as things have certainly moved on in storage since your SQL Server 2005 system was first deployed and once you’ve had those conversations, you can think about high availability options such as failover clustering, mirroring or AlwaysOn High Availability, the latter being new to exiting SQL Server 2005 users and offering a fantastic high availability solution.

I think the SQL Server 2005 issue is going to be quite a wide-spread one as in my travels to customer sites and on projects, I see a lot of SQL Server 2005 in the field still, running production systems and some of these systems may themselves no longer be within support so contacting the vendors for information about support for later versions of SQL may make for interesting work. If the vendor themselves has ceased trading then finding out whether that application will support SQL Server 2012 or SQL Server 2014 will be down to you and a test environment.

Public Cloud Security Verses On-Premise

Our MD at Fordway authored an article on freshbusinessthinking.com back in November 2014 which I was drawn to today which for me really hits the nail on the head about security and how public cloud addresses it and the simple fact is, is your organisation fully PCI DSS compliant or do you hold an ISO 27001 certification? How about the myriad of other industry security certifications such as SOC, FIPS 140-2, HIPAA or EAL?

Well public cloud providers often are accredited with a number of these certifications which makes their environments actually more secure than the majority of environments run by in-house IT.

You can read the full article by Richard Blanford at http://www.freshbusinessthinking.com/business_advice.php?CID=0&AID=13699&PGID=1#.VNTgpPkYt9A

Support My Wife Without a Penny from Your Pocket

Apologies to those who come here for a techo-fix but I’ve got to drop one personal post in here from time to time 🙂

My wife who is currently a 3rd year university student studying a degree in Midwifery has the option to be able to do an elective period of voluntary placement work overseas during this, her last year of the course. She is looking to work in Gibraltar for two weeks to complete this elective work module because it gives her a taste of how they do things overseas without the complexities of a language barrier.

These elective placements are not paid work and they are essentially working for free in exchange for getting their hands on experience and learning.

Because there are already enough charities asking for your money each month, she’s decided to take a different tact to fundraising using a site called Easy Fundraising. The way this site works is that when you go about your travels of the Internet, buying your wares from eBay, Amazon or other retailers, Easy Fundraising collect a small percentage of the value of the sale from the online stores in referral fees.

Simply visit http://www.easyfundraising.org.uk/causes/nicolagreen/ or using the bit.ly short-link I have created http://bit.ly/nickygib and make your online purchases via the Easy Fundraising site and we collect the referral bonuses. Sadly, I must confess that you do need to register on the Easy Fundraising site before you can support a cause.

International Technology Frustration

We live in a world where our communications are sent around the world in sub-second times thanks to services like Twitter, Facebook and WhatsApp. Thanks to Facebook, LinkedIn and other people hubs we are closer connected to those around us without geographic discrimination and thanks to all of this high-speed communication and information transfer, we discover news and new information faster than ever before.

Taking all of this into consideration, why is it, that we are still in a world where one country takes the glut of the new technology releases without them officially seeing the streets of foreign lands only assisting to line the pockets of the lucky few who are able to import and export these technologies and sell them in the foreign lands via channels like eBay at exorbitant prices.

In the technology arena, Microsoft are one of the worst offenders for doing this. There’s been a number of releases over the years including but not limited to the Zune, Surface Pro, the Microsoft Band and the Wireless Display Adapter for screen Miracast that have been released and neither of them have been released outside of the borders of the US and Canada. Why is it that these highly sought after devices are only being sold in the US and not sold worldwide via Microsoft’s normal retail channels?

I remember when the Surface Pro first launched and I waited months to get one officially in the UK but it never came so I ended up importing one from the US with the help from a former co-worker. Back when Zune was a thing, I happened to be in the US on a long bought of work with my family in tow so I decided to buy one whilst I was there. I for one, would snap up a pair of Wireless Display Adapters and a Microsoft Band the day that they went on sale if they did ever appear here in the UK but I’m not holding out much hope which leaves me with the remaining option to buy them via eBay sellers.

The Microsoft Band is in high demand right now and whilst there a few of them on eBay UK for sale, the price is riding higher than retail and given that the device isn’t officially available here in UK, you don’t know how your warranty will be effected.

The Wireless Display Adapter isn’t quite so hot, largely because other competing products are available in the UK such as the Netgear PTV3000 and as a result of this, if I wanted one, I’d have to buy one from a seller on eBay US and pay whatever import and duty taxes the British government deemed appropriate and then pay whatever handling tax DHL or UPS levy on the shipment for the privilege of advancing my customs payment for me.

All this behaviour results in is a reduced consumer experience because there are devices out there that we want and the companies making them aren’t making them available to us so middle-men fill the void lining their own pockets with profit and driving the retail price up for consumers like you and me. I know that beaming a packet of data down an undersea fibre is obviously easier than arranging shipping and stocking of physical goods, but my point here is that with all of this technology to tell us what is happening around the world, to let us see what we could have, it’s akin to teasing a kid with a lollipop, waving it in front of their face and showing them it, videoing you licking it and playing it over and over again in their face. The kid will end us crying and wanting the lolly and you’d likely give in and let them have it after enough tantrum so why can’t companies see the same logic?

If the trend of devices only being released into the US and not being made available in Europe and the UK (and let us not forget our friends in Australia and New Zealand) continues then I think anything relating to the devices should be applied with IP filters to block people from outside of the availability regions from seeing, hearing or reading anything about it. At least that way, we wouldn’t have the lolly being waved under our noses to tempt us without the opportunity to ever have the lolly.

Tesco Hudl 2 Date and Time Repeatedly Incorrect

Since about a week or so ago, the kids Tesco Hudl 2 tablets that they got for Christmas have been consistently reporting the wrong date and time. The issue is easily spotted because anytime they launch an app or open the Google Play Store or perform any action that depends on an SSL certificate, they are shown a certificate warning due to the inconsistency between the server date and time and the client date and time. Sometimes the tablet can appear just a few hours out of sync but in the main, it seems that the devices reset their date to January 1st 2015.

Yesterday, I noticed for the first time that my Hudl 2 tablet started exhibiting the same behaviour which led me to look online to see if this is a widespread issue as I couldn’t believe that all four of our Hudl 2 tablets could show the same symptoms and problems within two weeks’ of each other, especially considering I bought my tablet about a month after we bought the kids theirs so they would likely be from different batches of manufacturing.

Searching online, I came across a thread on the Modaco forums at http://www.modaco.com/topic/373796-misreported-time-and-other-things/ where other users are reporting the same issue and that it only seems to manifest after circa one month of using the device: an interesting observation given that I first powered up the kids tablets the week before Christmas to configure them and I got mine the week after Christmas.

Several users have tried contacting Tesco Technical Support and are advised to hard reset the devices or to exchange them in a local store but the issue continues to return and it appears from one commenter that Tesco is now working on a firmware update to address the issue. To me, this says that the current firmware build clearly has an issue relating to the CPU clock and tracking the time in relation to the CPU clock.

I reached out to Tesco on Twitter today to try and find out if it’s possible to contact their support via email or Twitter as opposed to phone as I don’t want to have to call them to add four new serial numbers to the list of effected devices that they are tracking. If I get a response, I’ll update the post here but in the meantime, if you have a Hudl 2 from Tesco and are experiencing the same date and time reset issue, it’s not you, it appears to be a known problem they are working on but please do report it to Tesco.

The more people that report the issue, the faster Tesco are likely to work on the firmware update and get it released.


Project Home Lab: Planning for Recovery

In my last post, Server Surgery Aftermath, I talked about the issues I was having with my home server. Whilst continuing to try and identify the issues after the post, I ran across some more BSODs and I managed to collect useful crash dumps for a number of them. Reviewing the crash dumps with WinDbg from the Windows Debugging Tools, I was able to see that in every instance of the BSOD, the faulting module was network related with the blame shared equally between Ndis.sys and NdisImPlatform.sys which means that my previous suspicion of the LSI MegaRAID controller were out of the window.

Included in the trace was the name of another application which is running on the server. I’m not going to name the application in this instance but let’s just say that said application is able to burst ingress traffic as fast as my internet connection can handle it. I decided to intentionally try and make the server crash by starting up the application and generating traffic with it and sure enough within a couple of minutes the server experienced a BSOD and restarted. This started to now make sense because the Windows Service for this application is configured for Automatic Delayed start which is why in one instance after a BSOD, the server had another BSOD about 45 seconds later.

For the interim, I have disabled the services for this application and with the information in hand, I started looking more closely into the networking arrangements. I knew that as part of the server relocation, I had switched from my dual port PCIe Intel PRO 1000/PT adapter to the on-board Intel 82576 adapters and both of these adapter ports are configured in a single Windows Server native LBFO team using the Static Team mode which is connected to a Static LAG on my switch.

To keep this story reasonably short, it turns out that the Windows Update provided network driver for my Intel adapters is quite old but yet the driver set 19.5 that Intel advertise as being the latest available for my adapters doesn’t support Windows Server 2012 R2 but will only install on Windows Server 2012. Even booting the server into the Disable Driver Enforcement mode didn’t allow the drivers to install. I quickly found that many other people have had similar issues with Intel drivers due to them blocking drivers on selected operating systems for no good reason.

I found a post at http://foxdeploy.com/2013/09/12/hacking-an-intel-network-card-to-work-on-server-2012-r2/ which really helped me understand the Intel driver and how to hack it to remove the Windows Server 2012 R2 restrictions to allow it to be installed. The changes I had to make differed slightly due to me having a different adapter model but the process remained the same.

Because my home server is considered production in my house, I can’t just go right ahead and test things on it like hacked drivers so luckily, my single hardware architecture vision came out on top because I’ve installed the hacked and updated Intel driver on the Lab Storage Server and the Hyper-V server with no ill effects. I’ve even tested putting load between the two of them over the network and there has been no issues either so this weekend I will be taking the home servers’ life in my hands and replacing the drivers and hopefully that will be the fix.

If you want to read my full story behind the Intel issue troubleshooting, there is a thread I started on the Intel Communities (with no replies I may add) but all the background detail is there at https://communities.intel.com/thread/58921?sr=stream..

Project Home Lab: Server Surgery Aftermath

So it seems that in my last post about relocating the Home Server into the new chassis was spoken a little too soon. Over New Year, a few days after the post, I started to have some problems with the machine.

It first happened when I removed the 3TB drive from the chassis to replace it with the new 5TB drive which caused a Storage Spaces rebuild and all of the drives started to chatter away copying blocks around and about half-way through the rebuild, the server stopped responding to pings. I jumped on to the IPMI remote console expecting to see that I was using so much I/O on the rebuild that it had decided to stop responding on the network but in actual fact, the screen was blank and there was nothing there. I tried to start a graceful shutdown using the IMPI but that failed to I had to reset the server.

When Windows came back up, it greeted me with the unexpected shutdown error. I checked Storage Spaces and the rebuild had resumed with no lost data or drives and eventually (there’s a lot of data there) it completed and I thought nothing more of it all until New Years day when the same thing happened again. This time, after restarting the server and realising this was no one off event, I changed the Startup and Recovery settings in Windows to generate a Small Memory Dump (256KB) otherwise known as a Minidump and I also disabled the automatic restart option as I wanted to try and get a chance to see the Blue Screen of Death (BSOD) if there was one.

Nothing happened on this front until yesterday. The server hung again and I restarted it but within two minutes of hanging, it did the same thing again. I decided to leave the server off for about five minutes to give it a little rest and then power it back up and since then I’ve had no issues but I have gathered a lot of data and information in the time wisely.

I used WinDbg from the Windows Debugging Tools in the Windows SDK to read the Minidump file and the resultant fault code was WHEA Uncorrectable Error with a code of 0x124. To my sadness, this appears to be one of the most vague error messages in the whole of Windows. This code means that a hardware fault occurred which Windows could not recover from but because the CPU is the last device to be seen before the crash, it looks as if the fault is coming from the CPU. The stack trace includes four arguments for the fault code and the first argument is meant to contain the ID of the device which was seen by the CPU to have faulted but you guessed it, it doesn’t.

So knowing that I’ve got something wierd going on with my hardware, I considered the possibilities. The machine is using a new motherboard so I don’t suspect that initially. It’s using a used processor and memory from eBay which are suspects one and two and it’s using the LSI MegaRAID controller from my existing build. The controller is a suspect due to the fact that on each occasion the crash has occurred, there has been a relative amount of disk I/O taking place (Storage Spaces rebuild the first time and multiple Plex Media Server streams taking place on the other occasions).

The Basic Tests

First and foremost, I checked against Windows Update and all of my patches are in order which I already knew but wanted to verify. Next, I checked my drivers as a faulting driver could cause something bad to get to the hardware and generate the fault. All of the components in the system are using WHQL signed drivers from Microsoft which have come down through Windows Update except for the RAID Controller. I checked the LSI website and there was a newer version of the LSI MegaRAID driver for my 9280-16i4e card available as well as a new version of the MegaRAID Storage Manager application so I applied both of these requiring a restart.

I checked the Intel website for drivers for both the Intel 82576 network adapters in the server and the Intel 5500 chipset and even though the version number of the Intel drivers is higher than those from Windows Update, the release date on the Windows Update drivers is later so upon trying to install them, Windows insists that the drivers installed are the best available so I’ll leave these be and won’t try to force drivers into the system.

Next up, I released that the on-board Supermicro SMC2008 SAS controller (an OEM embedded version of the LSI SAS2008 IR chipset) was enabled. I’m not using this controller and don’t have any SAS channels connected to it so I’ve disabled the device in Windows to stop it from loading for now but eventually I will open the chassis and change the pin jumper to physically disable the controller.

Earlier, I mentioned that I consider the LSI controller to be a suspect. The reason for this is not reliability of any kind as the controller is amazing and frankly beyond what I need for simple RAID0 and RAID1 virtual drives but because it is a very powerful card, it requires a lot of cooling. LSI recommend a minimum of 200 Cubic Feet per Minute (CFM) of cooling on this card and with the new chassis I have, the fans are variably controlled by the CPU temperature. Because I have the L5630 low power CPU with four cores, the CPU is not busy in the slightest on this server and as a result, the fan speed stays low.

According to the IPMI sensors, the fan speed is at 900 RPM constant with the currently system and CPU temperatures. The RAID controller is intentionally installed in the furthest possible PCI Express 8x slot from the CPU to ensure that heat is not bled from one device into the other but a byproduct of this is that the heat on the controller is likely not causing a fan speed increase. Using the BIOS, I have changed the fan configuration from the default setting of most efficient which has a minimum speed of 900 RPM to the Better Cooling option which increases the lower limit to 1350 RPM.

Lastly, I raised a support incident with LSI to confirm if there is a way to monitor the processor temperature on the controller however they have informed me that only the more modern dual core architecture controllers have the ability to see the processor temperature either via the WebBIOS or via the MSM application. If I have more problems going forwards, I have a USB temperature probe which I could temporarily install in the chassis but this isn’t going to be wholely accurate however in the meantime, the support engineer at LSI has taken an LSIGET dump of all of the controller and system data and is going to report back to me if there are any problems he can see.

The Burn Tests

Because I don’t want reliability problems on-going, I want to drive the server to crash under my own schedule and see the problems happening in live so that I can try and resolve them, I decided to perform some burn tests.

Memory Testing

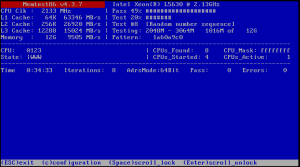
Memory corruption and issues with memory is a common cause of BSODs in any system. I am using ECC buffered DIMMs can can correct memory bit errors automatically but that doesn’t mean we want them still so I decided to do a run on Memtest86.

Memtest86 Memory Speed Screenshot

I left this running for longer than the screenshot shows, but as you can see, there are no reported errors in Memtest86 so the memory looks clear of blame. What I really like about these results is that it shows you have incredibly fast the L1 and L2 caches are on the processor and I’m even quite impressed with how fast the DDR3-10600R memory in the DIMMs themselves are.

CPU Testing

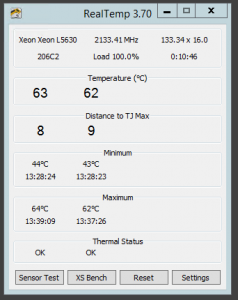
For this test, I used a combination of Prim95 and Real Temp to both make the CPU hurt and also to allow me to monitor the temperatures vs. the Max TDP of the processor. I left the test running for over an hour, 100% usage on all four physical cores and here’s the results.

RealTemp CPU Temperature


As you can see, the highest the temperature got was 63 degrees Celsius which is 9 degrees short of the Max TDP of the processor. When I log in to the server normally when there are multiple Plex Media Server transcoding sessions occurring the CPU isn’t as utilized as heavily as this test so the fact that it can run at full load and the cooling is sufficient to keep it below Max TDP makes me happy. As a result of the CPU workload, the fan speed was automatically raised by the chassis. Here’s a screenshot of the IPMI Sensor output for both the system temperatures and the fan speed, remembering that the normal speed is 1350 RPM after my change.

IPMI Fan Speed Sensors

IPMI Temperature Sensors


To my suprise, the system temperature is actually lower under the load than it is at idle. The increased airflow from the fans at the higher RPM is pushing so much air that it’s able to cool the system to two degrees below the normal idle temperature, neither of which are high by any stretch of the imagination.

Storage I/O Testing

With all of the tests thus far causing me no concern, I was worried about this one. I used ioMeter to test the storage and because ioMeter will fill a volume with a working file to undertake the tests, I created a temporary Storage Space in the drive pool of 10GB and I configured the drive with Simple resiliency level and 9 columns so that it will use all the disks in the pool to generate as much heat in the drives and on the controller as possible.

I ran three tests, 4K block 50% Read, 64K block 50% Read and lastly 256KB block 50% Read. I ran the test for minutes and visiting the garage to look at the server in the rack while this was happening, I was greeted to an interesting light show on the drive access indicator lights. After ten minutes of the sustained I/O, nothing bad happened so I decided to stop the test. Whilst I want to fix any issues, I don’t want to burn out any drives in the process.

Conclusion

At the moment, I’m really none the wiser as to the actual cause of the problem but I am still in part convinced that it is related to the RAID controller overheating. The increased baseline fan speed should hopefully help with this by increasing the CFM of airflow in the chassis to cool the controller. I’m going to be leaving the server be now until I hear from LSI with the results from their data collection. If LSI come up with something useful then great. If LSI aren’t able to come up with anything then I will probably run another set of ioMeter tests but let it run for a longer period to really try and saturate some heat into the controller.

With any luck, I won’t see the problems again and if I do, at least I’m prepared to capture the dump files and understand what’s happening.

Project Home Lab: Open Server Surgery

So with my recent bought of activity on the home lab project front, evident from my previous posts Project Home Lab: Server Build and Project Home Lab: Servers Built, I’ve forged ahead and got some of the really challenging an blocking bits of the project done over Christmas. I eluded to what I needed to do next in the post Project Home Lab: Servers Built. All of this work paves the way for me to get the project completed in good order, hopefully all during January, at long last.

In this post I’m just going to gloss over some of the details about the home server move that I completed over the weekend. Lots more hours of thinking, note taking and planning were involved in this and most likely more than should have gone into it but I don’t like failure so I like to make sure I have all the bases covered and all the boxes ticked. Most critically, I had to arrange an outage window and downtime with the wife for this to happen.

Out with the Old

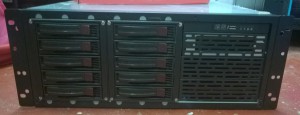
The now previous incarnation of my Windows Server 2012 R2 Essentials home server lived in a 4U rack mount chassis. As it was the only server I possessed at the time, I never bothered with rack mount rails so problem one was in the fact that the server was just resting atop of my UPS in the bottom of the rack.

Problem two and luckily, something which has never bitten me previously but has long bothered me is that the server ran on desktop parts inside a server chassis. As a result, it had no IPMI interface for out of band management so that if something should go wrong with the Windows install or some warning in the BIOS, I can remotely access the keyboard, video and mouse (a KVM no less). It had an Intel Core i5 3740T processor with an ASUS ATX motherboard and unregistered unbuffered memory with a desktop power supply albeit it a high quality Corsair one. All good quality hardware but not optimal for a server build.

The biggest problem however was with the fact that the 4U chassis, a previous purchase from X-Case a couple of years ago sat at 4U tall but only had capacity for ten external disks. I had two 2.5″ SSDs for the operating system mounted internally in one of the 5.25″ bays in a dual 2.5″ drive adapter in addition to the external drives. It all worked nicely but it wasn’t ideal as my storage needs are growing and I only had two free slots. Although not a problem, the hot swap drive bays were added to the chassis with an aftermarket upgrade from X-Case didn’t use SAS Multilane SFF-8087 cables but instead used SATA connections which meant from my LSI 9280-16i4e RAID Controller, I had to use SAS to SATA Reverse Fanout cables which made the whole affair a bit untidy.

None of this is X-Case’s fault let us remember. The case did it’s job very well but my evolving and increasingly demanding needs no longer met the capabilities of the case.

Planning for the New

Because I like their to be order in the force, per my shopping list at Project Home Lab: Shopping List, I bought a new 3U X-Case chassis for my home server at the same time as buying up the lab components and getting the home server set straight is priority one because the 4U chassis is a blocker to me getting any further work done as the 3U and 2U lab servers need to fit in above it. In addition to moving chassis, I’ve given it an overhaul with a new motherboard and CPU to match the hardware in the lab environment. A smaller catalogue of parts means less knowledge required to maintain the environments and means I have an easy way of upgrading or retro-fitting in the future with the single design ethos.

As anyone knows, changing the motherboard, processor and all of the underlying system components in a Windows server is a nightmare potentially in the making so I had to plan well for this.

I had meticulously noted all of the drive configurations from the RAID Controller down to the last detail, I had noted which drives connected to which SATA port on which controller port and I had a full backup of the system state to perform a bare metal recovery if I needed. All of our user data is backed up to Azure so that I can restore it if needed although I didn’t expect any problems with the data drives in honesty, it was the operating system drives I was most concerned about.

In with the New

After getting approval for the service outage from the wife and shutting down the old home server, I got it all disconnected and removed from the rack. I began the painful process of unscrewing all of my eight drives from the old chassis drive caddy’s and the two internal drives and reinstalling them into the new caddy’s using the 2.5″ to 3.5″ adapters from the shopping list. I think I probably spent about 45 minutes carefully screwing and unscrewing drives and at the same time, noting which slot I removed them from and which slot I installed them into.

With all the drives moved over, I moved over the RAID Controller and connected up the SAS Multilane SFF-8087 cables to the connector with the tail end already connected to the storage backplanes in the chassis.

Once finished, I connected up the power and the IPMI network port on the home server which I had already configured with a static IP as the home server is my DHCP Server so it wouldn’t be able to get an automatic lease address. I got connected to the IPMI interface okay and powered the server on using it and quickly flipped over to the Remote Control mode which I have to say, works really nicely even when you consider that it’s Java based.

Up with the New

While I was building the chassis for the home server, I had already done some of the pre-work to minimize the downtime. The BIOS was already upgraded to the latest version along with the on-board SAS2008 controller and the IPMI firmware. I had also already configured all of the BIOS options for AHCI and a few other bits (I’ll give out all of the technicalities of this in another post later).

First things first, the Drive Roaming feature on the LSI controller which I blogged about previously, Moving Drives on an LSI MegaRAID Controller worked perfectly. All 9 of the virtual drives on the controller were detected correctly, the RAID1 Mirror for the OS drives stayed in-tact and I knew that the first major hurdle was a behind me. A problem here would have been the most significant to timely progress.

The boot drive was hit okay from the LSI RAID Controller BIOS and the Windows Server 2012 R2 logo appeared at least showing me that it was starting to do something. It hung here for a couple of minutes and then the words “Getting Devices Ready” appeared. The server hung here for at least another 10 minutes at which point I was starting to get worried. Just when I was thinking about powering it off and moving all the drives back and reverting my changes, a percentage appeared after the words “Getting Devices Ready”, starting at 35% and it quickly soared up to 100% and the server rebooted.

After this reboot, the server booted normally into Windows. It took me about another hour after this to clean-up the server. First I had to reconfigure my network adapter team to include the two on-board Gigabit Ethernet adapters on the Supermicro motherboard as I am no longer using the Intel PCIe adapter from the old chassis. Then, using the set devmgr_show_nonpresent_devices=1 trick, I removed all of the references to and uninstalled the drivers for the old server hardware.

After another reboot or two to make sure everything was working properly and a thorough check of the event logs for any Active Directory, DNS or DHCP errors and a test from my 3G smartphone to make sure that my published website was running okay on the new server, I called it a success. One thing I noted of interested here was that Windows appeared to not require re-activation as I had suspected it would. A motherboard and CPU family change would be considered a major hardware update which normally requires re-activation of the license key but even checking now, it reports activated.

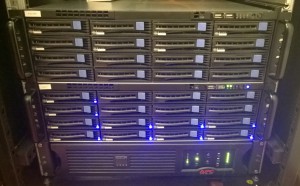
Here’s some Mr. Blurrycam shots of the old 4U chassis after I removed it and the new 3U chassis in the rack.
WP_20141230_009

WP_20141230_006

As you can see from the second picture, the bottom 3U chassis is powered up and this is the home server. In disk slots 1 and 5 I have the two Intel 520 Series SSDs which make up the operating system RAID1 Mirror and in the remaining eight populated slots are all 3TB Western Digital Red drives.

Above the home server is the other 3U chassis which will be the Lab Storage Server once all is said and done and at the very bottom I have the APC 1500VA UPS which is quite happy at 20% load running the home server along with my switches, firewall and access points via PoE. I’ll post some proper pictures of the rack once everything is finished.

Behind the scenes, I had to do some cabling in the back of the rack to add a new cable for the home server IPMI interface which I didn’t have before and the existing cables for the home server NIC Team were a bit too tight for my liking caused by the 3U Lab Storage Server above being quite deep and pulling on them slightly. To fix this, I’ve patched up two new cables of longer length and routed them properly in the rack. I’ve got a lot of cables to make soon for the lab (14 no less) and I will be doing some better cable management at the same time as that job. One of the nice touches on the new X-Case RM316 Pro chassis is the front indicators for the network ports, both of which light up and work with the Supermicro on-board Intel Gigabit Ethernet ports. The fanatic in me wishes they were blue LEDs for the network lights to match the power and drive lights but that’s not really important now is it.

More Home Server Changes

The home server has now been running for two days without so much as a hiccup or a cough. I’m keeping an eye on the event logs in Windows and the IPMI alarms and sensor readings in the bedding in period and it all looks really happy.

To say thank you to the home server for playing so nicely during it’s open server surgery, I’ve got three new Western Digital 5TB drives to feed it some extra storage. Two of the existing 3TB drives will be coming out to make up the bulk storage portion of the Lab Storage Server Storage Space and one drive will be an expansion giving me a gross uplift of 9TB capacity in the pool. I would be exchanging the 3TB drives in the home server with larger capacity drives one day in the future anyway so I figured I may as well do two of them early and make good use of the old drives for the lab.

I’m also exploring the options of following the TechNet documentation for transitioning from Windows Server 2012 R2 Essentials to Windows Server 2012 R2 Standard. You still get all of the Essentials features but on a mainline SKU which means less potential issues with software (like System Center Endpoint Protection for example which won’t install on Essentials). On this point I’m waiting for some confirmation of the transition behaviour in a TechNet Forum question I raised at https://social.technet.microsoft.com/Forums/en-US/d888f37a-e9e9-4553-b24c-ebf0b845aaf1/office-365-features-after-windows-server-standard-transition?forum=winserveressentials&prof=required as the TechNet article at http://technet.microsoft.com/en-us/library/jj247582 leaves a little to be desired in terms of information.

I’m debating buying up some Lindy USB Port Blockers (http://www.lindy.co.uk/accessories-c9/security-c388/usb-rj-45-port-blockers-locks-c390/usb-port-blocker-pack-of-4-colour-code-blue-p2324) for the front access USB ports on all the servers so that it won’t be possible for anyone to insert anything in the ports without the unlocking tool to open up the port first. See if you can guess which colour I might buy?

Up Next

Next on my to do list is the re-addressing of the network, breaking out my hacksaw and cabling.

The re-addressing of the network is make room for the new VLANs and associated addressing which I will be adding for the lab and my new addressing schema makes it much easier for me longer term to manage. This is going to be a difficult job much like the job I’ve just finished. I’ve got a bit of planning to finish for this before I can do it so this probably won’t happen now until after new year.

The hacksaw, as drastic as that sounds is for the 2U Hyper-V server which you may notice is not racked in the picture above. For some reason, the sliding rails for the 2U chassis are too long for my rack and with the server installed on the rails and pushed back, it sits about an inch and half proud of the posts which no only means I can’t screw it down in place but I can’t close the rack door. I’m going to be hacking about two inches off the end of the rails so that I can get the server to sit flush in the rack. It’s only a small job but I need to measure twice and cut once as my Dad taught me.

As I mentioned before, I’ve got some 14 cables I need to make and test for the lab and this is something I can be working on in parallel to the other activities so I’m going to be trying to make a start on these soon so that once I have the 2U rails cut to size correctly, I can cable up at the same time.
Project Home Lab: Servers Built

So in the last post (which I wrote in April but only posted a few minutes ago), I talked about some of the elements of the build I had done thus far. Well weekend just gone, I finished the builds bar a few small items and I’m glad to see the back of it to be honest. Here’s the pictures to show the pretty stuff first then I’ll talk effort and problems.

Server Build in Pictures

WP_20141222_001

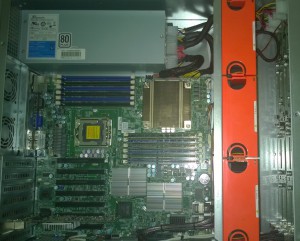
The image above is a top down view of the 3U Storage Server and you can see it in all it’s finished glory. It looks quite barren inside the case and that’s totally the look I was aiming for, maximizing the available resources to give me oodles of options to expand it in the future should I need. The braided cables which after much, much effort, I’m not quite 100% happy with but 95% there really clean it all up.

WP_20141222_002

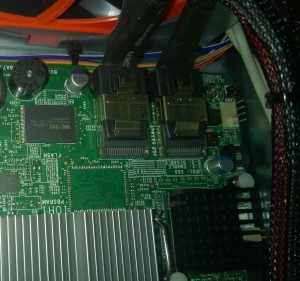
This is a close-up of the from edge of the motherboard where the on-board LSI SAS2008 ports live which I spoke about being problematic in my previous post. After the first chassis was built, I knew what was needed and it all went in fairly painlessly but luckily these SAS SFF-8088 multilane cables are quite flexible. The black braid on the LSI cables matches the braiding I used on the ATX cabling which makes the consistency monster in me happy.

In the top of the image, you can see a bundle of cables zip tied together running from left to right and these are the chassis connectors for power button and LED, NIC activity lights and so forth. These run off to the left of the shot and are connected to the pin headers on the motherboard. This is one part of the build I’m really happy with because the cables fitted nicely in the gap between the chassis and the motherboard so they are well kept.

WP_20141222_005

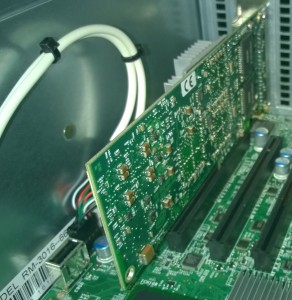
Nothing super exciting here, but this is the Intel PRO/1000PT Low Profile Quad Port network adapter that features in both the 2U Hyper-V Server and the 3U Storage Server with the difference being that the 2U server uses a half-height back plate and the 3U server uses a full-height back plate. No butchery required as I managed to get used versions of both with the correct plate from eBay.

You can also see here the white cables going from left to right. This is the front-access USB port connectors which plug into a pin header just behind the network adapter. I’ve installed the network adapter in the left-most-but-one PCIe slot. This keeps it as far away from the CPU as possible to avoid heat exchange between the two whilst giving a bit of room for the adapter to breathe as it’s passive heat sink is on the left side.

WP_20141222_004

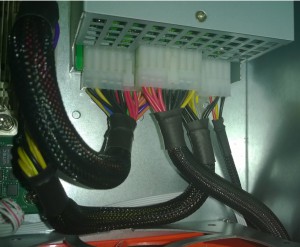
This last shot shows where all the effort has gone in the build for me personally and what has taken me so long to get it to completion. The original ATX looms with the case where over 70cm long and finding somewhere to hide that much cable excess in a tight chassis wasn’t going to be easy or efficient. There are three looms all told: One for the 24-pin ATX connector, one for the Dual 8-pin EPS connectors and the chassis fans and the third and final for the drive enclosures.

The reason I am only 95% happy with these is that I would have in hindsight, considered putting half the drives on the EPS channel and the other half on the same channel as the chassis fans but in reality. What I have got though does mean that the drives get an entire 12v rail to themselves which is good in one respect. Wiring the 24-pin ATX connector was by far the hardest and trying to crimp 24 pins onto cables and then squeeze in inside the paracord before heat shrinking the ends was a challenge for sure. In hindsight here, I should have found a local electrical company capable of such wiring work and paid them to do it. Even if it cost £20 or £30 per chassis to do, it would have been worth it for time and effort on my part.

Outstanding Items

So the only items outstanding are some disks. I didn’t talk about disks in the shopping list as I was kind of undecided about that part but the answers are written now and I just need to finalize some bits.

I was considering the option of using the on-board USB 3.0 port to install Windows Server 2012 R2 on the servers to give me maximum disk slot for data but I didn’t like the fact I only had a single USB 3.0 port on-board so there was no option to RAID the USB. A dual port SD Card controller would have been excellent here but they are only really seen on super high-end motherboards shipping today. Secondly, whilst USB boot for Hyper-V Server is supported, it appears that it’s not supported for Windows Server and as I wanted to keep the design and configuration as production capable as possible that meant this was out of the window too.

The final decision has led me to using a pair of Intel 520 Series 240GB SSD drives in a RAID1 Mirror for the OS in both the Storage Server and the Hyper-V Server with all the drives connected to the on-board LSI SAS2008 controller running in IR mode (Integrated RAID) but more on this in the configuration post.

For the Hyper-V Server, these two disks are the only disks installed as no VM data will reside on the server itself. For the Storage Server, I have another four Intel 520 Series 240GB SSD drives and two 3TB Western Digital Red drives which will make up the six disk Tiered Storage Space. I have two of the SSDs installed now and the other two our going back to Intel tomorrow.

The two SSDs going back to Intel appear to be fried and will not even get detected by the system BIOS or the LSI SAS BIOS. The two Western Digital 3TB Red drives are currently in my Home Server. I have two 5TB Red drives waiting to be installed in my home server and in exchange for the 3TB drives moving out of the Home Server into the Storage Server.

The log jam right now is the Home Server. The Home Server currently lives in an older generation X-Case 4U chassis and as part of Project Home Lab it is moving house into one of the 3U chassis to match the Storage Server. I’ve got a lot of data on the Home Server so taking backups of everything and finding the right moment to offline it all and move it is tough with a demanding wife and kids trying to access the content on it.

Up Next

In the next post, I will talk about some of the things I’ve found and done in the initial configuration of the hardware such as the BIOS and the IPMI.