Posts from 2015

Set a Registry Value Using PowerShell Containing a Forward Slash

I don’t normally blog about PowerShell as it’s just a day-to-day thing that we all do and use (you do all use PowerShell right) but I came across a problem today that I thought I would share as I had to run the net to find the solution for myself.

A co-worker came to me today asking for help with some PowerShell code for a script he is writing. The script is to apply some registry settings to machines for a piece of security hardening work which includes disabling some of the less secure SSL and TLS cipher suites. All is going well until he gets to the line of the script that tries to disable the DES 56/56 cipher suite and PowerShell throws it back at him. The reason for it is because PowerShell is treating that forward slash character as a separator for a multi-value string.

Here is the line of code that you would run normally to create the registry key for DES 56/56:

New-Item -Path “HKLM:\SYSTEM\CurrentControlSet\Control\SecurityProviders\SCHANNEL\Ciphers\DES 56/56"

When this runs, PowerShell creates a registry key for DES 56 but then it creates a sub-key for the second 56 as it’s seen as a separator which obviously isn’t what we want. I tried all sorts to get around it such as changing the double quotes for single quotes and first placing the path into a variable and calling in the variable but it just would not have it.

I managed to eventually find a way around this but it means that we can’t use the PowerShell Cmdlet New-Item but instead, we have to use the .NET way of things. Here’s the code sample to make it work:

$Writable = $True
$Key = (Get-Item HKLM:\).OpenSubKey(“SYSTEM”, $Writable).CreateSubKey(“CurrentControlSet\Control\SecurityProviders\SCHANNEL\Ciphers\DES 56/56”)
$Key.SetValue(“Enabled”, “0”, [Microsoft.Win32.RegistryValueKind]::DWORD)


MDOP and EMET for Windows 10

It’s been a while since I’ve posted anything here now which is in part down to me being busy at home and in part due to work being full-on at the moment trying to juggle a handful of internal systems projects as well as dropping in customer engagements but you won’t hear me complaining as it’s all great work.

In the time between I last wrote anything and now, Windows 10 is full swing and we are already looking at the Threshold 2 (or November 2015 Update) for Windows 10 shipping which will see the Skype Messaging experience rolled out to the public as well as the Cortana text messaging and missed call notifications on the desktop, both of which have been available to people running the Windows 10 Insider Preview builds for a few weeks’ now.

With people looking more closely at Windows 10, there’s good news for people who rely on the slew of Microsoft tools in the enterprise as many of them are either now already updated to support Windows 10 or are working their way to support. MDOP 2015 was released back in August 2015 and this included updated service packs for Application Virtualization (App-V) 5.0 SP3, User Experience Virtualization (UE-V) 2.1 SP1 and Microsoft BitLocker Administration and Management (MBAM) 2.5 SP1 to add support for Windows 10. App-V and MBAM are simply service packs to add support whilst UE-V not only gains support for Windows 10 but also gets native support for Office 2013 via the ADMX files which means you no longer need to manually import the Office 2013 .xml templates into your Template Store.

Sadly, UE-V 2.1 SP1 shipped before the release of Office 2016 which means there is no native support for this which seems to be a common theme for UE-V; the product ships ready for a new Windows version but misses the matching Office version so. If you want to use UE-V for Office 2016, you can head over to the TechNet Gallery and download the official Microsoft .xml templates for it from https://gallery.technet.microsoft.com/Authored-Office-2016-32-0dc05cd8.

Aside from MDOP, Microsoft EMET is being updated to version 5.5 which includes support for Windows 10 along with claiming to include much improved Group Policy based management of the clients. I haven’t tried this for myself yet as the product is still in beta but I will be giving it a try soon and I will be sure to post anything I find that can help improve the management position of it.

As a throw-in note, If you are using System Center Endpoint Protection for anti-virus then you might want to have a read of this post by System Center Dudes at http://www.systemcenterdudes.com/sccm-2012-windows-10-endpoint-protection/, which explains the behaviour of Endpoint Protection in Windows 10.

Enterprise Windows 10 Migration Article

Recently, via my work at Fordway, I was asked to write an article for the website ITProPortal on Windows 10 migration from an enterprise perspective.

The article got published on October 30th and judging by the social share buttons on the site, it has received quite a warm reception. You can read the article, entitled Migrating to Windows 10: It’s all about the preparation at http://www.itproportal.com/2015/10/30/migrating-to-windows-10-all-about-preparation/.

Unattended Installation of Office 2016

With the release of Office 2016, Visio 2016 and Project 2016, many will want to start thinking about their upgrade. Office 2016 at present is only available in the Click-to-Run format but if the Office 365 Community is to be believed there will be an .msi based installation coming for volume license customers on October 1st.

As it happens, in Office 2016, the Click-to-Run experience is actually quite nice compared to previous instances of it and while I’ve been running the preview builds of Office 2016, I certainly haven’t seen any issues with performance so I see no reason not to use Click-to-Run now given that if you ever decide to remove Office from the machine, it will leave you with a cleaner slate.

This post is going to cover how to build an offline source and perform an unattended installation of Office 2016. This will work for Configuration Manager customers as well as customers using a manual installation process. In order to be able to perform an offline installation of Office 2016, you are going to need two things. The Office 2016 Deployment Tool and you are going to need an offline source for Office 2016. If you don’t have this already, you can generate it using the tool but I was able to get the offline source from the MSDN .iso download.

Download the Deployment Tool

First things first, go to http://www.microsoft.com/en-us/download/details.aspx?id=49117 and get the Office 2016 Deployment Tool. The installer for this doesn’t actually install an application but merely unpacks a setup.exe file and a sample configuration.xml file. I unpacked the setup.exe file to a folder on the root of my drive for easy access.

Within this folder, create sub-folders for each of the Office products you want to configure. In my case, I am doing all three: Office, Project and Visio and once you have created these folders, copy the setup.exe file to each sub-folder.

Create the Configuration Files

Once you’ve got the sample configuration.xml file, you can use this, along with the reference at https://technet.microsoft.com/en-us/library/jj219426.aspx for generating your custom configuration file. I have created three files: one for Office, one for Project and another for Visio, all of which I have included below to save you some time.

You will notice that in the Product section of these files, I have a value called PIDKEY. This PIDKEY value is where you provide your product key if you are using one. If you are using per-user licensing then you need to remove the entire PIDKEY value.

I have also opted to exclude Access, InfoPath and Publisher from my installation as I don’t have an need for these applications. A full list of applications you can exclude is available at the TechNet reference page. Another option which you may find useful is the Display Level. This can be set between Full and None. I have opted for None to make this a silent installation but you could opt for Full. Full will present the user with the UI for the installation but they will not be prompted to answer any questions. This allows the user to track the progress of the installation if you are trying to perform a passive install rather than a silent one.

Save each of the products configuration files in their relevant directory. It is worth noting that you are not obliged to name the configuration file configuration.xml and you can save this as whatever you want to call it. This allows you to maintain multiple configurations for different sets of users who require access to different Office applications.

Office 2016 Pro Plus Configuration File

<Configuration>

  <Add OfficeClientEdition="32">
    <Product ID="O365ProPlusRetail" PIDKEY="XXXXX-XXXXX-XXXXX-XXXXX-XXXXX">
      <Language ID="en-US" />
      <ExcludeApp ID="Access" />
      <ExcludeApp ID="InfoPath" />
      <ExcludeApp ID="Publisher" />
      <ExcludeApp ID="SharePointDesigner" />
    </Product>
  </Add>

  <Updates Enabled="True" />

  <Display Level="None" AcceptEULA="True" />

  <Property Name="AutoActivate" Value="1" />
  <Property Name="ForceAppShutdown" Value="True" />

</Configuration>

 Project 2016 Professional Configuration File

<Configuration>

  <Add OfficeClientEdition="32">
    <Product ID="ProjectProRetail" PIDKEY="XXXXX-XXXXX-XXXXX-XXXXX-XXXXX">
      <Language ID="en-US" />
    </Product>
  </Add>

  <Updates Enabled="True" />

  <Display Level="None" AcceptEULA="True" />

  <Property Name="AutoActivate" Value="1" />
  <Property Name="ForceAppShutdown" Value="True" />

</Configuration>

 Visio 2016 Professional Configuration File

<Configuration>

  <Add OfficeClientEdition="32">
    <Product ID="VisioProRetail" PIDKEY="XXXXX-XXXXX-XXXXX-XXXXX-XXXXX">
      <Language ID="en-US" />
    </Product>
  </Add>

  <Updates Enabled="True" />

  <Display Level="None" AcceptEULA="True" />

  <Property Name="AutoActivate" Value="1" />
  <Property Name="ForceAppShutdown" Value="True" />

</Configuration>

 Create an Offline Source

With your configuration files created and saved in your product specific sub-folders, we can proceed with creating the office source.

If you have the .iso media from MSDN or elsewhere, to do this, mount the .iso file and locate the office folder on it. Copy this office folder into the sub-folder for your specific product and then repeat this with the media for the remaining products. You should end up with three folders, one for Office, Visio and Project and inside each of these folders, you will have a folder named office, the .xml configuration file and the setup.exe file.

If you don’t have the media, we now need to download the content for offline use. Open an elevated command prompt and change the working directory to the directory where your setup.exe is located. From here, type the command setup.exe /download configuration.xml. This will start the download for the Click-to-Run components for offline use. Once it has completed, you need to repeat the process for any remaining Office products you are using.

Perform an Unattended Installation

With the configuration files and offline source ready, you can now perform an unattended installation. To do this, you simply use the command setup.exe /configure configuration.xml from the working directory containing the files. You don’t need to specify the path to the configuration file as you have put it in the same directory as the setup.exe file and you don’t need to specify the path to the offline source because it will automatically look for this in the office folder from where you launched the setup.exe file.

If you are deploying Office using Configuration Manager then you would simply copy the folders for each of your products to package source path and create applications for them within Configuration Manager. Clients will download the package source to the local cache as it does for any normal application prior to performing the installation.

Update on Product IDs

After publishing this post, I noticed that my test machine wasn’t accepting the licence key I included in the .xml file. This turned out to be because the media I used from MSDN contained not O365ProPlusRetail Product ID but instead ProPlusRetail. My recommendation here would be to perform a test installation on a test machine first to check the Product ID which gets installed from your media (if you are using any) so that you can make sure you are targeting the correct Product ID.

After updating my .xml file to use the correct Product ID, the installation started automatically entering the product key and automatically activating the products.

Xbox One Streaming with Windows 10

This week, I decided to give Xbox One Streaming for Windows 10 a try and thought I would just briefly post up my experiences.

First off, I cannot speak highly enough of how well it works. Due to not getting around to installing extra Ethernet ports in my living room, I have only one port which gets used by the Plex Home Theatre PC so the Xbox One right now is wireless on my 802.11n network. I tested the streaming in a number of different scenarios including laptop and Xbox One both wireless connected to the same access point, laptop and Xbox One both wireless but with the laptop in a different part of the house on a different access point and also the Xbox One wireless with the laptop connected to a switch port.

In all scenarios, it worked flawlessly and using the little menu button in the toolbar on the app, you can bring up a bandwidth meter which appears in the bottom left corner of the stream. Over wireless I’ve seen it streaming up to about 6Mbps although I haven’t been watching this extensively so it could be going even higher. Right now I’m playing Assassin’s Creed IV Black Flag which was free on Games on Gold this month in July and even a fast paced high motion game like Assassin’s Creed, I’m not seeing any negative effects compared to being locally on the console in terms of input controls.

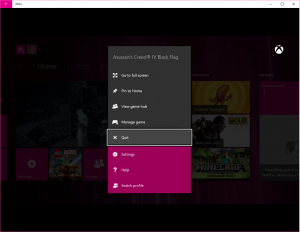
Streaming Assassins Creed Black IV Flag

Currently, the only way to use the Xbox One controller is via a Micro USB cable. Microsoft do have an adapter in the works but there is no news on when this is going to ship right now. When the adapter does ship it means you will be able to connect your controller wirelessly to your Windows 10 PC however I personally don’t like the physical look of this adapter based on the images released thus far as it looks pretty darn big and I would have much preferred to see something a bit more sleek and minimalist like the nano receivers we see for mice and keyboards.

The problem with the current scenario and the future one though is that it all hinges on having a USB port available. One of the great potentials with the Xbox One streaming in Windows 10 was the ability to use a low-end specification, cheap and cheerful Windows 10 tablet like a HP Stream (for example) and play your Xbox anywhere in the house however the requirement for a USB port means that actually a lot of tablets are out of favour because they are too thin to incorporate a USB port into their design. I’m really hoping that Microsoft come up with a solution to this – perhaps a Bluetooth to Xbox One controller bridge as most of these small tablets have Bluetooth so it’s an ideal protocol to use and has no physical port requirements on the tablet then.

I have found one flaw with the experience I should point out. It’s only a minor thing and truth be told, I’m not even sure this is a console related issue which is why I didn’t mention it above but a game specific issue. If I am playing the game on the console locally and then I later come back to it with my USB connected controller and streaming, the controller operates the console no problems, the start screen and menus however the game, Assassin’s Creed IV Black Flag doesn’t acknowledge that a controller is connected and sticks at the reconnect a controller page. This is obviously something to do with switching between a local controller and a streaming attached controller mid-session.

To work around the problem, hit the Xbox button on the controller to return to the home screen. With the large game tile selected, press the menu button on the controller, the button with the hamburger menu three lines just above the right thumb stick and select the Quit option from the menu. This completely closes the game or app that is active. After doing this, I can re-launch the game and the controller is detected no problems.


Managing Offline Sync in OneDrive for Business

Yesterday, I released a post explaining how we can control and manage some of the sharing capabilities of SharePoint Online. Those changes applied not only to SharePoint Online but also to OneDrive for Business such as whether or not a user can share a file publicly with an anonymous link.

In this post, I am going to focus on the offline sync capability of OneDrive for Business. This feature allows a user to have access to their OneDrive for Business files on their PC or Mac device and work on them offline and when they come back online, changes are synchronised back up to OneDrive for Business. The OneDrive for Business client allows not only syncing for offline access of a users personal site folders but also of team site folders and data. In some cases, people are even using this feature to replace their Folder Redirection shares on the local network to a file server and have users work go up to OneDrive for Business by default making the most of that 1TB per user allowance and reducing your on-premise storage management and purchasing costs. In other cases, you could use this to allow employees working remotely to have access to a central team site that contains all of your document templates or marketing collateral.

While this offline sync capability is very useful, it also comes with a price. Imagine a scenario with a disgruntled employee: Using their home PC, they login to OneDrive for Business and configure their client to sync their folders and files at home. Now, this user has copies of all of their corporate work product at home, free to take it or sell it to a competitor or such. Another scenario is that somebody gains access to your SharePoint Online environment and takes a copy of a sensitive folder of documents and then publishes them online, exposing your company.

Luckily, after all this scaremongering, we can control it although this is a new feature so it’s not something we could have done before.

Turn Off Offline Sync for a Library

The easiest way to protect sensitive content is to prevent it from being synchronised for offline access so that OneDrive for Business clients cannot take copies of it with them offline. Yes, this method as no neither of the methods given stop someone physically downloading a copy of files but it stops them doing it en-masse using the OneDrive for Business client as a bulk collection tool.

Within SharePoint Online, access the Library Settings for your particular library type and then head into the Advanced Settings section.

SharePoint Online Disable Offline Sync

As you can see, in the Advanced Settings, we have the option to disable offline sync. As I said before, this is a great option for really sensitive areas that you just flat-out do not want kept offline but it’s not ideal for your honest corporate employee nor is it very scalable as this is a per library setting so unless you want to iterate all your libraries with PowerShell or some automation tool, this will get old and very time consuming fast.

Limiting Offline Sync to Domain Clients

With this new feature for OneDrive for Business, we can now control whether or not a client is able to sync offline content based on whether their computer is a member of a given number of Active Directory domains. With this feature, we can allow our employees to sync files offline but we can limit the scope of it to our domain managed client PCs.

There are two caveats that come with this new capability. First, this is a tenant-wide setting so once you apply this, you will not be able to perform offline sync with OneDrive for Business for any library in your tenant outside of one of the configured domains. The second is in the detail in the previous paragraph – PCs. Because a domain joined Mac client is not really a fully-fledged domain member like a Windows Client OS, changing this setting disables offline sync for Mac devices regardless of whether they are joined to your domain or not. We can hope this is something that might get fixed in the future as this is the first release of this feature but we just don’t know right now.

Right now, this change does not effect or limit mobile OneDrive for Business apps in any way just as an FYI but that is where Office 365 MDM comes in to play which I will hopefully get a chance to cover in a future post.

So to get started implementing this, we first need to get the GUIDs for our domains. These are unique hexadecimal strings which uniquely identify our domain. To get the GUIDs for all of the domains in our forest, we can use the following PowerShell Cmdlets from a PC with the Active Directory PowerShell Module installed from the RSAT Tools.

Import-Module ActiveDirectory
$Domains = (Get-ADForest).Domains; ForEach($D in $Domains) {Get-ADDomain -Identity $D | Select Name, ObjectGuid}

This Cmdlet comes from the Microsoft TechNet page at https://technet.microsoft.com/en-us/library/dn938435.aspx on how to get domain GUIDs but I have added the Name column to the output. I know that it is likely in the real world that we may have resource or selected domains that we don’t want to allow sync to occur in so this way, we can see which domains relate to which GUID and we can filter them out as needed.

With the domain GUIDs in hand, we can now configure SharePoint Online. Using a PC with the SharePoint Online PowerShell Module installed, enter the following Cmdlets:

Connect-SPOService -Url https://tenantname-admin.sharepoint.com -Credential admin@domain.com
Set-SPOTenantSyncClientRestriction  -Enable -DomainGuids "786548DD-877B-4760-A749-6B1EFBC1190A; 877564FF-877B-4760-A749-6B1EFBC1190A"

So as you will be able to see in the example above, firstly, you need to change the Url parameter to match your Tenant Admin URL and you also need to enter your Global Administrator or SharePoint Online Administrator credentials. On the second line, I’ve entering the domain GUID for two domains which are semi-colon separated. If you have just one then omit the semi-colon.

Once the change is applied, users will no longer be able to sync content for offline access with OneDrive for Business unless they are using a corporate managed, domain joined machine in one of the domains you have specified or from any Mac clients. Any users who have configured offline sync with OneDrive for Business on non-domain joined machines prior to the change will stop syncing any new changes but the existing content will not be deleted from the client so it is important to implement this change early if you are starting out in Office 365 today.


Managing Sharing and Access in SharePoint Online

For many organisations using SharePoint on-premise, SharePoint Online is a very appealing proposition. For administrators, it’s easy to deploy as you no longer have to worry about farm topology design and sizing your SQL Server disks to meet your capacity and performance objectives nor do you have to open firewall holes left, right and centre to give your users the collaboration tools they require when they are on the move as access to your corporate SharePoint sites and OneDrive for Business is all done in the cloud.

For some organisations, SharePoint Online and it’s broad sharing capabilities will present a headache at the same time because managing the risk that comes with this open accessibility of information can add up and depending on your particular circumstances, you may want to restrict certain aspects of this to ensure that your corporate data stays safe. In this post, I’m going to address some of the things we can do to configure SharePoint Online to manage those risks using both some existing features and some newly added features.

Default Sharing Settings

By default, SharePoint is actually a pretty open book allowing your end-users to share anything with potentially anyone. We can share files with selected users within our organisation, all users within our organisation or external parties. The default configuration allows us to generate a sharing link that we can send out to third-parties and they will be able to view the file without needing to authenticate or prove who they are.

Get the SharePoint Online PowerShell Module

For this post, we are going to be working with the SharePoint Online PowerShell Module and you will need to have the latest version which includes all of the new Cmdlet parameters. To download this, you can get it from http://www.microsoft.com/en-gb/download/details.aspx?id=35588.

Connect to Your SharePoint Online Tenant

In order to use the SharePoint Online PowerShell Cmdlets, you need to be either a SharePoint Administrator a Global Administrator in your Office 365 tenant. Once you have the relevant permissions, open PowerShell and enter the Connect-SPOService to authenticate as follows:

Connect-SPOService -Url https://tenantname-admin.sharepoint.com -Credential admin@domain.com

You will be prompted to enter your password for the credential provided and once entered you will be connected to your SharePoint Online tenant. We can view the current configuration of the tenant sharing configuration using the Cmdlet Get-SPOTenant.

Restricting External User and Guest Sharing Setting

By default, SharePoint Online allows us to share with both registered external users and guest users with a link. We can control this setting with the SharingCapability parameter with the following examples:

Set-SPOTenant -SharingCapability ExternalUserAndGuestSharing
Set-SPOTenant -SharingCapability ExternalUserSharingOnly
Set-SPOTenant -SharingCapability Disabled

The top setting, ExternalUserAndGuestSharing is the default and allows sharing links to be sent to both authenticated users who sign in to access content with a Microsoft Account and guest users. The risk with this is that the links sent to guest users could be forwarded to other people once sent out or even shared publicly online exposing your content.

The second setting, ExternalUserSharingOnly allows sharing to take place but limits it to users who sign in with a Microsoft Account to access the content. Additionally, these links are one-time use which means once a user has accessed the link they will continue to be able to view that content but forwarding or outwardly sharing the link will not allow anyone else access to it without the original Microsoft Account credentials.

When applied using the above Cmdlets, this is set at the tenant level. Administrators of Site Collections within the tenant can change this setting on a per Site Collection basis however they cannot make the setting less secure that the tenant level setting. If for example, you set the tenant level setting to only allow authenticated users to access shared content, a Site Collection administrator would only be able to select between externally authenticated sharing or no sharing at all and the guest sharing option would be disabled.

We can couple the above setting for only allowing external users who are authenticated with another PowerShell Cmdlet.

Set-SPOTenant -RequireAcceptingAccountMatchInvitedAccount $True

This setting which is disabled by default but can be enabled, ensures that only the person who is sent an authenticated user sharing link can use the link. In it’s default state, a link for sharing can be sent out to a third-party user for them to authenticate with using a Microsoft Account however if they do not click the link to perform the initial binding to their Microsoft Account and instead, forwarded it to somebody else who signed in using their Microsoft Account would allow this alternate individual access to the document. Although this is quite a rare scenario to consider, it is still possible none-the-less.

For example, you send a link to dave@richardjgreen.net but Dave forwards the link to bill@richardjgreen.net and Bill opens the link and binds it to his Microsoft Account allowing Bill access to the document rather than Dave as you had intended.

This setting when enabled records the email address that the sharing link was sent to and will only allow the Microsoft Account named in the original invitation to use it and bind to it. My personal take on this is that if you are changing the default sharing behaviour to only allow authenticated user sharing then this setting is a must have.

Hiding Wide-Scoped Sharing Options

In SharePoint Online, not only can we share content externally but we can share content internally. Sometimes, especially in large organisations, this over-sharing can lead to people seeing things they perhaps shouldn’t. Microsoft have very recently added new Cmdlets to the PowerShell library for SharePoint Online to allow us to control this as shown below:

Set-SPOTenant -ShowAllUsersClaim $False
Set-SPOTenant -ShowEveryoneClaim $False
Set-SPOTenant -ShowEveryoneExceptExternalUsersClaim $False

These settings when configured as False using these Cmdlets remove certain groups from the people pickers in SharePoint Online when we invoke a sharing request.

The first setting, ShowAllUsersClaim controls whether users have the ability to share something with everyone within your Azure Active Directory tenant. This object includes both users who are internal to your organisation and users who have previously accepted sharing invitations. When this is disabled, users will not be able to see the All Users objects listed in the people picker so will not be able to broadly share anything to the entire organisation

The second setting, ShowEveryoneClaim controls whether to show or hide the Everyone object. The everyone object includes both internal users and external users but it includes external users of the authenticated and unauthenticated varieties so this object is the most damaging in terms of scope. You could argue this is less of an issue if you have already disabled the ability to share with unauthenticated users using the Cmdlets in the previous section but if that is the case, why confuse your end-users with the two different entities.

The final setting option is ShowEveryoneExceptExternalUsersClaim. This last option controls the Everyone Except External Users object. This object controls whether or not you are able to share something to your entire organisation but not to individuals outside it whether they are authenticated or not.

My personal feeling on this is that All Users and Everyone should be hidden for most people and that you could leave the final option for Everyone Except External Users enabled if you want to give your users the ability to broadly share within the organisation.

Limiting OneDrive for Business Sync Capabilities

UPDATE: In a partner post which I released the day after this was published, I have covered how we can manage and limit the OneDrive for Business client and it’s offline synchronisation capabilities to managed devices. You can see that post at http://richardjgreen.net/managing-offline-sync-onedrive-for-business/.

Configuring Global Service Monitor for SCOM

As System Center people, we all know that SCOM is very powerful and capable at monitoring but unless you deploy Management Servers or Gateway Servers into a public cloud environment like Azure, all of your monitoring comes with the perspective of inside your environment. If you are hosting web services that are externally accessible, one important aspect to consider is outside-in monitoring, otherwise known as monitoring your externally facing services from outside of your organisation.

Licensing and Registering

Global Service Monitor (GSM) for SCOM has been around for quite some time now since 2013 and I still see people running SCOM who are entitled to GSM not using it. To be eligible for GSM, you most importantly need to be running System Center Operations Manager 2012 SP1 or higher. You need to have a properly licensed SCOM deployment and you need to have Software Assurance for your System Center licenses as GSM is an SA benefit if you want to use the service permanently or you can also sign up for a free 90 day trial of GSM if you don’t have SA on your licenses to try the service out as I did.

To activate your SA benefit for GSM or to register for a 90 day trial, you first need to visit the Microsoft Commerce Portal at http://go.microsoft.com/fwlink/?LinkId=275502. You need an Organisational Account to sign in here which means in a sly way, you need to be using Office 365, Azure or Intune as well or at least have a working Azure Active Directory deployment ready for you to consume one of these services in the future.

Preparing the Management Servers

Once you get yourself either signed up or activated according to whether you are going trial or permanent, we need to download the GSM Management Pack. You can obtain this from the Microsoft Download Center at http://www.microsoft.com/en-us/download/details.aspx?id=36422. The download is a .msi file which you need to install to extract the Management Pack Bundle files.

With the files extracted but before we can install the Management Packs, you need to check you have the relevant Windows Features installed. GSM requires the Windows Identity Foundation 3.5 feature to be enabled on the Management Servers which will participate in the monitoring so make sure you install this on all the relevant Management Servers and not just the once you perform the installation on.

To avoid posting a screenshot of clicking through Server Manager and Add Roles and Features Wizards, the PowerShell Cmdlets for installing this feature is below.

Import-Module ServerManager
Install-WindowsFeature Windows-Identity-Foundation

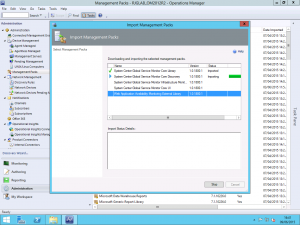
Once that is out of the way, you can import the Management Packs into SCOM.

Import GSM Management Packs

Configuring Global Service Monitor Settings

Once you have the Management Packs imported, a new view will be added to the Administration pane of the Operations Manager console for Global Service Monitor and you can start the configuration wizard. You will be asked to sign-in using your Organisational Account as part of the process and from this, your GSM Subscription ID will be discovered.

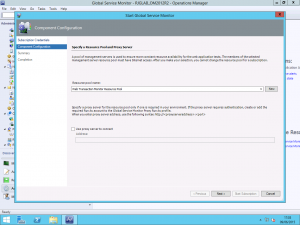
Configure GSM Resource Pool

GSM uses Resource Pools for determining which Management Servers will communicate with the service. You can use the All Management Servers Resource Pool however this is not recommended. I have created a new resource pool for as recommended. You also here have the option to configure a proxy server to use to access the GSM service.

Creating Web Application Availability Monitors

Once you have completed the wizard above and GSM is configured, you can start to configure monitors using the service. I already had an existing Web Application Availability Monitor configured for my blog so I have modified this to use GSM. It is important to note that GSM only works with Web Application Availability Monitors and not with Web Application Transaction Monitors so you will need to make sure that you are using the appropriate type. There is a good article on System Center Central that compares the two types of monitor and what each can do at http://www.systemcentercentral.com/which-is-the-best-synthetic-web-transaction-to-use-in-operations-manager-for-my-requirements-scom-sysctr/ if you need to understand the difference.

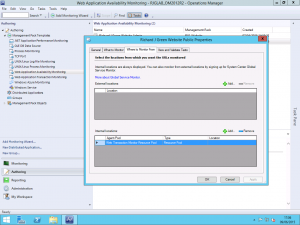
Web Application Availability Monitor Locations

As you can see above, I have my existing Web Application Availability Monitor and I have one internal location configured, my resource pool however we have an empty field above called External Locations. Select the Add button to add a new external location.

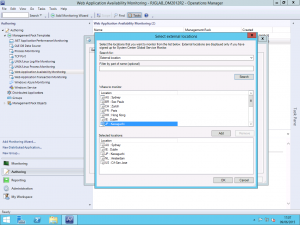
Web Application Availability Monitor Set External Locations

Selecting this option now presents us with a list of the available GSM monitoring locations. Those familiar with the Azure datacentre locations will note that they are the same as the GSM locations. I selected a few choice locations but which ones you use or how many is entirely up to you. If your service that you are trying to outside-in monitor is truly global, you may want to use them all but if you are only interested in the availability of your service within a particular geographic region then just use those relevant to you.

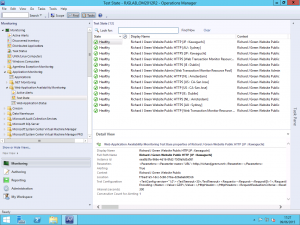
Once you apply the changes it takes a little while for the request to be sent up to Global Service Monitor and for the monitoring data to start coming back down but after a short wait, about fifteen minutes in my case, I started to see the health state for the various monitoring sites in the Monitoring view.

Web Application Availability Monitor Health

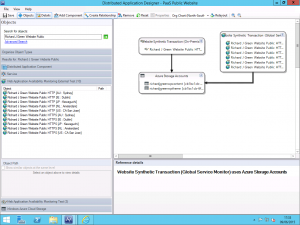
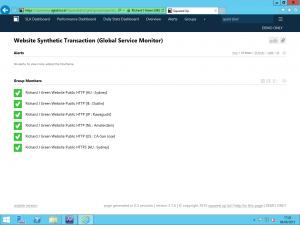
In my lab, I am using SquaredUp to provide rich HTML5 visualizations of my SCOM environment so I decided to take this a step further and I am using the Azure SQL Database Management Pack to monitor my Azure SQL databases that host my WordPress database and I built a Distributed Application for it and presented it via SquaredUp as shown below.

Web Application Distributed Application  Web Application Monitor via SquaredUp

And there we have it, a setup and working outside-in monitoring solution for web services using SCOM and taking advantage of SA licensing benefits. One of the best things about this is that each monitored location retrieves the counters you specify whilst configuring your Web Application Availability Monitor so you get the response time, DNS resolution time and other counters for each region so you can see really clearly how latency plays a part in your applications performance.

I hope you found this useful and it helps you to monitor your own solutions with GSM.


Office 365 Limited Administration Roles

In the past when managing Office 365 permissions, we had several options for granting ‘super user’ rights to users however these stopped somewhat short of allowing us to be selective over what parts of our Office 365 deployment an administration could have control. You could either make somebody a Global Admin which essentially gave them the keys to the kingdom or you could assign them one of the reduced adminsitration roles such as Password Admin or User Management Admin.

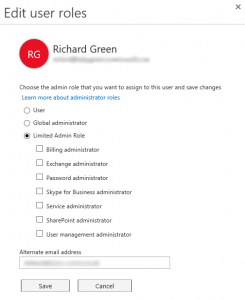
Fortunately, Microsoft listened to the vast feedback they must have recieved about this and in Office 365 we now have three new limited administration roles for Exchange Online Admin, SharePoint Online Admin and Skype for Business Admin as well as the existing roles including Global Admin. These new roles allow us to assign users permissions more appropriately scoped to their role in the organisation. If an admin is only responsible for SharePoint then no longer do we need to him them unnecessary rights to amnage Exchange so that they can perform Site Collection administration in SharePoint for example.

To take advantage of these new roles, you need to ensure that you are using the Office 365 Admin site to manage the permissions and not the Azure Active Directory settings in the Azure Management Portal (you knew that you could manage users there too right).

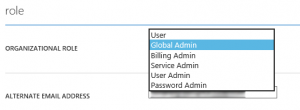
Azure Active Directory Organisational Roles

The image above shows the roles that are available if you are managing a user through the Azure Management Portal and as you can see, the same old options limiting you to using a Global Admin role are present. If you use the Office 365 Admin site however as shown below, you can see the new roles.

Office 365 User Roles

When changing permissions of your users, be careful that you don’t take away permissions from users that they actually need. As always, an element of caution should be applied.

If you want to see what permissions map to each role and how they differ, you can view the full table at https://support.office.com/en-us/article/Assigning-admin-roles-d58b8089-cbfd-41ec-b64c-9cfcbef495ac#__choose_an_admin


Microsoft Announce E5 Plan for Office 365

Currently in Office 365 when selecting Enterprise plans, we have the choice of four ranging from E1 up to E4.

At the Worldwide Partner Conference this week, a new SKU was announced called E5 which will be replacing the current E4 SKU. This new E5 SKU takes everything that was offered in E4 (namely E3 plus Enterprise Voice for Skype for Business) and adds even more features to help you adopt Office 365. Although this is not an available SKU right now, it looks set for the features to include the new Skype for Business services that are currently being trialled along with Power BI for Office 365 and potentially more stuff that we just don’t know about right now. Skype for Business currently has three new services in trial although these are limited to customers in the US at the moment.

The Cloud PBX feature will allow you to use Skype for Business Online without the need for a hybrid deployment with a Skype for Business Mediation Server hosted on-premises connected to SIP Trunks or ISDN circuits for

PSTN Conferencing allows you to host normal Lync meetings with the added capability of allowing parties to join the call from a telephone using Dial-In Conferencing. This can already be achieved using either a hybrid solution where PSTN callers join the call via a mediation server hosted on-premise or using a cloud based service such as those from InterCall or BT but the Skype for Business native offering brings it all under one roof with a single vendor to manage your billing and support.

The Meeting Broadcast feature allows you to broadcast your Skype for Business meetings online in instances where you need to have thousands of attendees joining such as a company-wide update meeting or a webinar. Although I confess to not having looked into this in-depth, there is no doubt this is being powered by Azure Media Services behind the scenes.

There are going to be questions that need to be answered for all of these new services such as how the billing model works, what countries it will be available in and will there be limited features in others. There is also the question (for existing Lync on-premise customers) or how the Cloud PBX solution will work with the likes of PSTN devices such as fax machines and whether or not ethernet based Lync clients (Tanjay devices) will work with the new Skype for Business but the promise of being able to have a fully cloud based PBX solution all under one umbrella of Skype for Business is very appealing.