The cloud is everywhere we look in IT now: more, and more organisations are adopting cloud services of one flavour or another. One of the benefits of cloud is that the costs can come out of operational expenditure in nice little monthly packages instead of giant wedges of capital expenditure. While cloud also offers us the […]
The cloud is everywhere we look in IT now: more, and more organisations are adopting cloud services of one flavour or another. One of the benefits of cloud is that the costs can come out of operational expenditure in nice little monthly packages instead of giant wedges of capital expenditure. While cloud also offers us the commodity of scale providing services faster, better protected, and more reliable than we can often build ourselves on-premises for equivalent cost but that doesn’t mean we need to pay the recommended retail price.
In this article, I’m going to cover a little-known feature in Microsoft Azure called Reserved Instances (RIs). Previously called Compute Pre-Purchase, this feature is available to anybody using a Pay As You Go (PAYG) subscription or an Enterprise Agreement Subscription. If you are using any other type of subscription such as one bundled as part of an offer then you will not be able to participate. Reserved Instances are only available for Infrastructure-as-a-Service (IaaS) virtual machines. They cannot be used for any other types of service.
So we understand who can use RIs and what they can be used for but what actually are they? If you are an organisation migrating to Microsoft Azure and you are using IaaS VMs then there is a good chance that you will be doing so for a long period of time (for some machines at least). Your core infrastructure like Domain Controllers, SQL Servers, File Servers, and more are likely to be around for some time: a year or more. RIs allow you to commit to a pre-paid quantity of virtual machines and in exchange, you get them at a reduced cost.
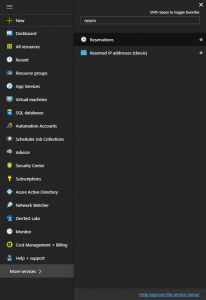
So how do we set it up? In the Azure Portal, select the New resource button and start typing Reservations and you will see it appear in the results. If you are likely to come here often you may want to add this to your favourites with the star.
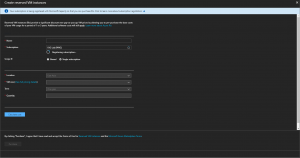
Once you have located the resource and clicked it, you will be taken to the Reservations page. If this is your first time here, you will need to register your Subscription for the Reservations service. This is done automatically for you; you just need to make sure that the correct Subscription is selected in the drop drop-down will see a tooltip to inform you that your Subscription is being registered and you will be unable to use the other fields until this is complete.
Once the Subscription has been registered, you can get to work. Set a name for the reservation that is suitably explanatory. You may end up creating multiple reservations in the future. Each reservation can be linked to a single region and to a single VM size. If you have multiple regions servicing your estate for multi-region availability or disaster recovery then you will off the bat want more than one reservation. If you use multiple IaaS VM sizes then you are going to need reservations for each size you want to save on.
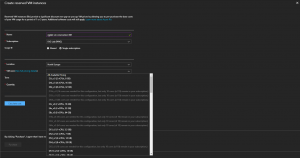
As shown in the screenshot below, I have specified the North Europe region and then expanded the VM size list. Because this is a Subscription I don’t use much the default CPU Cores limit has not been raised which means I cannot create a big ol’ reservation, however, your subscription will likely have this limit lifted already. If you use A2_v2-series VMs to host all your core infrastructure then set that. If you use DS11_v3 VMs for all your SQL Servers set that: you can see where this is going.
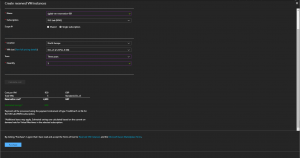
Once we have set the region and the VM size, we can define the quantity of the VMs we want to deploy at the reserved price and the duration. The more VMs you commit to and the longer you commit to the more you save, however, it is important to remember that you pay for this upfront. If you do not use all that you commit to you will not get a rebate so only reserve what you will really use. *
In the final image below you can see that I have said I want five VMs for three years. Once all the values are set, the savings will be shown.
In the example, I have said that I want 5 VMs for three years using the D2S_v3 VM size. If we use the public pricing calculator, this yields a cost of £ 1,302.84 per VM per annum assuming the VM is powered on 24×7. Using an Azure Reservation for this the price is reduced to £ 920 per VM per annum. That is a saving of £ 382.84 per year per VM. If you have an estate of many servers then these costs and savings can very quickly snowball.
With all the information entered, you can now hit the Purchase button to commit to the spend. Once committed, the RI will apply to both existing VMs deployed and to newly deployed VMs that match the specification of the reservation (region and size). As I said earlier on; if you have multiple VM sizes in use remember that you may want to create a reservation per size.
* If you have purchased a reservation and need to cancel it or exchange it for another VM size there are options to do so, however, you will need to raise a Microsoft Support incident and support will work through this with you.
That’s a wrap for this post. I hope reading this has inspired you all to go and save some money on your Azure VMs. I have another post in the works on Azure Hybrid Benefit licensing for Enterprise Agreement customers so stay tuned for that because it can be combined with Azure Reserved Instances for even greater savings!


One thought on “Saving with Azure Reserved Instances”
Comments are closed.