General

A catch all category for posts that are neither specific to a Microsoft technology which has its own dedicated category or posts that aren’t based on a Microsoft technology, as rare as those are.

Cisco ASA 5520 Memory Upgrade

For anyone using a Cisco ASA 5505, 5510, 5520 or 5540 in their home, lab or non-production environments and wants to be able to run ASA OS versions 8.3 and later you’re probably going to be on the market for a memory upgrade. Cisco ASA memory upgrades are bonkers expensive and while for a production environment you’d want to pay this to get the Cisco TAC support, chances are you aren’t going to want to stump up this kind of money for other purposes.

There is an exception to this rule is if you happen to have an ASA whereby it was either built after February 2010 or the previous owner upgraded it but that’s neither here nor there.

The specifications from Cisco on the memory requirements for each model to run ASA OS 8.3 or later and the comparative shipping memory values can be found at http://www.cisco.com/en/US/prod/collateral/vpndevc/ps6032/ps6094/ps6120/product_bulletin_c25-586414.html.

In my case, the ASA 5520 shipped originally with 512MB of RAM but for ASA OS 8.3 or later you need to have 2GB. The ASA 5520 varies in it’s hardware configuration according to age with some models having four DIMM slots and others only having two. If you’ve got an ASA 5520 or 5540 with only one DIMM slot then sorry, you’ve got an ASA 5510 which has been faked into a 5520 which was a big problem at the time (https://supportforums.cisco.com/message/3517301).

As I didn’t want to spend £300 on the memory upgrade for mine, I went on a search of the internet as you’d expect of me. It transpires that Cisco used memory from Smart Modular in the ASA appliances. 184-pin PC2700 DDR-333 ECC Unbuffered memory to be exact. According to some clever people on the internet, not many memory modules aside from these from Smart will work in the ASA as the Linux kernel on it is only coded to recognise a select few memory setups however luckily, it appears that Infineon are one of the good guys.

Due to the way that memory under-rates itself when required, you don’t have to stick to PC2700 DDR-333 and nor does it seem that you need ECC memory either. From advice online I’ve found that the following module models from Infineon work great in the ASA 5520. I’ve had none of the commonly reported issues with third-party memory of the appliance only successfully booting one in two or three reload cycles. My ASA has booted first time, every time and I’ve been cycling it about once and hour today to test it.

If you’ve got the luxury of four DIMM slots, go with the Infineon HYS64D64320HU-5-C. It’s a 512MB PC3200 DDR-400 DIMM which you can install four of to make the 2GB requirement. If you’ve only got the two DIMM slots to play with, go with the Infineon HYS64D128320HU-5-B which is a 1GB PC3200 DDR-400 DIMM.

eBay is the place to buy in case there was any doubt over that point and no matter which one of the above options you go with, by using these Infineon DIMM modules, you’ll get a reliable ASA platform and it allows you to hit your memory maximums for ASA OS 8.3 and onwards for about £20 at the time of writing. Just a touch better than the £300 for the official memory right?

David Attenborough Africa

I’m a little bit behind the times with this but I’ve just watched the final episode of the David Attenborough series from the BBC called Africa. The series aired late last year in 2013 and I watched all bar the final two episodes until this week.

I love watching his programmes because you get to see truly incredible things and watching them leaves me with an utterly humble feeling inside. Sure, at 88 years old now, he may not be as ‘down in the dirt’ as he used to be but who can blame him? He was in the news in June of last year reportedly to have a pacemaker fitted.

If I can see just 5% of the incredible things that he has been able to witness and experience in his life in my own then I would consider my life to be a rich and fulfilled one. Watching the series Africa also makes me, as a father of three, wonder what will be left for our grandchildren? What natural beauties and ecological wonders will remain for them to see and experience or will they be dependant on records of history like the documentaries of David Attenborough to understand what the world used to be like?

This story on the Radio Times website from July 2013 (http://www.radiotimes.com/news/2013-07-05/david-attenborough-to-make-new-landmark-bbc1-natural-history-series) reports that there will be at least one more high profile series from Attenborough which according to the story will be aired in either 2015 or 2016. I really look forward to it.

Digital Download Isn’t Always the Cheapest Way

The Xbox One gives you the option to download quite a few games as digital downloads, sparing you the time and effort to order games from online or high street retailers, waiting for Royal Mail to deliver them or going into the high street to collect them, but just because you get the option to use your internet bandwidth to download them, doesn’t mean it’s going to be cheaper.

The wife decided today that she wanted Just Dance 2014 so headed into the Xbox One store and made the purchase without even looking at the prices. The game was £39.99 from the Xbox One store as a digital download, so remember you don’t get a physical media for that price.

A quick check on Amazon reveals that you can get the same game, but this time with a physical media disk for £24.99 or on Play for £32.23. With that Amazon price, you save £15 and you get the physical media in exchange for a one to two day wait for the goods to be delivered.

Next time you think about buying something from the Xbox One store, bear this in mind. Convenience comes at a cost.

Permit PPTP VPN GRE Traffic via a Cisco PIX Firewall

Earlier this week, I tried to connect to a PPTP VPN connection. My Windows 8.1 PC gave me the following error:

Error 806: a connection between your computer and the VPN server has been established but the VPN connection cannot be completed.  The most common cause for this is that there is at least one internet device between your computer and the VPN server is not configured to allow GRE protocol packets Verify that protocol 47 GRE is allowed on all personal firewall devices or routers.  if the problem persists, contact your administrator.

At home, I use a Cisco PIX 515E firewall as my edge firewall device. My configuration isn’t particularly locked down in the sense that I don’t deny much traffic outbound (it causes too many internal support tickets with the wife and kids).

The error momentarily filled me with dread as I knew it was going to be an issue at my end as other people could connect to the service without any issues. The main reason though is that I know that from previous experience with VPNs, firewall and network devices getting in the stream and blocking traffic can be fraught with problems trying to resolve it.

A few Bing searches later and I was none the wiser. All of the details online seem to focus around people trying to host their own PPTP VPN servers and having issues with inbound connections, however with thru absence of other assistance, I figured I would try once of the recommendations I found which works to allow inbound PPTP connections and low-and-behold, a fix.

fixup protocol pptp 1723

Simply enter this command via the command line interface of the PIX or using Cisco ADSM and the command line entry dialog. The PIX will return with a slightly bizarre looking response and now you’re all set to place outgoing PPTP VPN connections.

The reason and rationale? The PIX does not by default inspect the IP Protocol 47 traffic (GRE) which is used by a PPTP VPN connection and therefore is dropped. Entering this command adds GRE to the inspection ruleset on the PIX so that the traffic can be seen and permitted to pass, assuming you don’t have an ACL which will then block it (the system level inspections happen before ACLs are taken into account).

Elgato EyeTV Netstream Sat Initial Setup

Network streamed TV is something I’ve long had an interest in due to the set top box lockdown imposed upon us in the UK by Sky and Virgin Media. Elgato EyeTV Netstream Sat is a DVB-S2 Freesat HD network attached TV tuner which allows you to escape the set top box lockdown and enjoy TV how you want on almost any device using your existing satellite dish and home network.

Recently, I tweeted (https://twitter.com/richardjgreen/status/395790001541496832) a picture of the new Elgato EyeTV Netstream Sat that arrived for me in the post. I got a chance last week to have a go at setting this up to see how well it all works. For this post, I’m just going to be installing the device and configuring it on my Windows 8.1 desktop PC to see if it works using the client software shipped with the device. Once I’ve got this all working, I’ll be moving up a gear to setting it up with Windows Media Center for my HTPC.

Where to Buy and What You Get

The EyeTV Netstream Sat sells on Amazon for just shy of £130, but head to eBay and you can pick up a new unit for an eBay shop as I did for £100.

The EyeTV Netstream Sat on it’s own is a single tuner device allowing you to stream a single channel of Freesat HD TV to your network devices. You can expand this with the EyeTV Sat Free which is identical in looks however lacks the Ethernet port and instead connects to the EyeTV Netstream Sat by a USB cable adding a second tuner capability.

For my needs, I’m looking at a final design consisting of two EyeTV Netstream Sat devices with two subordinate EyeTV Sat Free devices which will give me a total of four Freesat HD tuners on the network. Total cost for this is in the region of £300 but with my current Sky TV bill coming in at £39 a month, this will pay for itself in eight months due to the nature of subscription free Freesat.

Installing the EyeTV Netstream

Setup is really simple as it should be for a consumer device. Connect the EyeTV Netstream Sat to power, an Ethernet cable to the RJ-45 port and a Coaxial cable into the satellite input port. It goes without saying that for this to work you need an existing satellite dish on your house pointing to the right satellites. I’m currently a Sky customer which means I’ve already got the dish and it’s pointing at the right part of the sky to pick up the signals.

Once powered up and connected, the EyeTV Netstream Sat will pick-up an IP Address from DHCP on your router however with me and my overly complex home setup, I like to have my infrastructure devices on static IP addresses so that I can give them cute DNS names to access them. If you are going for a basic install, you can skip the following piece and head straight to software installation where the tuner will be automatically detected on the network however if you’re like me, then keep reading.

Configuring the EyeTV Netstream

My EyeTV Netstream picked up an IP Address out of my Windows Server 2012 Essentials DHCP scope which I pointed my browser to after which you are presented with the web interface. The initial page Status shows you the tuner signal strength which will probably show 0% at this point as it hasn’t been configured. Head straight to the Network tab to configure the static IP Address and DNS Server IPs.

You need to click the padlock icon in the right of the tab navigation bar to unlock the interface and allow you to edit the settings. The default PIN is 1234.

EyeTV Netstream Network Settings

Change the default option from DHCP to Manual Setup and enter your network settings. As you can see, I’m a bit of a propeller-head and use a 10.10.10.0/24 network range for my home network. Nothing like simulating the office right? There is a Test Network Speed button at the bottom of the page which I fail to understand and we’ll ignore as this button tests your broadband internet speed which being we aren’t streaming IPTV here but receiving hardline satellite signals here, I don’t quite get it’s purpose?

My EyeTV Netstream shipped with quite an old firmware version. Elgato don’t seem to issue very frequent updates but each one does include good fixes and updates, so head over to http://www.elgato.com/en/eyetv/eyetv-netstream/support/update and download the latest (1.1.5 Build 423 at the time of writing) and use the Update button on the General tab to install this. The device will reboot after installing the update and mine took about two minutes to come back to life afterwards.

EyeTV Netstream General Settings

The General tab also let’s you assign a name to it so that if you have multiple EyeTV Netstream’s on your network you can identify which is which. I’d also recommend changing the PIN number on this page too from the default of 1234 to something personal to you. This PIN is what locks down the web interface to prevent unauthorized changes.

Installing the Windows PC Software

At this point, you’ve configured your EyeTV Netstream Sat on the network and if you followed the steps above, you’ve got it updated with the latest firmware and set yourself a custom PIN. Installing the Windows PC Software can be achieved using either the provided CD or from the web interface. As I was already in the web interface, I did the latter. Click the Install tab in the interface.
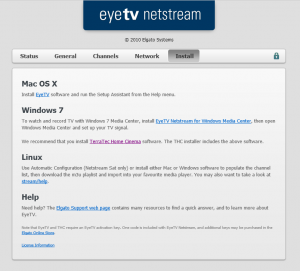
EyeTV Netstream Install Links

Here, you get links to all the various software options for accessing your Netstream. As you’ve probably gathered by now from the physical device’s appearance, the web interfaces look and feel and the fact that Mac OS X is listed top on this page, these EyeTV devices are really Mac biased but they work just as well for Windows and PC so don’t be put off by any of this. Click the link for TerraTec Home Cinema to download the software.

During the installation, you’ll be asked for an activation code. This is the code which is printed on a small card inside the product box. This is the reason I decided to buy new and not used as I was worried that the activation of a used product may not go down so well.

Scanning for Channels

Once you’ve got the software installed and running, you need to scan for channels. The scan interface should automatically pop-up on first run but if it doesn’t, you can access it from the Setup button on the black control console and then click the Scan tab.
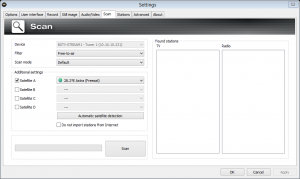
TerraTec Scan for Channels

To find the channels, leave the Filter set to Free-to-Air as you don’t get a card interface with EyeTV Netstream Sat to allow you to access encrypted channels. Click the Automatic Satellite Detection button after which a new dialog will appear. This will use the dish to determine what satellites are visible to the dish. After the scan completed, I was told that I’m using the Astra Freesat 28.2 East satellite.

Once this is done, click the main Scan button to begin a search for channels.
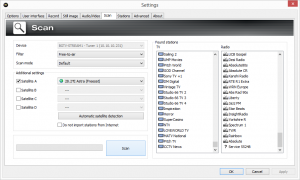
TerraTec Found Channels

Viewing the Results

As you can see from the screenshot above, it found lots of channels and radio stations. Click OK and you should now be able to start viewing. Right-clicking in the TV viewing area gives you an option to select a channel. I went straight for BBC One HD, the highest bit rate channel on Freesat HD currently to stress test it.

TerraTec BBC One HD

I happened to try this at the time that the regional news was on so I only got a splash page but it worked none-the-less. I tried this in full-screen mode on my 22″ LCD and it looked great.

TerraTec Channel 5

Here’s a screenshot of Channel 5 which is a non-HD channel and that considering, it still looks great even in full screen.

Channel switching is one area that people seem to have concerns and complaints with IPTV and streaming TV services. I tested this quite extensively, flicking between HD and SD channels, back and forth a number of times and I was quite happy with it to be honest. SD to SD channel switches happen in under a second. SD to HD channel switches take a fraction longer but that is to be expected as the EyeTV Netsream is having to start up a stream at a higher bitrate for the new channel.

I inspected the network usage whilst streaming and I was quite impressed with this too. A standard definition channel was stable at 4 Mbps (Megabits per Second) and a HD channel was stable at 10 Mbps. The EyeTV Netstream only has a 100 Mbps network adapter so whilst this is okay with a single tuner and in theory should be perfectly okay also with two, I’ll be interested to see how that coped with an EyeTV Sat Free connected via USB adding a second tuner with both tuners streaming a HD channel at the same time. I haven’t been able to test a wireless device yet as most of my home is wired with Gigabit Ethernet however as I have N 300Mbps wireless I’m pretty sure that’d work just fine and it should work okay over 54 Mbps G networks too.

In summary, I’m really happy with the results of the setup and streaming to my PC using the TerraTec software. The next step is to now configure the Windows Media Center HTPC in the living room to use the tuner and see how I get on with that. That for me is the biggest test also because this is how the wife and kids will interact with it. Unless it’s bulletproof, the wife and kids won’t be happy with it and I will probably have a hard time replacing Sky with this setup. I’ll be posting the Media Center setup steps in another post coming soon.

Bring on Elgato EyeTV Netstream

I’m not the biggest fan of Sky TV even though I’ve been a customer of theirs for about eight years now. The way that you are locked into their eco-system and how you watch media the way they want you and not what is most applicable to you to doesn’t appeal to me. Sky Go and other new features have helped the situation for a number of people but it doesn’t help me using a Windows Phone or Windows 8 devices as none of their apps are available on these platforms (for clarification, by Windows 8, I mean impressive UI native Windows 8 apps and not desktop apps). I’ve long wanted to break into the IPTV and streaming TV markets, originally with SiliconDust’s HDHomeRun product and now Elgato’s EyeTV Netstream and now is the time to strike.

Me and @NickyCGreen got an email from Sky at the weekend to tell us that our bill was going from a promotional rate to the standard rate, almost doubling to £40 a month. I was happy enough to pay for Sky at £20 a month and actually, I didn’t even consider this was a promotional rate. Just because something is easy though isn’t justification for buying it, certainly when it’s £40 a month. All we really watch on TV these days is FTA (Free to Air) content like BBC One, BBC Two, Channel 4 and the kids watch a little bit of kids TV too like Pop and CBeebies. We don’t have sports or movies add-ons and we don’t have any other services like Sky Go, broadband or phone from them, this is just for basic TV with HD.I  was pretty staggered that Sky will expect me to pay £40 for this basic service so I decided that now was the time to strike the IPTV drum.

I’ve long courted SiliconDust and their HDHomeRun product line but they have let the European products stagnate and not updated them to meet the x2 standards such as DVB-T2 (Freeview HD) or DVB-S2 (FreeSat HD) which means that you can only get the SD (Standard Definition) variants of Freeview or FreeSat on the HDHomeRun. On my search for other products, I came across Elgato and their EyeTV product line. On first inspection, it looks quite Apple focused with a lot of detail on Mac OS X software, AirPlay support along with mobile device support for iOS iPhone and iPad devices but they do support Windows and Windows Media Center also which is enough for me to be happy.

Elgato EyeTV Netstream Sat

I decided to dip my toes into the line-up today by ordering an Elgato EyeTV Netstream Sat, a single tuner DVB-S2 FreeSat network tuner. For those of you who don’t know what any of that means, it basically means that I can connect one of the satellite feeds from my Sky MiniDish into the box of tricks from Elgato and it will output those FreeSat HD pictures onto my home network to be consumed by any device I choose.

I’ve gone with a single tuner to start with as a proof of concept to the wife and kids, I’m going to be configuring this single feed on the Windows Media Center PC in the living room to test out the Media Center Live TV interface, that basics like live TV and channel switcing all work as planned and also that none of the codec changes I’ve made to support .mkv playback effect the TV experience. Once I can get this working and other basics like the EPG (Electronic Programme Guide), I can start to experiment a bit more like. Tricks like the MCL (My Channel Logos) plugin to add the UK channel icons to the EPG are nice additions and make the experience much sweeter.

Aside from watching live TV and optimising that experience, the next thing I’m going to be playing with is the Windows Server 2012 Essentials integration with Media Center. A feature has existed since the days of the first Windows Home Server which allowed the server to move TV recordings to a share on the server and replace that recording with a stub on the Media Center. For me, this is the best feature of Windows Media Center and Windows Server 2012 Essentials coming together. The HTPC (Home Theatre PC) records a programme from the network tuner as normal and once the recording completes, the server moves the recording to the backend Recorded TV share. The result is that the recording then is available anywhere I can access the server from. For me, this means any other Windows PC in the house, my Windows Phone using the My Server app or any internet enabled device which supports Silverlight. Windows Server 2012 Essentials (and notably R2 with it’s tablet and touch device improvements) allow you to use Silverlight Adaptive Streaming to deliver video and audio content from the server to any device you can think of (so long as it supports Silverlight).

Isn’t that a much better way to be able to consume your media? Exactly how you want, wherever you want on whatever device you want and not paying a penny for a subscription service in the process?

I tried, as I always do with product purchases to o a tonne of research before laying down the money but nearly all of the videos I can find on YouTube for Elgato EyeTV Netstream are in German which doesn’t really help me. I’ll be sure to post up a nice review of how setting up the EyeTV Netstream and getting it to play with Windows Media Center goes. If the test goes well, I’ll be sending some more of my money Elgato’s way to beef that single tuner into a dual tuner with their EyeTV Sat Free extender for the Netstream and I’ll then be doubling down to give me four network tuners throughout the house so that I don’t have to worry about recording conflicts or scheduling problems.

If the excitement of unboxing the product doesn’t overwhelm me (these things normally do) then I may even try and get a video on YouTube to get some English language demo’s of the product out there.


Making the Blog Better and Faster

After moving the blog to Azure, I was really happy with the performance, but I decided this weekend I wanted more so I set off on a personal mission to improve to make the blog better and faster. This post is a quick update on the changes I’ve made to the site to get it to where it is now.

So What Have I Done?

Lots of people recommend YSlow as a Firefox plugin for assessing website performance. I use the Internet Explorer Developer Tools normally for my needs, but YSlow outputs nice reports which tells you what you need to do to get results where as unfortunately, the developer tools only tell you what you’ve got currently.

CSS Removal and Compressing

YSlow identified a number of issues with the site which I’ve worked on resolving to varying degrees. Firstly, it wasn’t happy with the number of CSS stylesheets I referenced due to the theme colour switcher. As I figured this was a gimmick added at the time and nobody would actually really use this, I’ve removed it which allowed me to drop 19 stylesheets from the HEAD section of the site.

Once I’ve removed these stylesheets, I used a plugin called Dust-Me which scans the site and finds unused CSS styles in the stylesheets. When a stylesheet is only 2KB, ever little helps. Dust-Me found about 10 styles across my CSS which I was able to remove and marginally reduce the filesize.

Compressing happened by using a great website, CSS Drive. Their CSS Compressor tool. You copy and paste your CSS into their site and it outputs a shrunken version of it with a large chunk of whitespace removed and where possible is reduces the length of colour codes and converts your CSS into shorthand. Doing that saved me about 20% on the size of my stylesheets, dropping the colour specific sheets from 856 bytes to 777 bytes and dropping the main stylesheet from 6,686 bytes to 5,636 bytes.

Whilst this may not sound like a lot, the smaller the page, the faster it appears to the user and the less load it also puts on the server delivering the page so it’s a double win.

Image Resizing

All of the images on the site which make up the page layout I have designed with high DPI users in mind. This means that users who are operating their displays at 125% or 150% aren’t penalized for doing so and get the same high resolution images and people set to 100%. I realized this weekend that my images where actually scaled to about 225% which is way bigger than high DPI users need so I’ve resized all of the images which make up the standard site page. This has had a big impact on the page weight for the site as a whole. The images which have been updated include all of the logos in the header section on the tiles and all of the images in the sidebar for the navigation.

Page Bloat Removal

I’ve never been 100% happy with my pages on the blog. I do what I can to tweak it when I have time and this weekend, I had time. I’ve made a whole load of changes to the site which will work to improve it’s usability, some of which I’ll list below.

  • Updated page TITLE attribute to include the post title.
  • Removed a JavaScript and some CSS references from the page HEAD to speed things up.
  • Removed the messy looking pagination links at the bottom of singular post pages.
  • Removed a load of bloat and fluff from my about me personal page.
  • Used a WordPress function to HTTP 301 redirect the author archives to my about me page as there isn’t any point in having author archives on a single author website.
  • Added a plugin to manage my sitemap.xml file for Google and Bing search indexing.
  • Created myself a Google+ account and setup author verification for the site so that Google can show my face against results from this blog.

New Picture Time

I figured this weekend that I’d been using the same boring head and shoulders shot of myself for my social presence for nearly eighteen months now and I wanted a change. I’ve got myself a nice new image for all of my social sites. The picture was taken on our holiday to Spain in 2011. With me always being the person taking the pictures in our family, it’s rare find a picture of me and even rarer to find one that I like. With a little bit of Adobe Lightroom magic, what was a wide angle shot including me and some flowers because a lovely little super-crop of me and the flowers with an Instragram-esque vignette and black and white filter to finish the look.

The Results

When I started the journey of updates this weekend, the page weight for the site was about 210KB which was pulled together by nearly ~75 HTTP requests. After all of the work this weekend, the page weight is now down to 140KB (50KB per page saving) and the number of HTTP requests is down to 25 (~50 per page saving). Yes, all of this has taken me quite some time to achieve over this weekend, but the results are really worthwhile and goes to show that even a well performing website has room for improvement.

My current Pingdom score is 88 and my current YSlow small website/blog score is grade B (86). If I change YSlow to the YSlow 2 test pattern then my score drops to grade C (74) but that’s still a pretty good score in my view. I think I could probably get my score up to 90 for the small website/blog category with a little bit more effort in the coming weeks.

On my radar for future changes and updates to the blog are going to be going back through my historical posts and updating them all to use the Azure BLOB Storage for the image hosting and correctly some of the ASCII character errors which where caused by using Windows Live Writer to upload my posts on a previous iteration of the site which didn’t have the UTF-8 encoding set properly.

Somebing Isn’t Right

Pardon the pun in the title there, but I get the feeling something isn’t quite right with Bing this evening. I’ve been trying to do some searches online with respect to a feature in Windows Azure and an error I’m seeing. Every variation of the search I tried came up with no results. I know Bing gets a bashing from those Google types, but surely I’m not the only person to have ever thought of using a feature in Azure to the point that there isn’t a single post on it?

To test it out, I did the most basic search imaginable – “Facebook”. Here’s a screenshot of what I got back.

Bing Search No Results

Let’s hope this is just a transient thing which gets resolved soon.

SSL Certificates and Wild Pricing

As part of a project of work I’m looking into currently, we are planning a move from Exchange 2007 to Exchange 2010. As those of you who’ve done this before will know, you need to setup the environment with two namespaces for a period of the migration which Microsoft refer to as the Exchange 2010 namespace and the legacy namespace (the Exchange 2007 namespace). As part of this, we need to get a new SSL certificate.

Normally we buy our certificates from VeriSign as a standard rule of thumb however after looking at the costs today, I’m starting to wonder how VeriSign do so well in the SSL certificate business? I’m not going to go into exact specifics, but the overall cost for the certificate I was looking to purchase was £69,000 which is frankly unbelievable for a certificate to secure a messaging platform. The cost of the certificate is over double what we paid for a pair of HP DL380p servers fully loaded with 900GB SAS disk for local storage to host the DAG Mailbox roles. To make it worse than just the price on it’s own, that’s just for one year validity on the certificates too.

Out of curiosity and because they are starting to develop a bit of a name for themselves, I decided to compare the cost of this to GoDaddy. That very same certificate, offering me the same number of SAN names for the Exchange features with GoDaddy is a mere £165 a year.

How I wonder, when you compare £69,000 to £165, do VeriSign actually sell any certificates? Sure VeriSign offer more in the way of commercial compensation that GoDaddy ($1,500,000 for VeriSign and $160,000 for GoDaddy) but commercial compensation really only applies to transactional or commerce websites. When you are talking about a messaging platform, coupled with a two factor authentication system, the compensation loses it’s value quickly. GoDaddy offer a Malware inspection service for secured sites, something which VeriSign also offer. VeriSign have some value add propositions that GoDaddy don’t, I will grant them that. Features such as Norton Secured Seal and a Symantec Search Seal are on offer but both of those things are dependant on people having Norton software and browser plugins installed to show the seal. Installing browser plugins which really aren’t needed and adding a true sense of value is something which I don’t recommend and nor do Microsoft hence the popups that modern versions of Internet Explorer have asking you to disable addons.

With GoDaddy being so popular these days, their Trusted Root CA certificate is valid on a claimed 99.9% of devices therefore gone are the days of use the likes GoDaddy or Comodo SSL at your peril due to the possibility of getting certificate invalid warnings on the clients.

I haven’t taken a decision on the purchase just yet as it needs some consultation within the company, but one or two people I spoke to today agreed with me in so much as why shouldn’t we use GoDaddy and frankly, I’m not seeing a lot of reasons why currently?

Ballmer Leaving Speech Video

I saw the news last night that a video had leaked online of Steve Ballmer and got a chance to look at it today. Pretty emotional speech and quite restrained for Steve. I’ll be sad to see him leave Microsoft I think and he’s done so much for the company I love most. I hope that Microsoft can replace him with someone equally as energetic and enthusiastic about the company as he is. If you haven’t seen it, the  video on YouTube is below.


http://www.youtube.com/watch?v=38pWRi_LqV0