General

A catch all category for posts that are neither specific to a Microsoft technology which has its own dedicated category or posts that aren’t based on a Microsoft technology, as rare as those are.

Brent Ozar and the Free SQL Server Content

SQL Server is a great product however it’s not something I often talk or rave about. It’s the unsung hero of the majority of the software we use and a lot of the time, we don’t look after it properly and that’s assuming we deploy it properly in the first place. A colleague and friend of mine @LupoLoopy was at a SQLBits conference last week where Brent was speaking and it pipped my forgotten interest for SQL Server so I took to Brent’s site for some SQL inspiration.

It didn’t take long for me to find some great material. If you are in the SQL Server business then I’d really recommend some if not all of this material to you. I haven’t gotten through them all myself yet, but the eBooks I have no doubt are great insightful reads and the tools, sp_Blitz and sp_BlitzIndex will be so useful to you, you’ll probably wonder how you lived without them as I did when I first saw them.

Please don’t thank me for any of these tools and documents as they are all property of Brent Ozar Unlimited, his SQL Server practice but please do thank me for showing them to you if you haven’t already heard of Brent. If you haven’t heard of Brent then he is a SQL Server Master and a Microsoft MVP for SQL Server: a big deal basically.

SQL Server Tools

sp_Blitz is a free tool that gives your SQL server a full bill of health and tells you everything you want to know but didn’t know was wrong with it. My personal feeling is that this tool should be made mandatory to run against all SQL servers at periodic intervals to keep them in a sensible state of health.

sp_BlitzIndex is another tool but instead of checking out the health of your SQL Server, this checks the health of your database indexes so that you can get the most performance out of your databases.

SQL Server eBooks

SQL Server 2005, 2008, 2008 R2, 2012 and 2014 Setup Guide. This is a full on how to setup SQL Server by Brent book and probably number one on your reading list if you are ever installing SQL Server.

AlwaysOn Availabity Groups Setup Checklist isn’t a book as such but it’s a very helpful ticksheet you can use to make sure that when configuring SQL Server AlwaysOn Availability Groups that you haven’t missed a step and be left scratching your head wondering why it isn’t working as you had designed.

High Availability and Disaster Recovery Worksheet is the final example I like from Brent which helps you to decide which HA and DR technologies you should employ in your SQL Server designs. This is a really simple yet effective sheet to have with you if you design SQL Server deployments.

Moving Drives on an LSI MegaRAID Controller

As part of my home lab project which is still on-going (yes, I have been very quiet on this one of late), my plan has been to move my home server into a new chassis to match the other chassis I am using for the home lab. I use Storage Spaces on my home server but as I use an LSI MegaRAID card, I have all of my drives setup as individual RAID0 sets because the MegaRAID family of cards do not support JBOD.

My biggest worry with moving to the new chassis has been the storage and whether or not my RAID0 sets will come across and manage to keep all of my Storage Space data in tact as I have a lot of it and I’d obviously not like to lose it all. This worry is because of the changes in design. My current chassis uses a Reverse Breakout SATA cable to connect the drives, with an SFF-8087 SAS Multilane connection at the controller end and four conventional SATA connections at the drive enclosure end times four for the quad SAS channels on the controller card. The new chassis uses SFF-8087 to SFF-8087 SAS Multilane cables end-to-end and the backplane of the chassis handles the breakout to the individual drives. As a result, I can’t guarantee that all of the drives will be reconnected to the same channel and port on the controller during the move.

I got the chance this week to test this out as I had to add a new 3TB drive to the pool to add capacity. I added the drive to the server, configured a RAID0 for it but I set it up as a Simple NTFS partition disk and not a member of the Storage Space. I put some files on the disk and played around with different options moving the drive around. I pulled the new drive and re-inserted it in a different slot, now connected to a different channel and port but it came up with a foreign configuration on the drive, not exactly what I wanted.

I cleared the foreign configuration on the drive as importing these foreign configurations scares the hell out of me in the event that it overwrites the local configuration and blows away all of the drives including my RAID1 SSD pair for the operating system installation. After clearing the configuration, I created a new RAID0 set and added the drive to it however this time, I did not initialize the drive. After the virtual disk came online, instead of being uninitialized, it came up with the existing formatted partition and my existing test data, good but not perfect as I had to recreate the RAID0 set.

I was looking online for answers and nobody online seems to clearly answer the question how best to move disks around with an LSI MegaRAID controller, strange with these being some of the most dependable and popular cards on the market but I found my answer in the LSI documentation and a little under referenced feature called Drive Roaming.

Drive Roaming occurs when a disk is moved from one port or channel on the controller to another such as my case where I want to move to a new chassis and I am unsure whether all the drives will come back on the same ports and channels. Drive Roaming occurs at start-up when the controller starts up and reads the configuration in NVRAM on the controller and compares it to the configuration stored on each of the drives. This reading of the configuration allows a drive to be moved within the controller to another port or channel and remain configured as before but the emphasis here is on the at start-up.

When I first tested this, I moved the drive online so the drive did not roam, it was pulled and re-inserted. When I did a second test after reading the documentation, I moved the drive with the server shut down and indeed, the drive came back online with the same RAID0 set as configured before and all was working nicely. This is perfect because when I move between the chassis, I will be doing it with the server offline, shutdown and inert so I can now move all of my drives, safe in the knowledge that everything will be retained as was.

Because I know that nothing in IT goes as smoothly as planned however, my fallback option is to re-configure the RAID sets but select the No Initialization option for the drives. To this end, I have recorded the exact configuration of all of my RAID sets. I have recorded the RAID levels, Stripe Sizes, IO and Read Through settings. I have also recorded the current Port and Channel for each drive and the Model and Serial Number for each drive so that I can match the configuration back exactly as it is now. Consistency makes my life easier here. All my drives are 3TB, all Western Digital Caviar Red drives and all are in their own unique RAID0 set and all RAID0 sets are using the same Direct IO and Read Through setting so re-creating the sets is actually a cinch. The only exception is my operating system set which is configured as a RAID1 with two Intel 520 Series SSD drives and I’ve got the settings recorded for them too.

Last but not least, I’ve got my backups. My personal and important data is backed up to Microsoft Azure Backup using the integration with Windows Server 2012 R2 Essentials. To protect the operating system, I’ve got a Windows Backup created locally to a USB hard drive of the operating system partitions so that I can perform a bare metal recovery of the operating system if needed to the RAID1 SSD drives.

This post has been a bit of a waffle and a ramble but I hope that my learning of the LSI MegaRAID Drive Roaming feature helps somebody out there trying to investigate the same thing as me.

Blog Effectiveness Feedback

Web design and layout is an interesting beast with one man (or woman) and their view of aesthetically pleasing or effective layout and use of screen real estate being different from the next. With my blog, I’m generally happy with how it works but I like to operate my blog with an agile based approach, taking small iterative steps to continuous improvement.

When I normally make changes to the site, things I deem to be improvements, they are self-led ideas that I think would be good but not often do I really consider the effects on the viewers of the site but for this occasion, I’m going to flip that on it’s head.

I’m looking for anybody out there who reads my site for feedback. I’m not looking for feedback on the topic of the articles because frankly, that isn’t going to change unless my technology pattern at work changes, unlikely in the current circumstances, but I’m looking for feedback on the site itself.

  • How Do You Find the Layout?
  • Is the Navigation Useful?
  • Is the Content Clearly Legible in the Current Size and Font?
  • Does the Site Render Badly on Your Device of Choice?
  • Anything Else You Can Think of?

I normally have comments disabled on my blog for fear of the spammers but for this post, I’m going to leave them enabled although I may disable them again at a later date to prevent the spammers moving it to squat. If you’d prefer, you can send me a tweet to @richardjgreen or get in touch with me via one of the other contact methods outlined on the Contact page from the navigation at the top.

I’m really interested to hear what the community and people who actually use my site think of it and if there are ways you feel it could improve to make my content more accessible to you.

Microsoft Ordered to Release Dublin Server Data

An article went live on BBC News this morning (Microsoft ‘must release’ data held on Dublin server) which I hadn’t seen initially and was brought to my attention. The subject of the article is a US court case where a judge has ruled that Microsoft must hand over email records for a mailbox which is held on one of the servers in the Dublin, otherwise known to Microsoft Azure fans as the North Europe region.

Data sovereignty has always been an issue plaguing people considering a move to consume public cloud services and this case looks set to throw the whole debate up into the air once more.

The US government argue that they should be allowed to access the data in terms similar to those of a subpoena which grants them the right to request documents held in any country by the person subpoenaed however Microsoft contest against this and comments from the EU Commission agree with Microsoft. I’m in the camp of the Microsoft, the EU and the consumers among us all that if my data resides in outside of US jurisdiction that the US shouldn’t be able to just walk in and a take a copy. In all honesty, they probably already have a copy thanks to the NSA but unfortunately for them, that wouldn’t be admissible in court as evidence. Anybody else watch the Good Wife recently?

I really hope Microsoft battle this one through and that the EU member states back Microsoft in any appeals they make. The record and the law needs to be set the record straight with the US on the subject of data sovereignty. This is defiantly going to be a hot topic to watch out for.

Project Home Lab: Shopping List

Up until now, I’ve talked at length about the various factors dictating what I will be buying and why. In this post which is meant to be a high level overview of all the posts previous, I’m going to give you a shopping list of all of the components needed to make the build tick so that if you want to embark on your own project you can get a head start if you chose to go down the same route yourself.

This series will consist of the following posts. I will update the table of contents links in each post as I produce and publish the articles.

  1. Project Home Lab: Goals
  2. Project Home Lab: Existing Infrastructure
  3. Project Home Lab: Hardware Decisions
  4. Project Home Lab: Network Decisions
  5. Project Home Lab: Shopping List

Common Infrastructure

Storage Server

Disks for the server I’ve yet to purchase or confirm as these are pretty much a commodity item. I’ll update this post when I do select these but expect it to be a mixture of SSD and SATA disk.

With the SAS Multilane cables for connecting to the on-board SAS SFF-8087 ports, do make sure you get the cable with Sideband support, provided by an extra wire or two and an extra pin connection in the cable otherwise you won’t get the SGPIO disk failure and status indication through the disk backplane.

Hyper-V Server

Disks for the server I’ve yet to purchase or confirm as these are pretty much a commodity item. For the Hyper-V server, the disks need not be large or pretty as they will be used primary just for getting the host operating system online. A pair of SSDs in a RAID1 Mirror will be the most likely suspect.

With the SAS Multilane cables for connecting to the on-board SAS SFF-8087 ports, do make sure you get the cable with Sideband support, provided by an extra wire or two and an extra pin connection in the cable otherwise you won’t get the SGPIO disk failure and status indication through the disk backplane.

Next Up

With the shopping list crossed off and most of the hardware now ordered and some of it already in my hands, it’s time to get building. The next posts will show some of the builds, enjoy.

Project Home Lab: Network Decisions

So far in the series, I’ve talked about the goals and what hardware I want to use. In this post, I’m going to talk about how I plan to connect it all together and how I’m going to get it talking to the outside world via my existing production home network.

This series will consist of the following posts. I will update the table of contents links in each post as I produce and publish the articles.

  1. Project Home Lab: Goals
  2. Project Home Lab: Existing Infrastructure
  3. Project Home Lab: Hardware Decisions
  4. Project Home Lab: Network Decisions
  5. Project Home Lab: Shopping List

Hyper-V to Storage

I’ve got two new servers we know that much as planned so far. The data will be on one server, the processing power on another so I need a way to interconnect them. I also need to be conscious of ensuring that whatever I deploy for the interconnect can scale up with other areas if I elect to add another host later. Most importantly, I need to be sensitive to my existing network. Me hammering away with data transfers in the lab should not under any circumstances impact my home network as getting in trouble with the wife stopping her from being able to stream videos in Xbox Fitness or play the latest Facebook craze just isn’t worth it.

We know already that I am going to need three Ethernet ports, two gigabit and one 100Mbps for the two servers to operate the on-board network ports which I have said previously I will use for management and IPMI access. This leaves the most important aspect of getting data between the two. 100Mbps is gone, never to be seen again for anything other than out of band type connections so my options are 1GbE, 10GbE or Infiniband with RDMA.

As we know, this is a home project. Infiniband requires specialist knowledge, some of which I possess from work with Xsigo in a former role and whilst yes, 40Gb/s or more between the machines would be nice, the Infiniband host bus adapters (HBAs) are expensive and the Infiniband switches even more so. 10GbE is more common however as it is still pretty much at the pinnacle of Ethernet based networking with enterprises only really taking it by the horns today it too is also very expensive which leaves me with 1GbE.

Gigabit Ethernet has been around the block a few times, parts are common and reasonably affordable. Gigabit Ethernet can be run over standard Cat 5e or as I have, Cat 6 cable so I’m reusing my existing investment in cabling and tooling for producing cables. Gigabit Ethernet also means I’m working with a single connectivity medium throughout making the identification of faults and troubleshooting simpler.

I want to get good performance out this lab so after some discussion with @LupoLoopy, we came to the decision that I should use SMB Multi-Channel, the new feature in Windows Server 2012 R2. With four ports of Gigabit Ethernet I will get decent performance at a low price and it’s easy enough to add another card to the server to open up more ports if I need later. A quad port Intel PCI Express adapter comes in at between £50 and £100 on eBay used. I got both the cards for the Hyper-V server and the storage server for £50 so make sure to keep your eye on the available items for a bargain.

I will run my Hyper-V virtual networking over these ports also and using Storage QoS in Hyper-V I can ensure that I get the right amount of storage throughput at all times.

Switching

With it now decided I’m going to use four ports of Gigabit Ethernet for my SMB Multi-Channel storage traffic and three ports for management and IPMI, I need to provision seven Ethernet ports per server. With two servers right now, that’s 14 ports and if I allow an additional seven ports for a possible future expansion, that’s 21 ports, nearly a 24 port switch full.

My current core switch, a 24 port TP-Link TL-SG3424 has about 12 ports free right now so not enough for this project. Going back to my previous statements, I want to keep any of this traffic from harming my home network performance, therefore put two and two together and you can see I’ll need a new switch for this. I don’t want to have to replace my core switch as it works perfectly well, performs well, silent and so forth. As I want to completely isolate this lab, I’m going instead to add a second switch to my network for the lab and I will trunk the lab up to the core for internet access. With this leaf switch design for the network, the only traffic that needs to leave or enter the core switch to and from the lab is external access from myself or Internet access requests, containing the storage traffic and protecting my home interests.

I looked at all the options and came to the swift conclusion that I was going to be best placed to get another TP-Link TL-SG3424, the same as I have already for the leaf switch. 24 Gigabit Ethernet ports suit all my needs, I know it performs well, leaves me with enough ports free for an additional host in the future plus a few ports for uplinks into the core.

I wrote a review of the TP-Link TL-SG3210 I use as my access switch which has equal features and interfaces to the TL-SG3424 just it has 8 instead of 24 ports.

Access

Access into the lab will primarily be over Remote Desktop Protocol from the home network. To do this, I’m going to be accessing the lab across uplink ports that I will configure between the core and the lab switch. The lab will be in a separate VLAN to protect the home network from any broadcasts or such like going on in the lab. As my TP-Link switches are Layer 2, the Cisco ASA will be acting as my Layer 3 router between the home network and the lab which will allow me to place IP restrictions on who can traverse from the home network into the lab.

Costs

The cost for the new TP-Link switch is about £120. I’ve already got all the tools and cable I need to wire up the networking so there is no new costs there making this arguably, the cheapest part of the project. Time is actually going to be the biggest cost factor with the networking because of the time it’s going to take me to configure all of the new VLANs for the management, VM traffic and SMB Multi-Channel traffic, the sour side of using TP-Link over Cisco and not being able to use VLAN Trunking Protocol (VTP), a feature on Cisco which I love dearly.

Thankfully, VLAN configuration is a one time thing though, so although I’ll lose a couple of hours to all the network configuration initially, the cost of buying the switches and the low power consumption of the passive cooled TP-Link devices is worth it long term.

Next up, I will do a summary post in the form of a shopping list to get down everything I’m going to be using for the project and then I’ll be heading into build.

Project Home Lab: Hardware Decisions

In part one and two of this series, I talked about what I want to achieve and what I have in place already. From now on in, it’s all about the new stuff I want.

This series will consist of the following posts. I will update the table of contents links in each post as I produce and publish the articles.

  1. Project Home Lab: Goals
  2. Project Home Lab: Existing Infrastructure
  3. Project Home Lab: Hardware Decisions
  4. Project Home Lab: Network Decisions
  5. Project Home Lab: Shopping List

One Server vs. Multiple Servers

Early on, I had thought about building a single server with storage and hypervisor in bed together but I quickly came to the conclusion that this would hinder me in the long-run. Yes, I would get the fastest possible access to the disk storage for the VMs with an all-in-one but it would leave me with nowhere to go as scaling up would be limited by the specification of the internal hardware in that single server and scaling out would have big costs associated as I would need to buy the networking and Hyper-V servers to break it out.

I also decided that this wouldn’t give me a playground which could simulate much for a customer environment as how many business do you know that run everything on a single host?

To this end, I decided that one server to act as a storage server and another for my hypervisor was the solution. This means that over time if the need arises, I can add additional Hyper-V hypervisor servers to scale out my compute capacity and form a multi node cluster. There may be upgrades required to the storage server to increase the capacity or IOPS but those costs would be minimal and typical business and usual storage growth costs.

Rack Mount vs. Standalone

For most people considering rack mount verses standalone, the choice would be based on whether or not their wife or partner will allow them to get away with having a server rack in the house somewhere. As I have already overcome that obstacle years ago, it makes that easier. Standalone has it’s advantages because the machines can be put into the corner of a room or garage with ease, however standalone servers tend not to have the performance or scalability that I am looking for and want in a virtualization platform which demands big memory to name but one facet. Standalone servers tend not to be so readily available as parts of used systems on eBay for purchase either which makes it harder.

Server Rack Cabinet

Based on my points above regarding a rack, I stayed focused on rack mount however my problem lay in my current rack build. The cabinet I have currently stands roughly 22U tall however only has usable space for 12U of equipment as I built it originally with the design of the remainder of the space being storage compartments which I actually no longer use. With the rack currently being wooden, it’s very primitive and provides me only with front and rear access however due to it’s place in the corner of the garage, I only actually have front access.

Because of this, I am looking to need a new server rack to house everything. This rack will be a multi-tenant rack housing both my production home network and the lab environment and I need to make sure that I buy a rack which will fit my existing space and will give me some additional rack space for expansion should I need it in the future such as additional Hyper-V servers or storage enclosures

A UK based vendor called X-Case have recently started selling server racks and at £214 for a new 22U rack, which is perfect for me. It fits my space perfectly, it’s on castors so I can move it around, has removable side panels with doors from and rear. I’ve bought from X-Case before when I built my home server which lives in one of their 4U cases right now and their products are great and really affordably priced compared to the big name brands.

The 22U cabinet gives me plenty of space to house my current 9U of devices and 13U for new purchases and I don’t plan on taking my lab that big (just yet).

Off the Shelf vs. Custom

I try where possible to buy desktops and laptops from dedicated builders like Dell, Lenovo or the likes. Firstly because they can build it better than I can and gone are the days where it is cheaper to build your own. For servers at home, I have a slightly different view however. On eBay, you will find a myriad of used servers up for sale from the likes of Dell PowerEdge and HP Proliant. Sifting through them to find a good example which fits all the requirements can be a challenge. The problem I have with all of these is that none of them are energy conscious because servers are designed for the datacenter and not the home. It is to this end that I decided to build my own.

Building my own gives me the flexibility to select certain parts bespoke and new and others used and reputably branded whilst keeping an eye on the power meter.

Rack Mount Cases

For rack mount cases, I wanted to buy new. The first reason is that pressed metal tins are generally quite affordable and secondly, because I wanted to buy something that was going to perfectly fit my bill. I didn’t want 1U because that limits me with power supply, expansion card and CPU cooler options. 1U also means that you aren’t going to be fitting in many disks which would impact my disk I/O performance options. Lastly, 1U chassis need cooling fans and 1U fans are small which means they need to rotate fast to push the same cubic feet per minute (CFM) of air. Fast means noisy and all of these factors immediately rules out 1U.

2U is a good height. 2U means I’m not limited by the power supply as almost all server supplies are 2U compatible and most expansion cards are available in a half-height form factor suitable for installation into 2U.  Fans in a 2U chassis are larger which means slower spinning and quieter and I also have more height to work with for CPU coolers. 2U gives me enough room to work with, with my components but isn’t wasteful of space either. 2U does have a limitation however and that is physical space on the front of the enclosure for disks so whilst 2U is a good fit for my Hyper-V hypervisor servers, it doesn’t perfectly fit for the storage.

3U and 4U are ideal sizes for storage. You get all the benefits of 2U as above but more front surface area to jam in disk slots. I looked at what is out there and I decided early on that by using a combination of SSD and SATA disk for storage, I wouldn’t be needing that many disks for a single user environment and the gains in 4U over 3U wasn’t really worth it so I focused my attention on 3U. 4U also has the problem for me that with the number of disks it can support, you typically can’t find this number of SAS channels on a single controller so I would need multiple SAS controllers and if you could find one with enough ports, it would likely be upwards of £1,000 just for the card.

As I haven’t decided on my motherboard or CPU options at this point, but I know that I want this build to be flexible, I need to ensure whatever I buy can support ATX and Extended ATX motherboards so that I’m free to make the right decision.

Accessibility for me is important. I want whatever case I opt for to support sliding rails so that I can draw out a server if it has a fault to replace parts. I also want the disks in any of the servers to be hot-swappable so that I can see a faulting disk and replace it without having to open up the chassis and start messing around with drive screws and cables. As I plan on using a mixture of SSD and SATA disk, I need it to support 3.5″ and 2.5″ disks. I’m not interested in dual redundant power supplies in my build as that adds power demand and cost. If I lose a power supply, I can take the hit of having the lab offline for a few days for a replacement.

As I’ve expressed earlier, I like X-Case. They are a UK firm so I feel like I’m doing my bit for the UK economy and their products are good. For my 2U Hyper-V servers, I have decided on the X-Case RM 208 Pro (http://www.xcase.co.uk/rackmount-cases/2u-rackmount-server-cases/x-case-rm-208-pro-8-hotswap-caddy-with-6gb-sata-sas-backplane-temperature-controlled-fans.html).

The RM 208 Pro is a 2U rack mount enclosure. It’s £194 for the case and £27 for the sliding rail kit for it. It supports 2U power supplies, Extended ATX motherboards, has 8 hot-swappable disk caddies on the front taking 3.5″ disks and the disks are connected via two SAS 6Gbps SFF-8087 Multilane connectors, common on RAID and HBA cards. The SAS backplane supports SGPIO which means I will get disk failure and early warning notification lights on the enclosure if my RAID or HBA cards support it. The internal fans are hot-swappable and are temperature controlled for speed via the motherboard pin headers.

For the storage server, I decided on the X-Case RM 316 Pro (http://www.xcase.co.uk/rackmount-cases/3u-rackmount-server-cases/x-case-rm-316-pro-16-x-6gb-hotswap-caddy-mini-sas-backplane-120mm-temperature-controlled-fans.html). This enclosure looks and feels the same as the RM 208 Pro except at 3U, it has support for 16 3.5″ disks spread over four SAS 6Gbps SFF-8087 Multilane connectors. Everything else about this enclosure matches the RM 208 Pro that I will use for the Hyper-V server. The RM 316 Pro is more expensive at £370 for the chassis and another £33 for the sliding rails but the extra 8 disk slots will not limit me there.

Power Supply

For these servers, I want something fairly cheap but yet reliable and from a known brand as power is what makes the whole thing tick after all. X-Case resell Seasonic power supplies and after much research into them, transpires that they are actually the OEM manufacturer for a number of high-street brand power supplies, including the Corsair Builder Series supply in my current home server which has been running for over two years without a hiccup. The Seasonic SS-600 H2U 600 Watt power supply (http://www.xcase.co.uk/power-supply/2u-rackmount-power-supply-s/saesonic-ss-600h2u-2u-80-psu.html#sthash.WMRWR8NM.dpbs) is 80 Plus efficient and seems like the ticket. At only £100 it’s a good price too considering the price of some ATX power supplies these days. I’ll be using this unit in both the storage and Hyper-V servers.

Processor

In this decision process, processor comes before motherboard as after all, the motherboard is just a life support system for the processor. I knew I wanted a server processor, not a desktop processor. I knew I needed a processor which supported Intel Virtualization Technology (Intel-VT) or AMD-V so that cut down the options to pick from as not all CPUs, even new models released today have Intel-VT or AMD-V. I knew I also wanted a CPU with low TDP to keep power consumption down and heat BTU output down to reduce the cooling requirements and noise of the fans.

Server processors are highly expensive new so I also knew that this was going to be a used part. Intel processors are generally more readily available in used form but I didn’t want to omit AMD from the race as their Opteron processors have really high core counts which is a great thing for a virtualization host. I also wanted to make sure that I used at least the same family of CPU between the storage and hypervisor servers so that I was using consistent parts to keep the builds consistent and simple for me to support.

After weighing up all of the options back and forth, I settled on the Intel Xeon L5630 processor (http://ark.intel.com/products/47927/Intel-Xeon-Processor-L5630-12M-Cache-2_13-GHz-5_86-GTs-Intel-QPI) and got them for £25 per processor on eBay. The L5630 is a quad core CPU with a TDP of 40W which is really low for a server processor. The CPU launched in 2010 which means it’s not that old even if the units I have were first off the line. The L5630 has a clock speed of 2.13GHz and has 12MB of L3 cache. With quad core and Hyper-Threading, the hosts will see eight cores available and with Turbo Boost support, the CPU can boost up to 2.4GHz. As I said previously, Intel Hyper-Threading and Turbo Boost are supported as is Intel VT-x, Intel VT-d, SpeedStep and the latest AES encryption instructions which makes this CPU very feature rich for it’s age.

Memory support is tri-channel DDR3 up to 288GB per processor and it can be used in a dual processor mode thanks to it’s dual Quick-Path Interconnect (QPI). DDR3 support is useful because higher capacity DIMMs such as 8GB or 16GB are rare in DDR2 and DDR2 is becoming harder and more expensive to buy as stocks dwindle while DDR3 is readily available in sorts of shapes, sizes and flavours on eBay.

Motherboard

With my processor decided upon, I now needed to select a motherboard to suit. The Intel Xeon L5630 uses the Socket 1366 motherboard socket running the Intel 5500 series Tylersburg chipset. My first port of call was Supermicro as they make amazing products and they frequently OEM their parts to other vendors which shows a lot of faith in them. This, coupled with the fact that their parts range is wider than the Grand Canyon meant I was sure to find what I wanted.

The requirements for the motherboard, in line with my goals meant that I wanted something which gives me plenty of options for future expansion. I also want accessibility which means I don’t want to be running to the server with a keyboard and monitor in hand to troubleshoot a boot issue so iLO, DRAC or IPMI are very important for me. The more feature rich the motherboard also means the less I potentially need to spend on expansion cards so that was also a factor.

Selecting the motherboard took the longest amount of time due to the options available but eventually I selected the Supermicro X8DTH-6F motherboard. I was able to find this for £250 including shipping and import taxes, new from a seller in the USA on eBay.

The X8DTH-6F (http://www.supermicro.com/products/motherboard/QPI/5500/X8DTH-6F.cfm) has everything. It’s a dual socket Extended ATX motherboard taking the Intel 5500 and 5600 series processors, good for my L5630 Xeon. It can be run in uniprocessor mode and a second added later which meets my expansion plans allowing me to add a second CPU for the Hyper-V server to add processing power at a later stage. Six DDR3 DIMM slots per processor gives me a total of 12 DIMM slots with six usable now supporting 1333MHz DDR3 in either conventional desktop UDIMM format, all the way up to ECC Registered and Buffered. With the second CPU added later, this opens up the additional six DIMMs for use also.

On-board dual port gigabit Intel Ethernet and a dedicated IPMI port supporting remote media and KVM ticks another box. Being Extended ATX, the board has seven PCI Express slots giving me lots of options for expansion cards and the on-board Intel ICH10R and LSI SAS 2008 6Gbps SAS controllers handle all of my drive quandaries too, at least for the medium term.

£250 for the motherboard may seem a bit steep however I consider these factors. Having the two on-board gigabit Ethernet ports saves me about £40 buying a used dual port Intel PCI Express network adapter from eBay to service the management traffic. The on-board LSI SAS controller saves me around £100 buying a used LSI SAS host bus adapter card. Having both of these on-board means two less PCI Express cards installed, theoretically improving the airflow in the case and likely reducing power consumption too. IMPI can be added to any machine with a PCI Express slot, however whether the add-in cards available online are as integrated and feature rich as dedicated on-board is questionable and the cards I have seen online run for about £500 each making the motherboard look positively cheap.

Memory

I want as much memory as possible in my Hyper-V servers. For the storage server I want a sensible amount but not to the extent of the Hyper-V servers. The more memory I have, the more I can give my virtual machines to help give them that production feel.

DDR3 support on the CPU and motherboard means I’m up to date with the current specification although not for memory speed I should point out. I wanted to buy from the Supermicro validated memory support list and I wanted ECC Registered Buffered DIMMs as that’s what you use in servers for the error correction capabilities of these DIMMs. Also, because the motherboard only supports 16GB memory per processor if you use UDIMM desktop type memory this means I really wanted to use ECC Registered DIMMs. I need to make sure I do everything possible to squeeze the maximum performance out of this lab and that means using memory in accordance with the tri-channel native operation mode of the CPU.

For the storage server, I decided on 12GB RAM by way of three 4GB DIMMs. For the Hyper-V server, I decided on 48GB as six 8GB DIMMs for the uniprocessor setup and if I add a second processor later, I can add an additional 48GB.

16GB DIMMs are available but they are just way too expensive right now for me to consider. I managed to get the 4GB DIMMs for about £20 each and the 8gB DIMMs for £35 each. All of the DIMMs are Samsung low voltage DIMMs running at 1333 MHz. To translate, this means I am using PC3L-10600R designation DIMMs. These DIMMs will automatically down rank to the highest speed supported on the motherboard and under-running the memory will help to keep the temperature of the DIMMs during operation down.

With a second processor installed later, this would give me 96GB of RAM in my Hyper-V host if I stay with 8GB DIMMs and if I later upgrade to 16GB DIMMs should their prices become sensible, I could have to 192GB of memory.

Ancillaries

As always with a PC build, you need some odds and sods to finish it off.

The CPU needs a cooler so I opted for the Supermicro SNK-P0037P passive cooler. The cooler is recommended for the motherboard and made by the motherboard manufacturer Supermicro. The cooler is rated for processors up to 90W TDP which means they will more than easily handle my 40W L series CPU and no fan on the CPU will help to keep downs the power consumption and noise as one less moving part to power.

To connect the SAS Multilane connections on the motherboard to the enclosure backplane, I need some SFF-8087 cables. For the Hyper-V server, I will be installing only a pair of SSDs to run the host Windows Server 2012 R2 operating system. To protect against a SAS channel or cable failure, I will be installing both SFF-8087 multilane cables with a single SSD per channel.

For the storage server, I am going to install both channel cables allowing me to run 8 disks. I will operate like this initially and once I need more than 8 disks to increase the performance, I will buy an 8 Port LSI PCI Express SAS HBA to run the other two channels, buying two more cables. Genuine LSI SFF-8087 to SFF-8087 cables with Sideband support for the SGPIO disk information pass-through are £10 each, new on eBay.

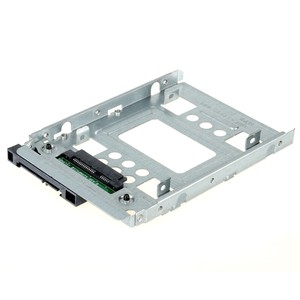
The enclosures have 3.5″ drive bays to allow me to use big capacity SATA disk but as I will be using a combination of SSD and SATA, I need a way to mount the 2.5″ SSD disks. For about £10 each on eBay, you can pick up the HP 654540-001. This is a 2.5″ to 3.5″ disk carrier specifically designed for hot swap enclosures. You mount the disk into the carrier and it translates the power and data port positions to match that of a 3.5″ disk. It uses no intermediary disk controller so the disk will be seen exactly for what it is by the controller and the operating system and there is no performance penalty either.

Project Home Lab: Existing Infrastructure

In this second post in my Project Home Lab series, I’m going to cover fairly loosely what I’ve got in my environment at home already as I need to take this into account to determine whether I can keep it all or whether I need to make more fundamental changes to my environment also.

This series will consist of the following posts. I will update the table of contents with the new page links in each post as I produce and publish the articles.

  1. Project Home Lab: Goals
  2. Project Home Lab: Existing Infrastructure
  3. Project Home Lab: Hardware Decisions
  4. Project Home Lab: Network Decisions
  5. Project Home Lab: Shopping List

Racking

I’m fortunate that my wife lets me have a server rack in the garage which is what allows me to even chase the Project Home Lab ambition. Currently, this is a 12U rack I built myself with wooden panels and some 12U AV posts I got from eBay. It’s served me well although it has it’s nuances.

  • Non-removable side panels make access tricky
  • No wheels or castors making rear access non-existent as the rack is backed into a corner
  • No cooling aids such as top vents or air ducting

The rack is probably going to have to go for three reasons. Firstly because there isn’t going to be enough U space in the rack for me to add the new hardware I am going to be looking at and secondly because I need there to be more access into the rack so that when I need to add cabling or investigate faults, I need to be able to get in there and check it all without more time being spent on gaining access then doing the task in hand. The third reason is weight. All of the new equipment such as new rack chassis and the like will add weight and I don’t think the wooden panels right now will support all the extra.

Power

Currently, my rack gets its power from an APC 750VA 1U RM UPS. I’ve had it for about six years and it’s been faultless. I currently operate at about 20% load which gives me a runtime of around 25 to 30 minutes on battery. With the addition of new equipment, I think that I can probably get away with keeping the UPS load within capacity limits but this is going to severely hamper my battery runtime and I’d like to keep a minimum of 15 minutes battery to protect against short-term power outages so the UPS may need to be replaced.

A secondary issue with the UPS is connectivity. This model of UPS has four outlet IEC C13 ports as do most small form factor UPS units. I’m going to need to invest in a power distribution unit (PDU) or two to add extra power outlets for the new devices. The reason for two and not just a single PDU is that I want to spread the power load over the physical ports on the UPS so that I’m not driving all the power through a single outlet on the UPS and potentially burn it out.

Network

My network core lives in the rack right now and this is where it will stay. I currently have a Cisco ASA 5520 firewall and a TP-Link TL-SG3424 gigabit 24 port switch. Both of these will certainly be kept as is.

The ASA is amazing. It’s running just shy of the latest Cisco IOS release with fully upgraded 2GB RAM and it’s handling the Layer 3 inter-VLAN routing of my home VLANs right now and also acting as my edge router receiving my 120Mbps Virgin Media cable connection and it barely cracks 5% CPU usage and 512MB memory usage. I’ve got no questions whether this can handle the new device traffic but when you look at the specification of the Cisco ASA 5520 is it any wonder?

The TP-Link switch is a Layer 2 managed switch with 24 gigabit ports. I’m using 2 of the ports in a LAG up to my access switch in my home office, another two ports in a LAG to the ASA and a third pair of ports in a LAG to my home server. The remaining ports connect to devices in the main area of the house. For £125, this is a great switch. It supports all of the enterprise features you would expect from a named brand Layer 2 managed switch like Cisco, HP or Dell but at a fraction of the cost. Reliability and performance has never been an issue and I don’t foresee it being one. Lastly, it’s silent as it is passively cooled keeping the volume and BTU output of the rack down.

I have two issues with the current switch however relating to the new lab. One is port count and the other is performance impact. With the current port occupation on the switch, it is highly unlikely that I will be able to get everything connected to it so I will be likely adding a leaf switch for connecting the lab devices and then an uplink or two into the core from the leaf. The second reason is that I like how my home network performs right now. If I was to start throwing Hyper-V over SMB 3.0 File Server traffic across it all day long, I’m not sure how my home production network would suffer. This adds credence to adding the leaf switch. With the leaf switch, the only traffic that need to leave the confines of the lab back into the core are packets destined for the internet or administrative connections from me into the lab via Remote Desktop Services or management consoles.

Cabling

All of my cabling at home is shielded category 6 cable wired into a category 6 patch panel with homemade patch leads from the panel into the switch. I test all of my cabling with a Fluke tester to validate them to make sure I’m going to great good clean transmissions over the wire. I try to use wired in the house where ever possible as I like having that constant, reliable gigabit speed compared with the relative slowness of 300Mbps N specification wireless and potential disruptors such as DECT cordless phones, Bluetooth and microwaves.

I’m going to be continuing to use this cabling in the new lab. I won’t be using fibre or InfiniBand due to the complexity and cost. Sticking to category 6 copper cabling keeps my cable media uniform across the all my devices.

Server

I’ve got one server right now which is running Windows Server 2012 R2 Essentials. This acts as the core to everything in the house offering Directory Services, DHCP, DNS not to mention being a backup target and a media streaming server. It’s currently housed in an RM 400/10 4U rack enclosure from X-Case. I upgraded the case about two years ago with hot swap drive caddies to allow me to add and remove drives to my Storage Spaces Storage Pool easily. Inside the case is an ASUS ATX desktop motherboard with an Intel Core i5 3470T low power processor and 12GB DDR3 RAM.

Although I’m really happy with the performance of this server right now, I am a sucker for consistency and the aesthetics of things. If I can get parts at the right prices, I may well give my home server a little upgrade so that the parts inside match those of the new servers. For me this is a silly thing to cure a minor case of OCD I have but in real terms, it means if I have any suspect failed parts, I can swap and move them between servers to test as needed.

What’s Next

To be honest with you from the start, I’m actually writing some of these articles after the fact: I started this project over a month ago and I already have quite a few of the hardware parts ready for use. In the next post, I will explain my thought processes for selecting the hardware I have bought already and what I still need to purchase and why I will be purchasing those parts.

I’ll do a summary of all of the prices too for budding lab builders among you to use as a reference.

Project Home Lab: Goals

Since I’ve started working in consultancy, I have the constant need to challenge myself and spend more time working with the technologies that I promote. The only way to do this is learn and practice and the only way to learn and practice is to have equipment to do that on. I have embarked on a project to build myself a home lab and in this Project Home Lab series of blog posts, I’ll go through all that I am doing to produce my home lab.

This series will consist of the following posts. I will update the table of contents with the new page links in each post as I produce and publish the articles.

  1. Project Home Lab: Goals
  2. Project Home Lab: Existing Infrastructure
  3. Project Home Lab: Hardware Decisions
  4. Project Home Lab: Network Decisions
  5. Project Home Lab: Shopping List

Project Goals

In this first post, I will explain the goals of my home lab and what I want to be able to achieve with it.

The goal of the project is to allow me to work in an environment where I can break and fix, play, learn and explore the products I work with as a consultant, System Center primarily.

I need the project to provide me with a hardware platform which is well performing, not to the degree that an enterprise customer would expect it to be but enough to not make me want to hurt myself every time I do something in the lab due to a severe lack of performance. Functionally performing to summarise. I need the hardware I use to be cheap but suitable for the task, cost effective in other words. I also need it to be energy efficient where possible as I don’t want to be paying the earth to run this environment. Coupled to the energy efficient statement, I need it to not sound like a datacenter in my garage where I keep my kit so there may be a need for some post-work to add some sound deadening to the garage if things get too loud as noise output can’t be completely eradicated unless I spend a fortune on water cooling for it all.

Although my plans for the environment are small right now, I don’t want to be hamstrung in the future, stuck at the end of a garden path without options to either scale up or scale out the project. Virtualization is a given in this project and being that I work with the Microsoft technology stack, this is obviously going to be centred around Hyper-V. The primary goal is to run System Center in it’s entirety which will include some SQL Servers for databases. If I decide in three months time to add the Windows Azure Pack or in six months that adding Exchange or another enterprise application to the mix will help me understand the challenges that customers I work for have then I want to be able to deploy that without having to re-invent the wheel to do so but minor upgrades are to be expected: memory uplifts or more disks for increased IOPS perhaps.

Project Budget

To be honest, there is no real budget limit for this. I’m going to spend what is appropriate to make it work but the sky is not the limit. I’ve got a wife and three kids to feed so I need to make it all happen as cost effectively as possible which will likely mean the cost is spread with purchasing parts over a number of months.

Mixing TP-Link Switches and Cisco SFP Modules

Sometime ago, I posted reviews of my use of two TP-Link switches to operate my home network. To recap briefly, I use a TP-Link TL-SG3424 as my core switch and a TP-Link TL-SG3210 as my access switch. Both switches are Gigabit Ethernet across every port which I love. The pair of switches cost me under £200 new for the pair.

Recently I’ve deployed some extra devices into my home office leaving the TL-SG3210 a little short a free ports (a la none) so I was interested in moving my two LAG trunk ports onto the SFP Mini-GBIC modules to free up two ports. Taking a look at the TP-Link Media Converters and Modules page at http://uk.tp-link.com/products/?categoryid=225 reveals that they do produce fibre modules but nothing for Ethernet which had me a little worried about the future of my eight port home office switch.

Determined not to be beaten, and not wanting to fork out to lay fibre through my house or buy a new, larger switch, I decided to take a punt on buying two used but functional Cisco GLC-T= SFP modules. These are 1000BaseT Gigabit Ethernet modules taking copper connectivity as opposed to fibre (or fiber depending on your preference). With Mini-GBIC SFP being an industry standard, I figured it must work right?

The good news folks is that it does work. The Cisco modules work just great and I’ve got four of the modules now. I am using a pair of them at either end of my LAG for consistency to I’m connecting SFP to SFP and I’ve had no issues with them at all.