Azure

All posts relating to Microsoft Azure services including information about new services and features as well as deep dives on configuring and using the services.

Save with BYOL and Azure Hybrid Benefit

In my post from earlier today, I talked about the benefits of using Azure Instance Reservations to save money on the compute of IaaS virtual machines. When we think about the components that make up an IaaS VM, we have a few: the VM instance and configuration, the storage, and the software that runs on it. For most people, the software at the most basic level will be either Microsoft Windows or Linux and likely some application software layered on top such as SQL Server.

When we are talking about Microsoft Windows there is a license associated with running the operating system and when you commit to running a Microsoft Azure IaaS VM running Microsoft Windows, the cost of that virtual machine includes that license. If you are an enterprise client of Microsoft’s with an Enterprise Agreement you will likely already have entitlement some Windows Server licenses through that agreement. If you already have licenses that you are paying for, why would you want to pay for them again in Azure? The obvious answer is that you wouldn’t unless your intentions are to do away with the Enterprise Agreement and license everything through retail channels.

Microsoft Azure offers a lesser known option called Azure Hybrid Benefit which is often referred to as Hybrid Usage Benefit (HUB for short). HUB allows you to apply your Enterprise Agreement licenses to your IaaS VMs deployed in Azure. What this means in cost terms is that the price of the Azure IaaS VM ceases to include the Windows Server license element and you are paying purely for the compute. The benefits of HUB are not limited to Windows Server either. You can also use the HUB option with SQL Server IaaS VMs deployed to Azure which means you no longer pay the list price in Azure for either the Windows Server or the SQL Server application license.

Read more…

Saving with Azure Reserved Instances

The cloud is everywhere we look in IT now: more, and more organisations are adopting cloud services of one flavour or another. One of the benefits of cloud is that the costs can come out of operational expenditure in nice little monthly packages instead of giant wedges of capital expenditure. While cloud also offers us the commodity of scale providing services faster, better protected, and more reliable than we can often build ourselves on-premises for equivalent cost but that doesn’t mean we need to pay the recommended retail price.

In this article, I’m going to cover a little-known feature in Microsoft Azure called Reserved Instances (RIs). Previously called Compute Pre-Purchase, this feature is available to anybody using a Pay As You Go (PAYG) subscription or an Enterprise Agreement Subscription. If you are using any other type of subscription such as one bundled as part of an offer then you will not be able to participate. Reserved Instances are only available for Infrastructure-as-a-Service (IaaS) virtual machines. They cannot be used for any other types of service.

Read more…

Azure Route-based VPN with a Cisco ASA 5505

I haven’t posted here for a while and I have a bit of a success story that I thought I would share and hopefully help somebody else encountering the same issues.

Over the last few weeks, I have been working with a customer: the customer has a Cisco ASA 5505 firewall in a co-lo datacentre operated by a third-party whose name is something like (big metal thing that vertically stores servers)(the place where Jean-Luc Picard travels around). The customer has started to consume some Azure IaaS VMs and wanted to be able to establish a VPN to the co-lo to enable them to hop from one location to the other; a VPN connection from Azure was already in place to the office site which means we needed to use a multi-site VPN to Azure.

With the VPN to the office already working, we knew that the VPN Gateway and Virtual Network in Azure were sound. A multi-site Azure VPN requires a Route-based connection, not the basic Policy-based connection. We got the VPN Gateway all set up for Route-based connections and confirmed that was still working; no dramas. After doing this, we started speaking to the co-lo. The first response from the co-lo was that the ASA 5505 didn’t support a Route-based VPN which put us in dangerous territory. Reading the Azure documentation, there are a few articles that seem to contradict and conflict and having the right documents to hand helped enormously.

The first article you will probably encounter is the generic supported devices list for Azure VPN with caveats around Policy-based only or only supported Route-based in specific circumstances which are at https://docs.microsoft.com/en-us/azure/vpn-gateway/vpn-gateway-about-vpn-devices. This article used to state that the ASA 5505 did not support Route-based connections but it no longer does state this. If your vendor is telling you otherwise, direct them to the article in the first instance. For the ASA 5505, we need to ensure that it is running ASA OS 8.4 or above; this added supported to IKEv2 which is a requirement for Route-based connections to Azure.

With the first hump over, we initially struggled to get the connection up and running which is where the next articles come in. Firstly, direct the vendor to https://docs.microsoft.com/en-us/azure/vpn-gateway/vpn-gateway-3rdparty-device-config-cisco-asa. This article is a specific example of the ASA 5505 using IKEv2 without BGP for a Route-based VPN. Once the vendor was on-board, we started to make progress, however, there are changes you will need to make in Azure too! Firstly, the implementation of a Route-based VPN with an ASA 5505 requires the use of Traffic Policy Selectors. When configured, this requires you to define a custom IPSec Policy in Azure for the connection and then apply the policy and the Use Traffic Policy Selectors option to the connection. The second part is that both these features require a Standard VPN Gateway and will not work with a Basic VPN Gateway. For this configuration, follow the guidance of https://docs.microsoft.com/en-us/azure/vpn-gateway/vpn-gateway-ipsecikepolicy-rm-powershell#workflow.

By the end of this, hopefully, you have a working VPN connection to an ASA 5505 using a multi-site Route-based Azure VPN, however, if you do not, here are a few things to check:

  1. Verify the pre-shared key at both ends of the connection matches
  2. Verify that the custom IPSec Policy in Azure matches that on the firewall
  3. Verify that the correct Traffic Policy Selectors are applied on the firewall
  4. Verify that the Azure Virtual Network and Azure VPN Connections have the correct address ranges configured

Any of the above will cause the connection to fail. If the connection still refuses to establish, you can enable the Azure Network Watcher feature and enable diagnostics for the VPN Connection. The diagnostic logging will generate a .zip file which contains two files of interest: ConnectionStats.txt and IKEError.txt. Below are the outputs for both files from my real-world scenario. As you will observe, IKEErrors.txt reported a generic authentication failed error and suggests checking the pre-shared key, crypto algorithms and the SA lifetimes, however, the ConnectionStats.txt file shows a more specific “Packets Dropped due to Traffic Selector Mismatch” error.


Error: Authenticated failed. Check keys and auth type offers. 
	 based on log : Peer sent AUTHENTICATION_FAILED notify
Error: Authentication failed. Check shared key. Check crypto. Check lifetimes. 
	 based on log : Peer failed with Windows error 13801(ERROR_IPSEC_IKE_AUTH_FAIL)


Connectivity State : Connecting
Remote Tunnel Endpoint : 1.2.3.4
Ingress Bytes (since last connected) : 0 B
Egress Bytes (since last connected) : 0 B
Ingress Packets (since last connected) : 0 Packets
Egress Packets (since last connected) : 0 Packets
Ingress Packets Dropped due to Traffic Selector Mismatch (since last connected) : 0 Packets
Egress Packets Dropped due to Traffic Selector Mismatch (since last connected) : 0 Packets
Bandwidth : 0 b/s
Peak Bandwidth : 0 b/s
Connected Since : 1/1/0001 12:00:00 AM

Failed Azure Web App Auto Restart Runbook

Let me start by painting a picture. You are using Azure. You have an App Service configured with a Web App that is hosting a website; this website for example. The website could be single-instanced or it could be multi-instanced using Azure Load Balancer, Azure Traffic Manager, Azure Application Gateway, or any other number of load balancing and traffic distribution technologies. One day, your web application fails to respond and you get a dreaded HTTP 500 or another error code. As a dedicated Azure consumer, you use Azure Application Insights to monitor your website. Application Insights not only gives you user metrics akin to Google Analytics but also gives you performance and availability metrics.

The picture I painted just then explains my scenario. I use Azure App Service with an Azure Web App to host this blog. I use Azure Application Insights to provide me with all of the metrics and data I need to understand the site. The availability monitoring feature is quite excellent. It allows me to monitor the website availability from up to five locations around the world with performance data for each region so I can see how the site performs for each geography. If the site goes down for any reason, I get an email notification to warn me.

Read more…

The Case of the Failed Azure Automation Runbook

In a post I will be publishing shortly after this one, I wrote an Azure Automation Runbook to automatically restart an Azure Web App when Azure Application Insights reports the site as being offline. The solution is not foolproof, but it offers a good first line of defence against issues that bring the site down. I originally wrote the runbook some time ago, however, with pressure elsewhere, it has been a while since I have been able to re-visit it and complete it.

Whilst testing the workflow this morning, I found that it was generating an error at the Login-AzureRmAccount stage; the stage where the workflow should be logging into Azure using a service principal to obtain permissions on the relevant Resource Groups. A screenshot of the error log from the automation job is shown below.

The error had been puzzled as I know this had previously worked and I have not made changes to the Azure credential nor to the runbook since. A quick Google of the error message brought me to the answer at https://social.msdn.microsoft.com/Forums/en-US/c38e01df-dac8-4095-9658-7b1d981fe8e6/azure-automation-error-run-loginazurermaccount-to-login?forum=azureautomation. The problem lay in the fact that my Azure Automation account was referencing old versions of the Azure PowerShell Module. The old version of the module generated a failure to use the Login-AzureRmAccount command.

Updating the Azure PowerShell Module in Azure Automation is painless and can be performed from the Modules blade in the Azure Automation account.

After a short wait, the modules are updated to the latest version. Re-running my workflow in Azure Automation completed successfully proving the issue as being an out-of-date module version.

An interesting point is that there is currently a banner message in Azure Automation warning that Azure PowerShell modules will be automatically updated in Azure after the 17th July 2017. The screenshot below illustrates the message in Azure Automation. I think this is a very good move by Microsoft. As an author of automation, my workflow and runbook should not be beholden to the version of the module. If a new module is required to allow my code to continue to function, do the update automatically. If features are being deprecated in the Azure PowerShell modules, I hope that Microsoft will notify us in advance. This will give us all time to revise our code to work on any deprecated commands.


Changes to Azure Certificates and HPKP

An email landed in my inbox this morning from Microsoft Azure regarding HTTP Public Key Pinning, a subject I have posted about at some length recently. If you don’t know what HPKP is or how it is used, refer back to some of my previous posts on the subject.

A normal HPKP implementation would see you configure your website to pin your own public certificate. Whilst I would advise against it because you have no ownership or control over the certificates, it would be entirely possible to pin the Microsoft Azure Websites certificates using HPKP to your site. The email from Microsoft this morning was an advisory that Microsoft is changing the certificate it uses.

If you are using HPKP and think there is a chance you may have pinned the Microsoft certificates, I would strongly advise you to read the Microsoft Knowledge Base article at https://blogs.technet.microsoft.com/kv/2017/04/20/azure-tls-certificates-changes/?WT.mc_id=azurebg_email_Trans_33716_1407_SSL_Intermediate_Cert_Change for more information.

If you are unsure if you are using HPKP or if you are unsure of which public keys you have pinned, I would suggest you use the Qualys SSL Test site as this will report the certificates in use with HPKP and whether it is enabled.

Add Brotli Support to an Azure Web App

Deflate and GZip compression have been with us on the web for many years. They do a decent job but as times move on, so do compression algorithms. This is something I have talked about before using services like TinyPNG to squeeze the spare bytes out of your images to reduce page load times but this only applies to images obviously.

Brotli is a Google project for a newer, more modern compression algorithm for the web. According to the claims of Google, using Brotli over GZip not only increases the content compression reducing page size but also reduces CPU usage in the decompression process too. With the ever expanding usage of mobile devices, both of these are great things to have.

If you are interested in reducing your page size to improve load times and reduce your outbound bandwidth on your site then read on to learn now. I will cover the requirements, fallback compatibility and also how to get Brotli for Linux and Windows as well as the main point, how to enable it for an Azure Web App.

Read more…

MySQL and PostgreSQL Database as a Service in Azure

Today is the day that ClearDB users rejoice. Today is the day that a viable platform as a service offering for both MySQL and PostgreSQL exist in Microsoft Azure. Announced last night, Microsoft have now launched their own platform as a service offerings for the two database engines.

For years, ClearDB have offered a PaaS solution for MySQL. I had the misfortune of trying it out first hand recently on a web project and I can tell you that the performance was shocking. So bad was the performance that we actually deployed a Linux VM in Azure to run the MySQL service in IaaS and take the management hit on IaaS vs. PaaS. Even the support offered was terrible, blaming the performance on Azure itself when there were no issues with the Azure platform globally at the time.

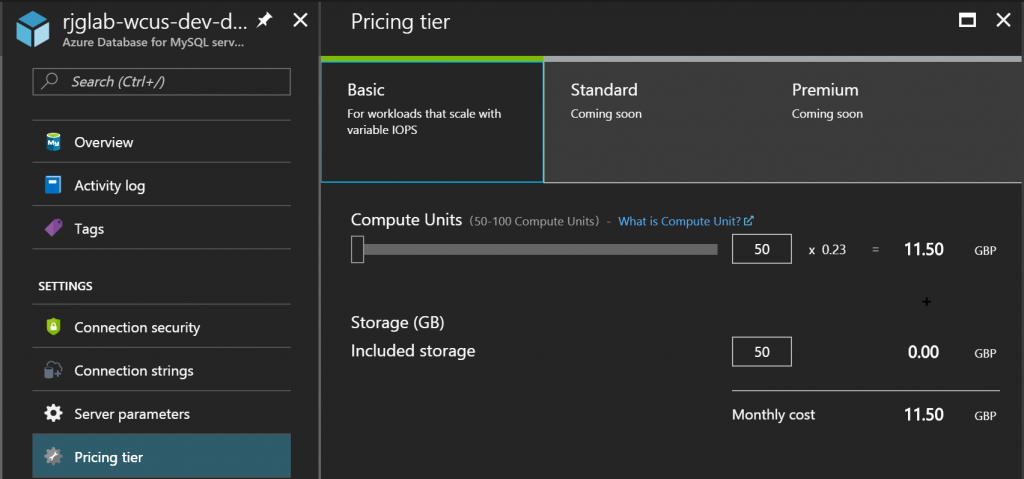
The announcement puts these new services in preview. This means that the services and features aren’t going to be ready for your production workloads nor are all of the features going to be available right now. For example, I deployed an Azure Database for MySQL server last night to try it out and the Basic pricing tier is the only tier available right now. The ability to force all connections to secure and to define firewall rules for access is important and good to see there from day one.

All in all, it looks like a good first release. As I have been using In App MySQL database for Azure Web Apps to run the MySQL database on this site for sometime now (since preview in fact), and I have been debating whether to step back to IaaS for MySQL because of the fact that In App MySQL limits my ability to use features like Azure Load Balancer or Azure Traffic Manager with multiple site instances, this is going to be something I can definately see me using in the near term for real.

You can check out the documentation, pricing and scaling details for yourself at https://docs.microsoft.com/en-gb/azure/mysql/concepts-servers.

The Case of the Missing Azure Portal Detach Button

This is going to be a really quick post but one I thought may be worth sharing. Imagine that you are working in the Azure Portal and you are trying to update a Virtual Machine configuration to detach an existing data disk on the VM. You’ve done everything right following the steps at https://docs.microsoft.com/en-us/azure/virtual-machines/windows/detach-disk by stopping the VM and waiting for it to fully stop.

For normal users, this wouldn’t be an issue however if you are like me and you care for your eyes and have switched to the dark theme in the Azure Portal, you are in for a problem. When you select Edit on the disk configuration of the VM, you notice that the Detach button that the Microsoft article refers to is missing as shown below.

The Detach button should be visible just to the right of the Host Caching drop-down menu but as you can see, it is not.

It turns out, this is a bug in the Azure Portal when using the dark theme and I have reported this already. If you switch to one of the other theme colours, the button magically appears.

The problem is that the buttons are meant to change when you select the dark theme. If you look at the Save and Discard buttons at the top of the screenshot, you can see that in the dark theme, these two buttons are white to constant with the dark background and when using the white theme, these buttons are black to contrast with the background. The Detach button at the moment, doesn’t appear to be properly changing between white and black to cater for the background colour in use.