Richard works as a Cloud Consultant for Fordway Solution where his primary focus is to help customers understand, adopt and develop with Microsoft Azure, Office 365 and System Center.

Richard Green is an IT Pro with over 15 years' of experience in all things Microsoft including System Center and Office 365. He has previously worked as a System Center consultant and as an internal solutions architect across many verticals.

Outside of work, he loves motorbikes and is part of the orange army, marshaling for NGRRC, British Superbikes and MotoGP. He is also an Assistant Cub Scout Leader.

SMB Multichannel Constraint FQDN and Hostname

Today, whilst working on something in my home lab, I noticed an issue with SMB Multichannel which if you are using SMB Multichannel in your environment you will want to be aware of.

I’ll cover how to make SMB Multichannel actually work in another post, but for now, I’ll just cover the issue. I had configured my SMB networks using the New-SmbMultichannelConstraint Cmdlet to prevent the SMB traffic for my Hyper-V VMs from using my management network and I had assumed that all would work nicely, however when I ran the Get-SmbMultichannelConnection Cmdlet, I noticed that the Client IP and Server IP columns showed the address of my management network adapters and not the SMB adapters when it struck me.

I had registered the SMB Multichannel Constraint using the NetBIOS hostname of the servers however my Hyper-V server is using the FQDN of the storage server to connect to the SMB share with the VM data in it. I ran the New-SmbMultichannelConstraint Cmdlet again but this time registering the FQDN of the hosts on both side of the connections and shortly afterwards, running the Get-SmbMultichannelConnection Cmdlet, I observed that the connections where now being made to and from the Client and Server IPs in the SMB networks.

The bottom line here is that you should register SMB Multichannel Constraints for both your NetBIOS and FQDN server names. You may well design your Hyper-V deployment to use the FQDN after registering the constraint for the FQDN but you don’t know what other administrators are going to do long-term and having both the NetBIOS hostname and FQDN registered will prevent and potential issues down the road.

Company Branding for Office 365 Apps

In the last two posts, I’ve explained and demonstrated the process for configuring customized branding for your Office 365 and Azure Active Directory login experience to give users a company branded experience when accessing Office 365 applications and extending that experience for international non-English users. Once the user is logged in, we want to ensure that, that company consistent branding identity resumes so in this post, I will be covering just that in how to brand your Office 365 Tenant Portal and Apps and just to reiterate, this is free for all Office 365 Tenants and you don’t need to be on a particular plan or SKU to access this.

To start, we need to login to the Office 365 Admin Center as a Global Administrator. You can access the Admin Center at https://portal.office.com. If you haven’t ever applied any branding to your Office 365 Tenant, then it will probably look something like the following image.

Office 365 Admin Center Home

The default branding uses a blue accent colour which is used for the clickable App shortcut button in the top-left corner and is used to colour the page body text. The default header colour is black. To change the branding, click the Company Profile link in the left navigation bar in the portal. This will take you to the page where you configure your company name and address etc. Once on this page, there is a link in the left navigation for Custom Theming which you want to click.

Office 365 Admin Center Custom Theming

On the Custom Theming page, you can see there are several options for applying your branding to the portals and apps in Office 365. Custom Logo does what you would expect by allowing you to add your company logo to the pages. URL for Clickable Logo allows you to add a hyperlink to the company logo perhaps to direct people to your SharePoint Online intranet site or to your public website.

Background Image allows you to apply an image to the background of the header. If you use a gradient effect header or a patterned image on your public website,  you could apply this here to give a consistent look and feel across your internal and external facing portals.

To the right, we have options for Accent Colour, Nav Bar Background Colour, Text and Icons and App Menu Icon colours.

Accent colour is the colour used for the app shortcut icon in the upper left corner of the Office 365 sites and apps and is also used to colour hyperlinks and buttons on the pages. Nav Bar Background Colour applies to the Nav Bar if you have not applied a background image and applies to the whole bar except for the shortcut icon in the left corner. The Text and Icons colour applies to the title shown in the navigation bar along with the buttons in the upper right corner of the portal next to the user profile picture. Lastly, App Menu Icon applies to the tile like icon used in the upper left shortcut. If you use a light accent colour then you many want use the black option for this icon, otherwise the other option is white.

Office 365 Admin Center Custom Theming Applied

One you have applied your colour and icon selections, click the Save button to apply the changes. The changes will be visible in the Admin Center straight away but they will take a little time to appear in other Office 365 sites and apps. I had to wait about 15 minutes for my Tenant sites and apps to reflect the changes.

One observation I made is the placement of the company logo in the navigation bar appears to be dead centre. To me this looks very odd and in other blogs and instructions I have seen online showing this process, their logos appear in the left corner. Suspecting it to be IE in Windows 10 Technical Preview at fault, I tried a Windows 8.1 machine using IE and Chrome with the same results. I’m not sure when this changed or why but needless to say, it looks odd to me so I’ve opted to remove the logo from my final implementation for my tenant but your results will vary.

One you have given it some time for the changes to be applied across Office 365, here is how is looks in some of the user facing sites.

Office 365 Calendar Themed  Office 365 OneDrive Business Themed

Language Support for Office 365 and AAD Login

In my previous post, Company Branding for Office 365 and AAD Login, I showed you the steps to implement a company branded and customized login experience for Office 365 and Azure Active Directory. This post centred around using the default branding settings which for most organisations will probably be just fine but if you have employees in non-English speaking or English as a second language countries, you may want to provide them with a more regionalised experience using another language.

Luckily, Azure Active Directory allows us to do this with ease. Firstly, you need to configure the default settings so if you haven’t already, follow the steps in my previous post Company Branding for Office 365 and AAD Login to get that setup and working. Once you have it working and tested, you can head back to the Azure management portal at https://manage.windowsazure.com and login as a Global Administrator role user.

Once logged in, go to the Active Directory section from the left navigation pane and select the same directory that you customized previously. Once you are viewing the directory, click the Configure tab in from the top of the page and once again, select the green Customize Branding button.

Last time, you were taken immediately into the Customize Default Branding settings however on this second occasion, you will be shown an option first.

AAD Customize Branding Specific Language

The portal prompts you if you want to Edit Existing Branding Settings or Add Branding for a Specific Language. In this example, I want to add branding for my French users so I select the Add Branding Settings for a Specific Language option and select France from the drop-down language selection. Once you have selected your language, you are prompted to provide the same logos and text as previous for the default branding.

This is especially useful if you have provided the Sign In Page Text as you will likely want to provide this text in a non-English language. It could also be useful if your company trades under a different name or uses a different logo in another region to identify your brand better for those customers.

You can repeat this process as many times as you like for as many languages as you need however it’s worth noting that because each language uses different images and text, if you ever need to update the logos and text, you will need to update them for each language you have specified and configured. You can use this same options page to come back and edit your customizations at a later time also by select the Edit Existing Branding Settings option which is where you can also delete any customizations to return them to the Azure Active Directory defaults if you decide you no longer want to customize a specific language or the defaults at all.

Company Branding Office 365 and AAD Login

Last week, Microsoft announced via a blog post on the Office Blogs site at http://blogs.office.com/2015/02/17/sign-page-branding-cloud-user-self-service-password-reset-office-365/ that they were moving the ability to add company branding to the Azure Active Directory and Office 365 login pages from the Azure Active Directory Basic and Premium tiers down into the Free tier making this feature available to everyone.

This great news as for a lot of customers, Azure Active Directory Free provides all the service they are looking for and being able to have this fit into your corporate identity and branding makes users more comfortable that they are signing into a company authorised login portal.

In order to brand your corporate Azure Active Directory instance and your Office 365 login pages, login to the Azure Management Portal as a user with the Global Administrator role. For now, this needs to be managed via the legacy Azure portal at https://manage.windowsazure.com. Once you are logged into the portal, you need to head to the Active Directory node from the left navigation area.

Azure Portal

Once on the Active Directory page, select your Azure Active Directory instance. If you have more than one instance, select the instance which is responsible for the domains that you want to be branded with your corporate identity for Azure Active Directory and Office 365 sign-in.

Azure Portal AAD

On the properties for your Azure Active Directory instance, you will notice the green button Customize Branding which you would not have seen in the portal previously if you are an Azure Active Directory Free customer. Click the button to open the properties for branding and customization. Assuming this is the first time that your settings have been customized, you will be taken to the Customize Default Branding properties.

AAD Customize Default Branding

The Banner Logo image is used on all of the various sign-in pages for Azure Active Directory and Office 365 and should contain your company logo. The Tile Logo is to provide a square Modern UI version of your logo. I have yet to actually find anywhere that this Tile Logo is used so if you come across it, do let me know. In either case, the logos can be provided in .png or .jpeg format. I would highly recommend using an image minifier such as TinyPNG to compress your images without distortion with the view to help improve load times of these pages.

Sign In Page Text is displayed on all login pages and is used as a legal disclaimer or login help message. You can use this to display a message to provide help information to end-users such as a service desk phone number or you could use it to show a legal message matching your on-premise Windows server and client logon banner. This is entered as plain text and does not support HTML or other formatting such as hyperlinks.

Sign In Page Illustration allows you to provide a large image that is used prominently on the login pages for Azure Active Directory and Office 365 and it works in partnership with the Sign In Page Background Colour setting. The illustration takes either a .png or a .jpeg file to provide a rich client experience. The background colour is applied to the same container on the login page as the illustration and is used when the user is on a low bandwidth device.

Once you have entered all of the logos and text, click the tick button to save the changes. Once saved, give it a couple of minutes before testing to allow time for the Azure Active Directory instance to replicate throughout Azure and all of the login pages to be updated.

If you visit https://login.microsoftonline.com  you will see the generic login page, however once you enter your email address, the page will update to show your new branding.

AAD Default Login  AAD Branded Full Login

In the two images above, we can see the default login on the left and once I enter my email address, the image on the right shows my branding. The default highway image has been replaced by my Seattle skyline image along with the Office 365 logo replaced by my corporate identity. If I was on a low bandwidth device then instead of the Seattle image, I would be shown this portion of the screen as a solid block of colour using the hexadecimal value I provided on the branding page. The banner message I provided is shown at the bottom of the page in the right third.

If you direct clients to the Office 365 or Azure Active Directory login page from internal sites or a link on your public website then you may be interested in updating those hyperlinks to use the Realm URL. The Realm URL is a query string added to the end of the default URL pre-warning the portal which domain you are going to log in to and as such, the portal is pre-branded meaning that your users will never see the default Office 365 branded page.

To use the Realm URL, you need to update your hyperlinks to https://login.microsoftonline.com/?whr=richardjgreen.net replacing the domain name after the ?whr= query string with your own domain name.

AAD Branded Realm URL

As you see on the image above, I have navigated to the Microsoft Online login page using my Ream URL and without entering my email address to provide it with the domain identity for branding, the site is pre-branded for my company.

AAD Branded Compact Login  AAD Branded Mobile Login

In the two images above, you can see how the customized login page scales with the screen real estate. The left image shows a compressed width page on a client with a 4:3 standard aspect ratio. The right portion of the screen remains unchanged but the illustration image on the left is cropped. The crop to the image is applied to the right edge, so when choosing your illustration image, make sure any important parts of the image are on the left as this is the portion which will always be visible regardless of screen size.

The second of the images above shows a mobile device viewing the page. In this view port, the illustration is completely hidden and we see just the login boxes, the corporate banner logo and the message text.

I trust that you will all enjoy seeing a customized login page for your company and enjoy it even more knowing that it’s not freely available for all Azure Active Directory and Office 365 users.

Windows Server Hyper-V vNext Features

Hyper-V MVP Aidan Finn has a post running over at http://www.aidanfinn.com/?p=17424 where he is maintaining a list of the new features coming in Windows Server vNext specifically around Hyper-V.

His post is worth keeping an eye on if you are in the Hyper-V virtualization business. Reading through it myself, there seems to be a lot of work gone into stabilising clustered Hyper-V which is very welcome. My personal favourites from the list so far are Production Checkpoints to allow you to checkpoint an application service; a number of VMs in a collection that make up an application such as SQL Server, an app server and a web server, all in a single operation for consistent snapshots across multiple service tiers. Network Adapter Identification allows the name of a vNIC from the Hyper-V host to be passed through into the VM Guest OS so our Guest OS will see our vNICs not as Ethernet or Local Area Connection but as Production-VMNetwork or whatever you naming convention is. Rolling Cluster Upgrades is something which Windows Failover Clustering has long needed to allow us to upgrade our nodes whilst retaining the cluster functionality and integrated Backup Change Tracking prevents the need for 3rd party backup APIs to be installed which can commonly destabilise the platform.

All in all, it’s a nice list of features and the changes will be very welcome. There is nothing here which technically blows your mind like the feature gap bridged from Windows Server 2008 R2 Hyper-V to Windows Server 2012 R2 Hyper-V however there is definitely enough here to pip your interest and to make you warrant moving to Windows Server vNext when it ships if only for the platform stability improvements.

Public Cloud Security Verses On-Premise

Our MD at Fordway authored an article on freshbusinessthinking.com back in November 2014 which I was drawn to today which for me really hits the nail on the head about security and how public cloud addresses it and the simple fact is, is your organisation fully PCI DSS compliant or do you hold an ISO 27001 certification? How about the myriad of other industry security certifications such as SOC, FIPS 140-2, HIPAA or EAL?

Well public cloud providers often are accredited with a number of these certifications which makes their environments actually more secure than the majority of environments run by in-house IT.

You can read the full article by Richard Blanford at http://www.freshbusinessthinking.com/business_advice.php?CID=0&AID=13699&PGID=1#.VNTgpPkYt9A

Non-Published Office 365 Directory Sync with Azure ExpressRoute

In one of my recent sessions with a customer, the customer expressed an interest in protecting their communication between Office 365 and their on-premise environment for the purposes of making their directory synchronization server traffic invisible to the outside world. This got me thinking about Azure ExpressRoute which we know can provide very fast connectivity between your on-premise environments and Azure if you are using a supported MPLS network provider.

The customer in question is using Level 3 Networks as their carrier and Level 3 are on the supported carriers list for ExpressRoute on the ExpressRoute Technical Overview page at https://msdn.microsoft.com/en-us/library/azure/e224be0a-d7b2-4514-b868-86d61cee0ead#bkmk_Connection so I looked into it a little bit further as this was a really interesting proposition – to have Office 365 SaaS managed productivity with Exchange, SharePoint and Lync but to have all of the sync traffic traffic privately routed over ExpressRoute so that you weren’t passing any of that data over the public network (albeit encrypted with HTTPS SSL).

When I looked further, I found that on the ExpressRoute FAQ page at https://msdn.microsoft.com/library/azure/dn606292.aspx it explicitly defines which Azure services are accessible over an ExpressRoute connection and Azure Active Directory (AAD) is not listed nor is anything in relation to Office 365.

Unfortunately, it seems that this isn’t possible right now but it would be nice to see something added in the future to allow AAD to be access over ExpressRoute to allow us to hide and conceal our ADFS or AADSync traffic as this may well answer a security question that some more conscious customers have. The other reason this would be nice as it means we can have our internal users accessing their mail and SharePoint via the ExpressRoute connection so they will get a faster experience that over the companies internet link. Right now however, the best use case for ExpressRoute in my opnion is Azure RemoteApp, allowing you move some or all of the Remote Desktop Services terminal server farms that you may have to Azure and offload your RemoteApp applications to the cloud.

Deployment Scenarios for Office 365 and AAD Identity

In my previous post from yesterday on understanding Office 365 and AAD federated identity types, I talked about the two methods for allowing our users to sign in to the Microsoft cloud services with our on-premises identity using either DirSync, AADSync or FIM for same sign-on or using ADFS for single sign-on. Now that we understand the products at a high-level, I want to cover off some options for deployment scenarios and specifically, how we can leverage Microsoft Azure to host these services.

Customers are increasingly trying to cut the cord with their on-premise datacenters due to the high cost of running them and are looking for cheaper alternatives to run their services. Moving our email, collaboration and communication productivity tools to Office 365 is one way that we can work towards achieving that however in consuming these Office 365 services, we remove the need for having our on-premises Exchange, SharePoint and Lync servers but we replace them with servers that are used to synchronise our identities to the cloud or provide the authentication tokens. If these servers go down it could actually have a more detremental effect than the loss of an on-premise Lync server so we need to pay close attention.

On-Premise Deployments

DirSync, AADSync and FIM for Same Sign-On

If you have opted for a same sign-on deployment then unless you have a specific need for FIM because you have a complex infrastructure or if you have already deployed FIM and want to leverage that existing investment you will be deploying DirSync or AADSync. DirSync is the incumbant tool and AADSync is its replacement although DirSync is still supported and will continue to be supported for a currently undefined period of time so if you have already deployed DirSync then you don’t need to rush out and upgrade your servers to AADSync.

AADSync On-Premise

None of these products, DirSync, AADSync or FIM support clustering or high availability which means you can deploy only one of them at a time. FIM can be sweet talked into working as a clustered product but the process is unsupported and documented by Damian Flynn at http://www.damianflynn.com/2012/10/11/fim-sync-server-2010r2-cluster-build/. If you want to provide high availability for these applications then you will need to look outside the operating system and look to your hypervisor, assuming you are deploying them as virtual machines.

For DirSync and AADSync, the easiest thing to do will be to have a disaster recovery plan and a build document for the installation so that if you’re server melts, you can deploy a new one from a VM template in short order. If you were extra paranoid, you could have a VM deployed with the DirSync or AADSync binaries on the server ready to install (but not installed) so that if you had a failure you could simply run through the installer following your build document and be up and running in about 15 to 30 minutes.

For FIM, you definately want a backup of this server because a) its not highly available and b) there are complex configurations going on here and tryring to re-create this from scratch as we would likely do with DirSync and AADSync wouldn’t be fun nor quick.

ADFS for Single Sign-On

As we know from my previous article, deploying ADFS is more involved and requires more moving parts howeer luckily, all of these parts can be clustered or load balanced accordingly. The exception to this is the DirSync or AADSync server that you deploy in addition to the ADFS servers to sync the users identities but not the password attribute to go with it.

ADFS On-Premise

ADFS Proxies which reside in your DMZ network segment are essentially web servers which can be load balanced. We only require Port 443 for HTTPS SSL pages to be made publicly accessible and we can use either Windows native NLB or we can use a hardware or software load balancer such as a Citrix Netscaler, KEMP Loadmaster or an A10 Thunder load balancer. As a side note of interest, Citrix and A10 both support integration into VMM so if you are using a Microsoft private cloud with Hyper-V and VMM in your on-premise network then these products can be easily integrated into your deployment approach for new servers.

ADFS servers live in your clean, corporate network and route requests between the proxies in your DMZ to the Active Directory domain controllers to retrieve the authorization for users. The ADFS servers use a Windows Internal Database (WID) as standard which supports farms of up to five ADFS servers however if you need more than five servers, you will need a seperate SQL Server for the database which we can of course cluster.

Azure Deployment

DirSync, AADSync and FIM for Same Sign-On

As I mentioned earlier, companies are interested in cord cutting the on-premise datacenter as we know so moving things into the cloud where it is possible and makes sense helps us to achieve this and more importantly, reduce the dependancy on our internal facilities. With DirSync, AADSync and FIM deployments for same sign-on, we can really easily achieve this with Microsoft Azure.

AADSync Azure

The components that make this design work are the Azure VPN which provides site-to-site connectivity between your on-premises environment and Microsoft Azure. Once you have the Azure VPN configured and working and you have your virtual network segments configured in Microsoft Azure, we need to deploy an Active Directory Domain Controller into Azure using an IaaS VM. This will hold a replica of your Active Directory database from on-premise. We then deploy the DirSync, AADSync or FIM server on an IaaS VM in Azure.

By deploying the synchronisation VM in Azure along with the domain controller, the two servers are within the same AD Site which you will have created for Azure and will allow the synchronisation server to contact AD for the user data it needs and will allow it very fast access to the Azure Active Directory service to sync your objects to the cloud directory.

For high availability in this design, we can deploy multiple Domain Controllers into the Azure AD Site and we can use the Azure VPN service in a point-to-multi-point configuration so that two of your on-premise datacenters have an endpoint for the Azure VPN so that we aren’t dependant on a single site for on-premise connectivity. Remember that with this same sign-on deployment, we can only have a single synchronisation server so it is not possible to make this element highly available. When we deploy multiple Active Directory Domain Controllers into Azure, we need to make sure that these VMs go into an Availability Set together which causes the Azure fabric to place these VMs on seperate hosts and racks in the environment so that they are not effected by maintenance operations.

ADFS for Single Sign-On

Using Azure to deploy our ADFS for single sign-on deployment really is the way to show case the power and ease at wihch we can deploy a complex solution with Microsoft Azure. The building block of this design is the same as that of the DirSync and AADSync in that we start out with configuring Azure VPN in a point-to-point or point-to-multi-point connection to our on-premise environment and we then deploy multiple Active Directory Domain Controllers which provide our authentication source.

ADFS Azure

In deploying SSO with ADFS, we need to configure, deploy and test the ADFS environment before we deploy and configure the DirSync or AADSync server. I must atest to not fully understanding the reason for this but Microsoft recommend it so we do it. As you would do for an on-premise deployment, we deploy two ADFS Proxies which recieve our incoming token requests and we deploy two ADFS Servers which do the back and forth between our ADFS Proxies and the AD Domain Controllers to authorize users.

As we did with our previous same sign-on design for a Microsoft Azure deployment, we need to make sure we place our IaaS VMs into Availability Sets however this time we have three sets: one for our Domain Controllers, one for the ADFS Proxies and one for the ADFS Servers.

With an on-premise deployment, we need to buy and configure a load-balancer to use with the multiple ADFS Proxy servers however in Azure we can simply use the Azure Load Balancer to quickly and easily achieve this.

With the ADFS for single sign-on deployment in Microsoft Azure, if having two VMs running for each service isn’t quite enough availability for you because you are concerned about the resiliency that Microsoft provide within a single Azure datacenter, you could take the deployment to another level and use two datacenters. Using two Microsoft Azure datacenters, we split the services provided by the deployment throughout the Azure environment and use the Azure Traffic Manager to provide Geolocation awareness for users and direct them to the most appropriate ADFS Proxy for authentication. If you are deploying ADFS for single sign-on in an organisation which has users throughout the globe then this could be an ideal deployment to achieve not only your high availability requirements for IT but also to improve the user experience by sending the user to the ADFS Proxy closest to them.

Cost Consideration

All of this talk of Azure deployments is very nice but we need to be aware of our costs. Deploying services on-premises has costs associated and these costs are often a lot higher than people realise because they don’t fully take into account every facet of the infrastructure. When you are costing up an on-premise VM you will likely include the cost of the SAN disk occupation or the percentage of a host it occupies and the host of that virtualization host but are you factoring in the amount of extra power that server will consume as a result of the extra CPU cycles or the fraction of load that adds to your UPS or your network switches?

Implementing a simple deployment of DirSync or AADSync will be very cheap and I would challenge any enterprise to be able to do it themselves cheaper. A single datacenter deployment of ADFS for single sign-on will cost more to implement than same sign-on due to the increased number of servers and the addition of the Azure Load Balancer however that cost will double if you extend that to a dual Azure datacenter deployment not to mention the increased configuration complexity.

To conclude, make sure you consider the cost and complexity of what you are proposing to implement and make sure that what you plan to do is really what you need to do. If all your users are based in the UK then having that all sining, dual datacenter, multi-point Azure VPN deployment split across the UK and East Coast US with Geolocation Traffic Management probably isn’t what you really need and you will be wasting resources in both money to pay for it and time and complexity to manage it.

Understanding Office 365 and AAD Federated Identity Types

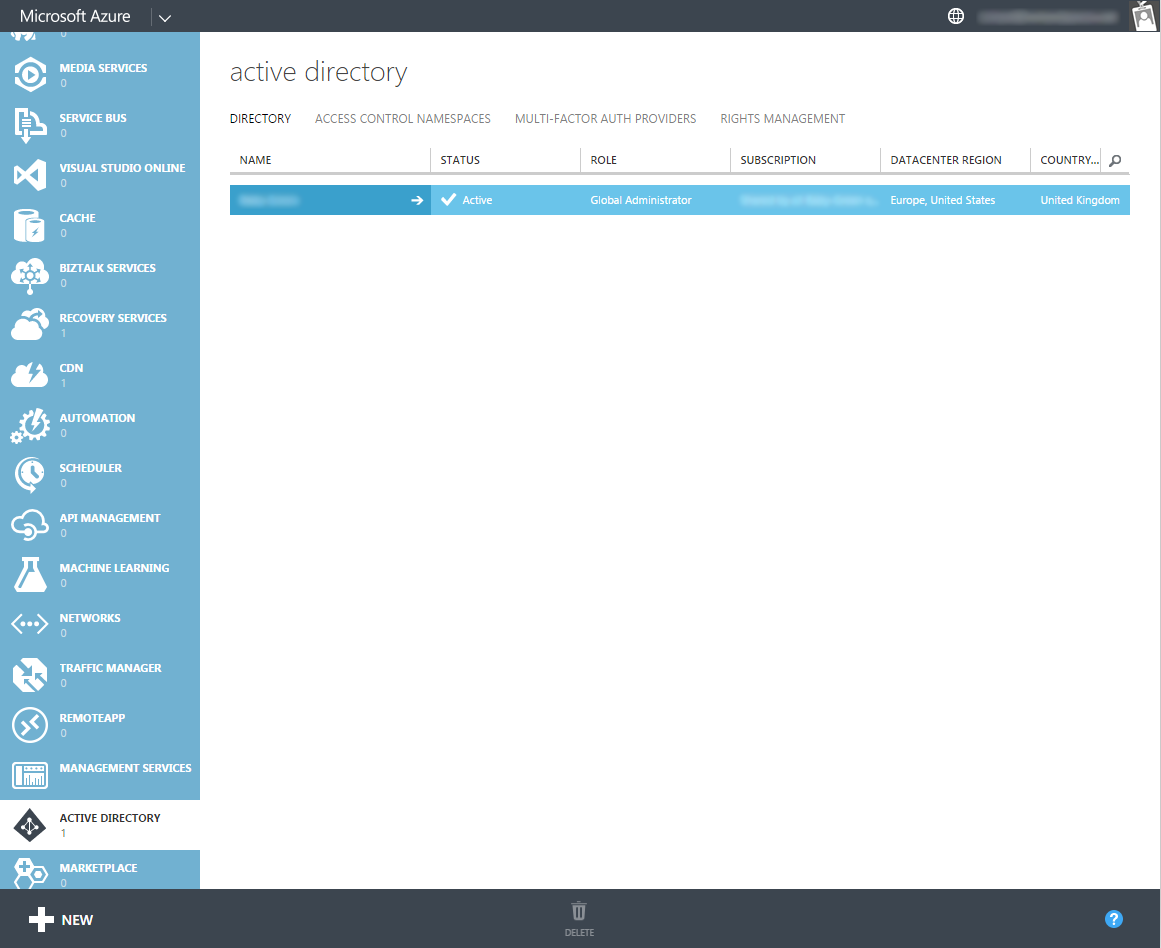
Recently, I’ve undertaken a number of customer chalk and talk sessions on Office 365 to discuss with them some of the benifits they can expect to see from moving from on-premise services to Office 365 hybrid and cloud services. Amongst the myriad of topics that get covered in these sessions, one of the biggest areas for discussion and contention is identify federation from the on-premise environment to Office 365 which uses Azure Active Directory (AAD) as it’s identity management system.

I thought I would take this oppourtunity to cover off some of the high-level points of the trade-offs and differences between the ways of achieving identity federation with Office 365 and Azure Active Directory. Please remember that this isn’t an exhaustive list of things to consider but a good taster.

In some future posts, I will be covering deployment scenarios for the two methods of identity federation and also the software we need to configure and deploy in order to make it work.

What is Identity Federation

Simply put, identity federation is the means of allowing your users to logon to both on-premise services and Office 365 and Azure Active Directory authentication based services with a single identity, the identity they know and love that resides currently in your on-premise Active Directory and to most people is simply the username and password that they use to logon to your internal PCs and other systems.

Without identity federation, we have a scenario where users have split personas resulting in them having one logon for your on-premise services and another for their cloud services with Office 365 and Azure Active Directory. If you work in a highly secure, militry level environment, perhaps this is actually what you want and you don’t want to potentially expose your internal identies to the cloud but for 99% of people looking at Office 365, you want the simplified experience for your end-users of having just one credential to rule them all.

Single Sign-On vs. Same Sign-On

Single Sign-On and Same Sign-On are the same yet different. Single Sign-On refers to the ability to logon once such as to a domain joined Windows desktop PC and then not have to re-enter credentials for any of the services you consume during that session and this is the holy grail of integration scenarios where the user experience is totally seamless and the user doesn’t need to think about anything other than which app or product they want to work with next.

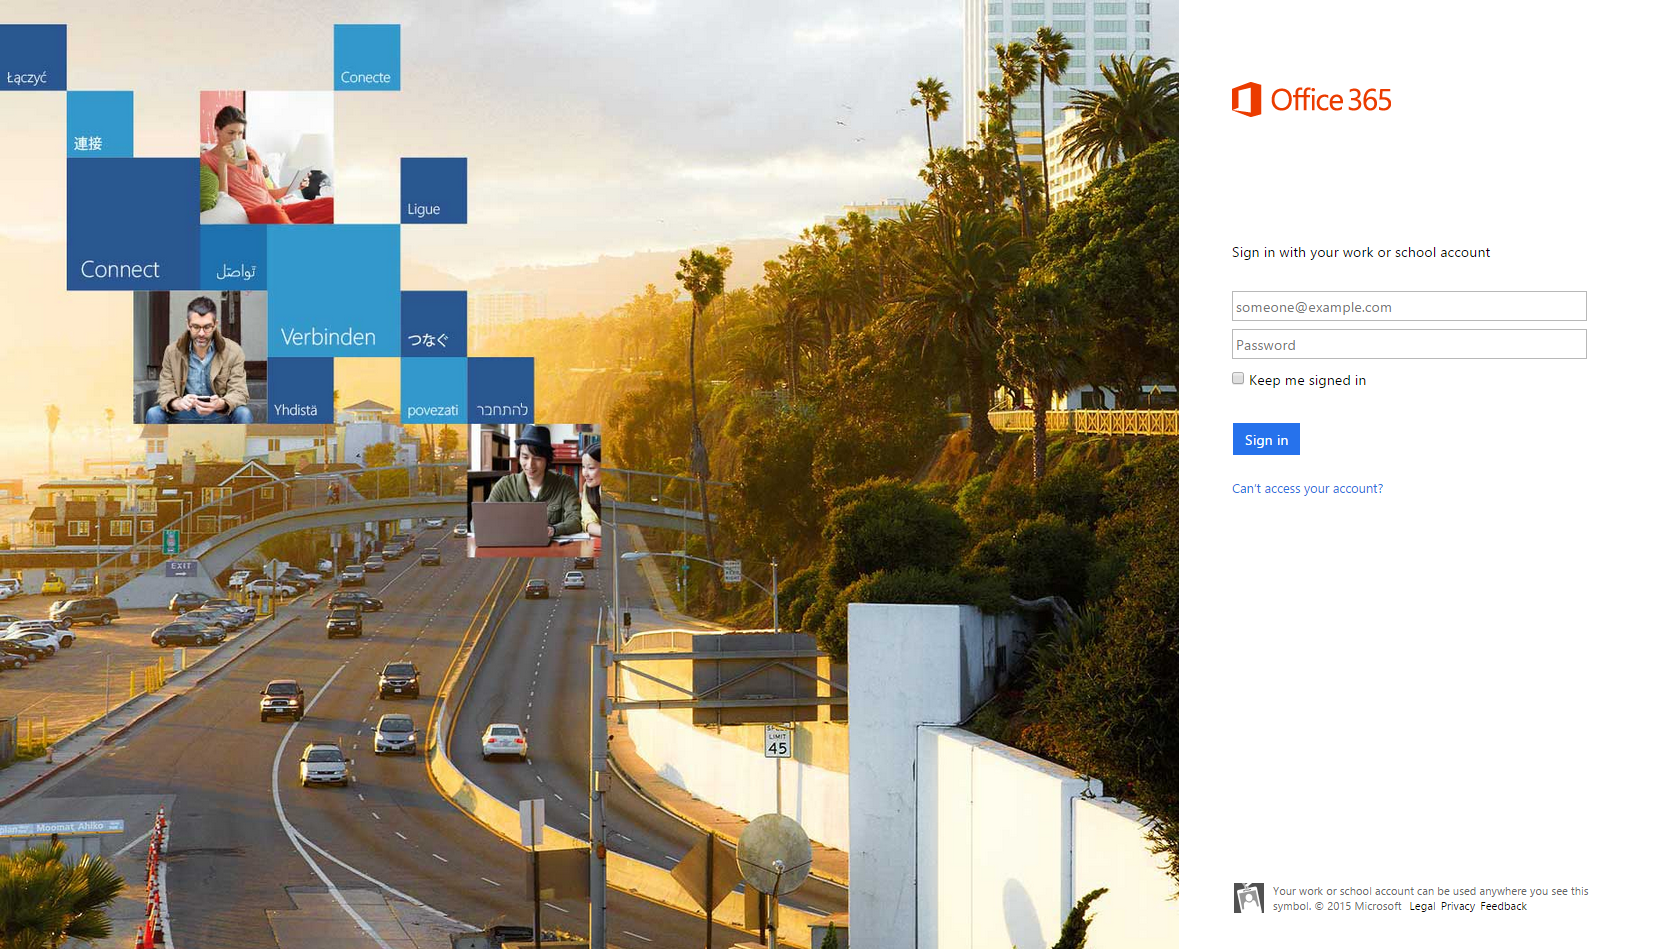
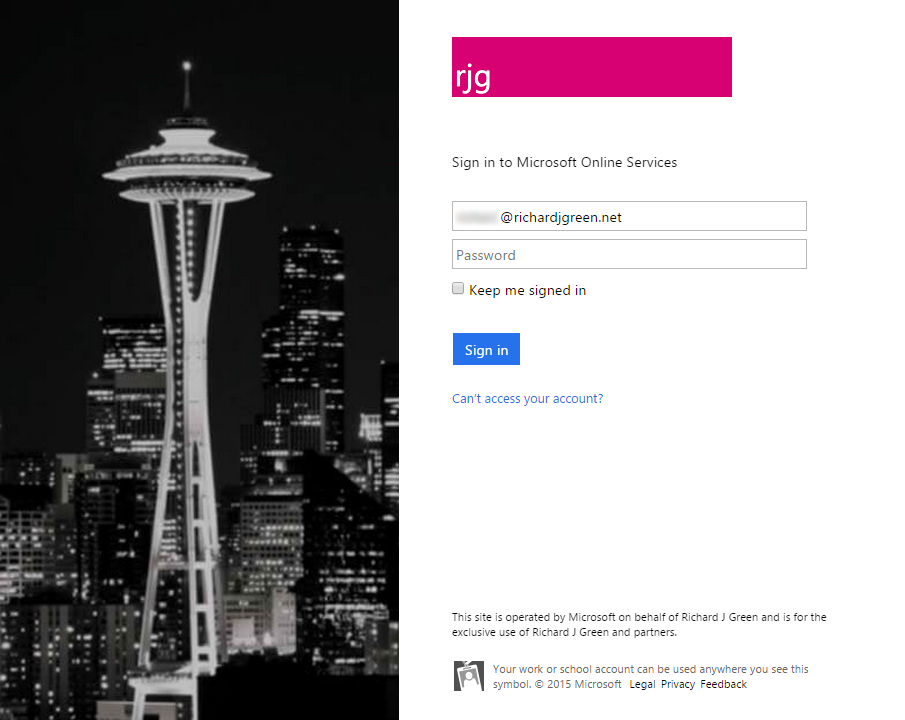
Same Sign-On refers to using a single identity, provided by our identity federation solution however instead of the user seamlessly being logged into these systems, the user may be prompted at various stages to re-enter their credentials in order to authenticate to a web service or an application such as with the Lync Client or a SharePoint team site.

Both of these scenarios are achievable with Office 365 and Azure Active Directory however in order to achieve one over the other increases the amount of work and effort required upfront in order to achieve success. I will explain in more detail further on the technical differences but for now, know that Same Sign-On is the easiest to implement and requires nothing more than one server to run the syncrohisation software. Single Sign-On requires more servers to be deployed and it requires some firewall reconfiguration in order to allow the services to be properly accessible.

Deciding Which Identity Type is Right for You

In this section, I will talk about some of the determining factors for deciding betwween same and single sign-on.

User Experience

The end-user experience is obviously high on the agenda when it comes to deciding between the two identity federation modes. Same sign-on means users can login to services with the same username and password whilst single sign-on allows users to seamlessly move between applications and services without the need to re-authenticate.

The winner here is clearly single sign-on however this comes with a caveat that Outlook does not behave in a truely singluar fashion like the other applications do.

Due to the way that Office 365 uses the RPC over HTTPS protocol with Basic Authentication, Outlook users will still be prompted to enter their credentials even when single sign-on is deployed and properly configured. This is a common misconception and people see it as a problem with their single sign-on configuration or deployment but sadly it is just the way that Outlook behaves. The workaround to this issue is for users to select the Remember My Credentials option and their password will be cached in the Windows Credential Manager until such a time that the user changes their password.

Password Security

Password security is in my opinion, the number one reason that people consider the single sign-on deployment over same sign-on.

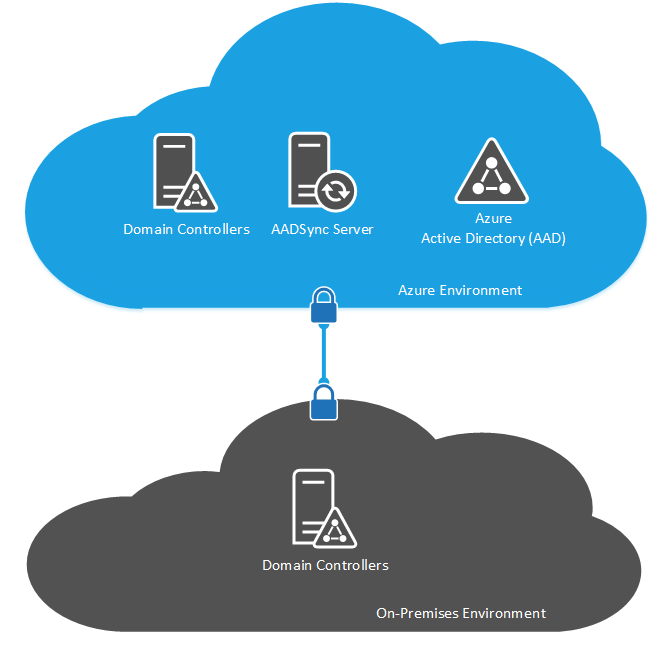
With a same sign-on deployment, the authentication to Office 365 and Azure Active Directory service is performed within AAD. The syncronisation software that is run within your organisation syncs both the users and their passwords to the cloud AAD directory. When a user requests access to a service, the password entered by the user is sent to AAD for verification and authorization. All this means that there are copies of your passwords stored in AAD.

With single sign-on, your passwords are not stored in the cloud AAD directory but instead, only the usernames and a few other attributes of the users. When a user requests a login to a service, the authentication request is forwarded to servers within your organisation known as proxies which then forward the request to your internal Active Directory domain controllers. Once authorized, a token is sent back to Office 365 and Azure Active Directory to approve the login. In a nutshell, the passwords never leave your environment, only tokens approving or denying the connection.

The winner for password security is likely to be single sign-on. The idea of having passwords stored in the cloud is too much for some organisations whereas for others, the idea of the authentication tokens flying back and forth is equally bad coupled with the exposure a single sign-on solution potentially adds to your internal directory environment.

Password Changes

Users need to be able to change their passwords in accordance with your organisations security policy. Typically, in order for a user to make that change, they need to be either on-premise or connected to the on-premise environment via a VPN or such if they are working remotely. Windows Server DirectAccess helps with password changes amongst many other scenarios where the users need to be connected to the corporate network.

If you opt for a same sign-on implementation then by enabling the Password Write-Back feature in the sync application, we can enable users to change their passwords without requiring a connection back to the corporate environment. This password change can be performed via one of the Office 365 application websites such as Outlook Web App. Once the password is changed by the user, it is written to the cloud Azure Active Directory and is synchronised back to the corporate directory when the nextx synchronisation occurs.

If you deploy a single sign-on model then you do not have the flexibility of enabling users to perform password changes via the portals because there is no cloud storage of the password and the cloud environment is not aware of the users password but only that they were authenticated from your environment.

If you are looking for ways to reduce the user reliance on VPN technologies and enable them to do more of their work remotely using cloud based applications then same sign-on could provide an added benifit here. Companies which use single sign-on will need to maintain these VPN technologies even if simply to allow users to change their passwords as required. As I have mentioned previously, DirectAccess if not already deployed could be a real answer here as it provides always-on connectivity back to the corporate environment and does not require the user to interact with a VPN client improving the user experience.

Access Revokation

In a scenario where you need to revoke somebodies access very quickly either due to a confidentiality issue or an employee has gone rogue, single sign-on is the clear winner. Same sign-on works by syncronising the stage of user objects periodically based on a scheduled job from on-premise to the Azure Active Directory. If a user account is disabled on-premise then it could take sometime for that change to make it’s way to the AAD directory and further damage could be done in the scenario as a result.

If you are using single sign-on, when a user account is disabled, that user account will no longer be able to authenticate to Office 365 and AAD federated applications as soon as the account is disabled because those services will no longer be able to authorize that user based on the fact that, that authentication request is sent directly into your environment.

Availability and Reliability

This point is closely linked to the password security requirement, as is configuration complexity. In order for users to be able to sign-in to Office 365 and AAD linked services, there needs to be an authentication service available to process the request. For same sign-on where the passwords are stored in the cloud directory, the availability and reliability is provided by Microsoft Azure.

As we understand from the Microsoft Azure SLA page at http://azure.microsoft.com/en-gb/support/legal/sla/ Azure Active Directory Free provides no guarantee of uptime or SLA although through my personal experience and use of it, I have never seen a problem with it being available and working. Azure Active Directory Basic and Premium both offer a 99.9% enterprise SLA along with a slew of other features but at a cost.

For deployments using single sign-on, because the authentication requests are redireted to servers which are maintained by you as the customer, the availability and reliability of the authentication service is dependant on you and is born of a number of factors: we have authentication proxies, authentication servers and domain controllers all of which need to be available for the solution to work and not to mention any firewalls, load balancers, networks and internet connections, service providers, power sources, you name it, all of which are consumed by these servers.

I’ll be covering some deployment scenarios for both same and single sign-on in a future post however for now, we’ll assume all of this resides in your on-premise datacenters. If you have reliable on-premise servers and infrastructure services and you can provide a highly available solution for single sign-on then you will have no problems however if any of the components in the single sign-on server chain fail, users will be unable to authenticate to Office 365 or AAD federated applications which will cause a user experience and an IT support issue for you.

Configuration Complexity

Taking what we learn from the reliability and availability information above, it is fairly apparent that there are more moving parts and complexities to the single sign-on implementation. If you as an organisation are looking to reduce your configuration complexity because you want to unlock time from your internal IT resources or you are looking to improve your uptimes to provide a higher level of user satisfaction then you should consider whether the complexity of a single sign-on implemention is right for you? In theory, once the solution is deployed it should be no hassle at all but all know that servers go bad from time to time and even when things are working right there is still things to contend with like software updates, security patching, backups and so forth.

The same sign-on implemention requires only one server to implement, requires no firewall changes to allow inbound traffic to your network (all communication is based on an outbound connection from the server) and if you wanted to, you could even omit the backups because the installation of the software is very simple and can be recovered from scratch is little time at all.

Same sign-on is definately the winner in the complexity category so if you have a small or over-worked IT department then this could be an assist in the war against time spent on support issues however single sign-on clearly provides a richer user experience so it needs to be a balanced debate about the benifits of avoiding the configuration complexity.

Software Implementation

In this section I am going to quickly cover off the software we use for these scenarios but I am not going to go into configuration of them or the deployment scenarios as I want to save that for another post at the risk of this post dragging on too long. The other reason I want to cover these here is that throughout this post I have talked of same sign-on and single sign-on but I want to translate that into a software term for later reference.

Same Sign-On using DirSync, AADSync or FIM

Same sign-on is implemented using the Directory Synchronisation (DirSync), the Azure Active Directory Sync (AADSync) tools or using Forefront Identity Manager with the Azure AD Connector.

The DirSync tool has been around for quite some time now and has been improved with new features from one iteration to the next. For example, initial versions of DirSync didn’t support Password Sync to the cloud environment which meant users had different passwords for on-premise and cloud which was a reason a lot of early Office 365 adopters didn’t adopt DirSync. With more recent additions to DirSync to support Password Sync and Write Back from the AAD cloud environment, DirSync has become a lot more popular and I find that the majority of customers seeking a fast track adoption of Office 365 going for DirSync. DirSync has a limitation of only working for environments with a single Active Directory forest which made it a non-starter for customers with more complex internal environments.

Forefront Identity Manager (FIM) with the Azure AD Connector is DirSync on steroids or rather, DirSync is a watered down version of FIM. DirSync is a pre-packaged and pre-configured version of FIM. Using the full FIM application instead of DirSync enables support for multi-forest environments and also for environments where identity sources include non-Active Directory environmnets such as LDAP or SQL based authentication sources. For customers wanting a same sign-on experience but with a complex identity solution internally, FIM was the only option. If you have FIM deployed in your environment already then you may want to take this route in order to help you sweat the asset.

AADSync is a relatively new tool and only came out of beta in September 2014. The AADSync tool is designed to replace DirSync as it provides additional features and functionality over DirSync for example, AADSync has support for multi-forest environments (although still only Active Directory based) making it much more viable for larger, complex customer environments. It also allows customers to control which attributes and user properties are synchronised to the cloud environment making it better for the more security concious amongst us.

Single Sign-On using ADFS

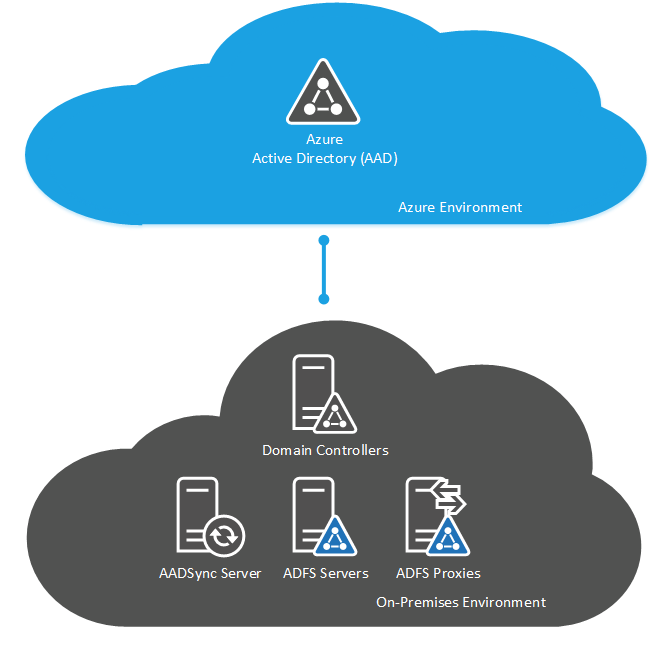
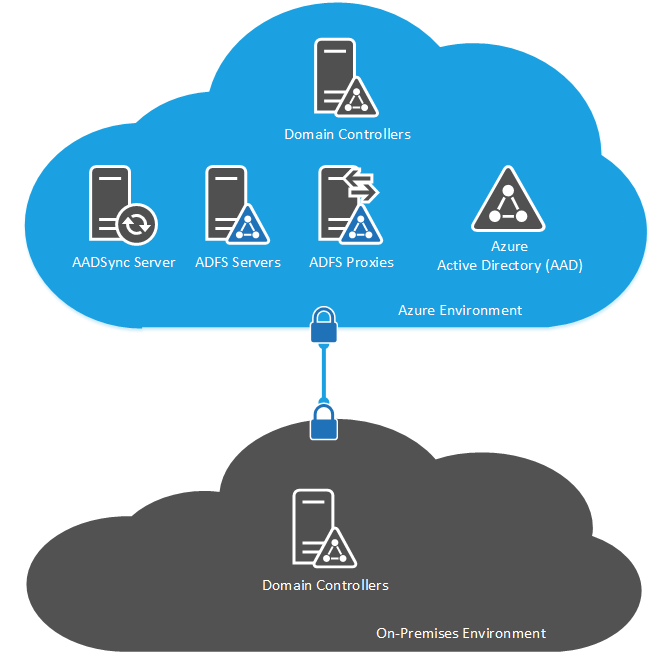
Single sign-on is implemented using Active Directory Federation Services (ADFS). ADFS is deployed in many different configurations according to the requirements of the organisation but in it’s simplest form, it requires an ADFS Proxy which is a server residing in your DMZ responsible for accepting the incoming request for authorization from Office 365 and AAD to your environment. This is passed to an ADFS Server which resides on the internal network and communicates with the Active Directory environment to perform the actual authorization.

There is an additional component in the mix and that is the requirement for either a DirSync or an AADSync server however this is deployed to push the user objects into AAD however there is no password sync or write back of attributes occuring here, this server is there just to allow AAD to know what users you have so that AAD knows whether a valid username has been entered in order to pass it down to your environment for authorization.

Because of the public nature of ADFS, it requires you to have public IP addresses available, certificates for the URLs used by ADFS and also requires you to have a DMZ segment exposed to the internet.

Deployment Scenarios

In a future post which I hope won’t take me too long to make available, I will talk about some of the deployment scenarios and options for deploying both same sign-on and also single sign-on. I will also cover how the release of AADSync effects existing deployments of DirSync or FIM.

Support My Wife Without a Penny from Your Pocket

Apologies to those who come here for a techo-fix but I’ve got to drop one personal post in here from time to time 🙂

My wife who is currently a 3rd year university student studying a degree in Midwifery has the option to be able to do an elective period of voluntary placement work overseas during this, her last year of the course. She is looking to work in Gibraltar for two weeks to complete this elective work module because it gives her a taste of how they do things overseas without the complexities of a language barrier.

These elective placements are not paid work and they are essentially working for free in exchange for getting their hands on experience and learning.

Because there are already enough charities asking for your money each month, she’s decided to take a different tact to fundraising using a site called Easy Fundraising. The way this site works is that when you go about your travels of the Internet, buying your wares from eBay, Amazon or other retailers, Easy Fundraising collect a small percentage of the value of the sale from the online stores in referral fees.

Simply visit http://www.easyfundraising.org.uk/causes/nicolagreen/ or using the bit.ly short-link I have created http://bit.ly/nickygib and make your online purchases via the Easy Fundraising site and we collect the referral bonuses. Sadly, I must confess that you do need to register on the Easy Fundraising site before you can support a cause.