Richard works as a Cloud Consultant for Fordway Solution where his primary focus is to help customers understand, adopt and develop with Microsoft Azure, Office 365 and System Center.

Richard Green is an IT Pro with over 15 years' of experience in all things Microsoft including System Center and Office 365. He has previously worked as a System Center consultant and as an internal solutions architect across many verticals.

Outside of work, he loves motorbikes and is part of the orange army, marshaling for NGRRC, British Superbikes and MotoGP. He is also an Assistant Cub Scout Leader.

jQuery and WordPress No Conflict

Last night, I was doing some work on my blog as ever since I wrote the custom theme I use (and since updated it) I have neglected my mobile visitors and the mobile views not only looked awful but in some cases, depending on the device you were using made the content totally invisible due to the black wallpaper background and the black body text appearing on top of each other.

I decided I wanted to add a fixed top header that faded away as you scroll down the page and reappeared as you scroll back up as I’ve seen it on a number of sites before and the effect is both aesthetically pleasing and maximises the real estate on devices with small screens such as smartphones. I found a site which had a good reference on how to implement this using jQuery and I added the script to the site and the relevant CSS selectors but it wasn’t working.

Using the Developer Tools in Internet Explorer, I could see that my script file containing the jQuery was generating an error on line 1 with the error $ is not defined. Being that I’m just about good enough to write and tweak the jQuery for my needs, I had to resort to searching online to find the solution so I thought I would post it here in the hope that I help some other WordPress administrator out there struggling with the same issue.

The problem arises not because of a problem with jQuery but a nuance with WordPress and how it implements jQuery. With a normal site under normal conditions, you load the jQuery library to allow you to invoke jQuery on the site and in doing so, jQuery assign itself the $ symbol as a variable used for invoking jQuery. jQuery includes an optional mode called noConflict which helps to prevent conflicts with other libraries and extensions that may also use the dollar symbol as a variable. WordPress implements jQuery in no conflict mode and as a result, the dollar symbol is not available and instead, we have to invoke jQuery using the jQuery named variable.

When writing jQuery scripts for use on a WordPress site, we need to replace all instances of the dollar symbol with the jQuery notation. Below is an example line from the script I first wrote for the disappearing menu bar script referencing jQuery using the dollar symbol which causes the $ is not defined error.

$(window).scroll(function(event){
    didScroll = true;
});

To make the script function properly on the WordPress site, I had to modify this section of code to replace $ with jQuery as shown below.

jQuery(window).scroll(function(event){
    didScroll = true;
});

After changing this and all the remaining references in the script and saving it back to the site, the Developer Tools ceased to report the error and the script started to function as expected.

One Year Left for SQL Server 2005 Support

Many enterprises are still dealing with the challenges of completing Windows XP and Windows Server 2003 migrations. Whether you are moving to Windows 7 or Windows 8.1, perhaps even running the gauntlet on Windows XP and hedging your bets for Windows 10 later this year on your clients all the while, evaluating and testing your line of business applications and servers on Windows Server 2012 R2, there is a lot to deal with.

There’s nothing like a little added pressure to throw into the mix and that is why as of 12th April 2015, there is one year left on the extended support status of SQL Server 2005. This notice effects all editions of SQL Server 2005 including 32-bit and 64-bit versions, remembering of course that later versions of the Microsoft database engine are 64-bit only.

With databases and their associated servers being critical to the underpinning of your applications, making the right choices to move these databases is a big decision. If for example, your current database server is a 32-bit server then not only will you have to move that to a 64-bit version of SQL Server but also a 64-bit operating system and that may mean new hardware required if the server only has a 32-bit processor to work with. There is also the question of virtualization as back in 2005, many people wouldn’t have dreamed of virtualizing a database server but today, it’s a commonly done thing . We even have Database as a Service solutions available in the public and private cloud such as SQL Database in Microsoft Azure.

Once you’ve decided on a target architecture platfom, the talk may move on to questions such as storage types, SSDs and flash cache devices such as the Fusion-io ioDrive as things have certainly moved on in storage since your SQL Server 2005 system was first deployed and once you’ve had those conversations, you can think about high availability options such as failover clustering, mirroring or AlwaysOn High Availability, the latter being new to exiting SQL Server 2005 users and offering a fantastic high availability solution.

I think the SQL Server 2005 issue is going to be quite a wide-spread one as in my travels to customer sites and on projects, I see a lot of SQL Server 2005 in the field still, running production systems and some of these systems may themselves no longer be within support so contacting the vendors for information about support for later versions of SQL may make for interesting work. If the vendor themselves has ceased trading then finding out whether that application will support SQL Server 2012 or SQL Server 2014 will be down to you and a test environment.

Mail Calendar and People Apps in Windows 10 Build 10049

In previous builds of Windows 10, there was a known issue with the default Mail, Calendar and People apps which caused them to become corrupted and you had to use PowerShell to resolve the issue by removing the old app instances and re-installing them from the Windows 8.1 Store. My PC downloaded Build 10049 overnight and this build seems to have the same issue however the catch appears to be that if you follow the old instructions that it doesn’t work off the bat and you have to repeat the process as suggested on the thread http://blogs.windows.com/bloggingwindows/2015/03/30/windows-10-technical-preview-build-10049-now-available/.

First, open a PowerShell prompt with the Run As Administrator option. Once launched, enter the following code.

Get-AppxProvisionedPackage -Online | Where-Object {$_.PackageName -Like "*WindowsCommunicationApps*"} | Remove-AppxProvisionedPackage -Online

Once you have completed this, restart the PC. With the restart complete, open the Administrative PowerShell prompt and re-enter the same command again. I had to do this twice in the end so just hit the up arrow to re-use the command and hit enter to run it twice.

Once you have done this, open the Windows 8.1 Store using the green tiled Store app, not the Windows 10 Store with the grey tiled Store (Beta) app. In the store, search for Mail and install the Mail, Calendar and People app collection.

If the installation fails, try restarting and re-running the PowerShell command above as it will work eventually.

Once the apps are installed, looking at your Start Menu, you may see them appear corrupted still, showing the odd looking app names. If this is the case, unpin them from your Start Menu by right-clicking on the tiles and select the Unpin from Start option and then re-pin them to the Start Menu by right-clicking the odd looking app name from the All Apps list and select the Pin to Start option. Once you re-pin the apps, they should change to show the correct app name and launching the apps should now work.

Microsoft are reporting working on fixing the issue to prevent the corruption of these apps in future builds but for the time being, it looks like removing the apps just once that worked in previous builds isn’t enough.

Automatically Assign DVD Drive Letter VMM Private Cloud

When you are running a private cloud, automation is the key to success and having everything automated and running in a repeatable fashion every time is important.

When using Virtual Machine Manager to deploy VMs into a Hyper-V (or VMware) environment, it is fairly common for the VMs we deploy to have multiple drive letters such as C: for the operating system and D: for the data directories and server application installations. One of the problems with this setup is the virtual DVD Drive interfering with your drive lettering.

Like many administrators, I like to move my DVD Drive to the Z: drive so that it is still there to allow me to mount .iso files on the VM using stored .iso files in the VMM Library Share but that way, I know that all my data drives are kept together. Unfortunately, Windows Server will automatically assign the DVD Drive to the D: letter which means a manual task is required to move it to another letter however I have a nice little solution that will move it to the Z: drive or any letter you desire using the VMM GUI Run Once commands.

To make this work, we need to perform two distinct activities. One is to add some files to support this change to our VM Template and the second is to configure VMM to do the work.

Adding Files to the VM Template

I’m assuming in this post that you have a working VM Template configured in VMM. If you don’t then you should get that sorted first as deploying VMs using VMM lives around good quality templates and not deploying VMs with blank hard disks and installing the OS from the .iso image.

On either your VMM Library Share server or on another server, using Computer Management, attach the VHD file for the VM Template so that you can get access to the disk.

On the disk, I created a folder call FirstRun at the root of the drive. Inside this folder, we are going to add two script files. One is a simple command script and the other is a PowerShell script. Through my testing, it appears VMM isn’t quite so impressed with launching PowerShell scripts from the GUI Run Once commands and there is also the matter of PowerShell Execution Policy to factor in, both of which we can get around by using a command script to bootstrap the PowerShell script.

The first script is called FirstRun.cmd and contains the following.

:: First Run Configuration Script
:: v1.0 7th April 2015 by Richard J Green

:: Assigns DVD Drive to Z: Drive and Perform Clean-Up

@echo off
title First Run Configuration Script

:: Launch PowerShell and Set the DVD Drive Letter to Z
echo Set the DVD Drive Letter to Z
PowerShell.exe -NoLogo -Sta -NoProfile -ExecutionPolicy Unrestricted -File %SystemDrive%\FirstRun\Set-DriveLetter.ps1

:: Clean-Up Script Files from VM
echo Clean-Up Script Files
cd\
rd /S /Q FirstRun

This script simply launches a PowerShell session and forces PowerShell into single threaded mode to avoid any multi-threading issues, it does not attempt to load a PowerShell profile which speeds things up and it sets the inline Execution Policy to Unrestricted. This restriction only applies to this instance of PowerShell and not the system as a whole which is how we get around PowerShell Execution Policy defaulting to Restricted (we can’t be sure Group Policy will have been processed by this point so any GPO setting to lower the policy to RemoteSigned (for example) may not be ready). Lastly, we call in a PowerShell script file which does our real work.

At the end of this script, it runs a quick rd command which deletes our FirstRun directly meaning that your resulting VM deployment isn’t left with the first run deployment scripts and files on it so we are cleaning up after ourselves.

The second script is the real worker script, the PowerShell which is going to configure your drive letter.

# Set-DriveLetter.ps1
# v1.0 7th April 2015 by Richard J Green

# Sets the Drive Letter for the DVD Drive to Z
(GWMI Win32_CDROMDrive).Drive | %{$a = mountvol $_ /l;mountvol $_ /d;$a = $a.Trim();mountvol Z: $a}

This script is even shorter and simply locates any removable media drives via WMI and then remounts the drive to the Z: drive. If you want to use a different drive letter, simply change it at the end of the line. The PowerShell for this is courtesy of Derek Seaman at http://www.derekseaman.com/2010/04/change-volume-drive-letter-with.html.

Although I am using this for merely changing the DVD Drive letter right now, I can see me expanding these First Run scripts over time to do more work for me on VM deployments.

Once you have added the two script files into the FirstRun directory in the VM .vhd template, using Computer Management on the server, unmounts the .vhd file so that the changes are saved back into the template.

Configuring VMM GUI Run Once Commands

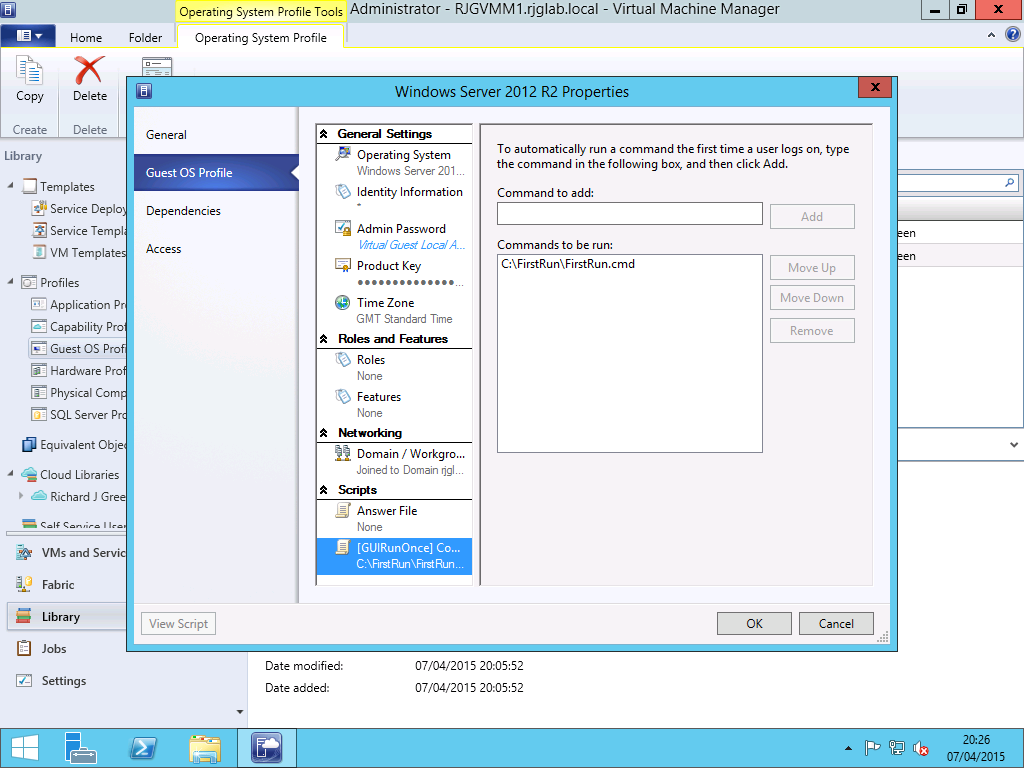
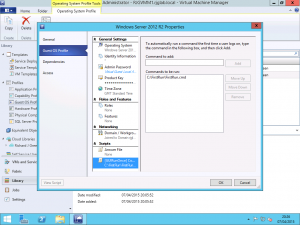
With the template now configured, open your Virtual Machine Manager console and head to the Library pane. Depending on how you use VMM, you will need to configure this directly on your VM Template or on your Guest OS Profile. I use a Guest OS Profile with all of my VM deployments as I keep my VM Template configuration as low as possible to allow for maximum re-use so I will be showing you how to configure this on a Guest OS Profile.

Edit the Properties of your Guest OS Profile that requires these scripts to run and select the Guest OS Profile tab and then the [GUIRunOnce] Commands option from the bottom of the configuration options list. IN the right of the Properties window, in the Command to Add field, enter the path to your FirstRun.cmd script stored in your VM Template.

VMM Guest OS Profile GUIRunOnce

Testing the First Run Script

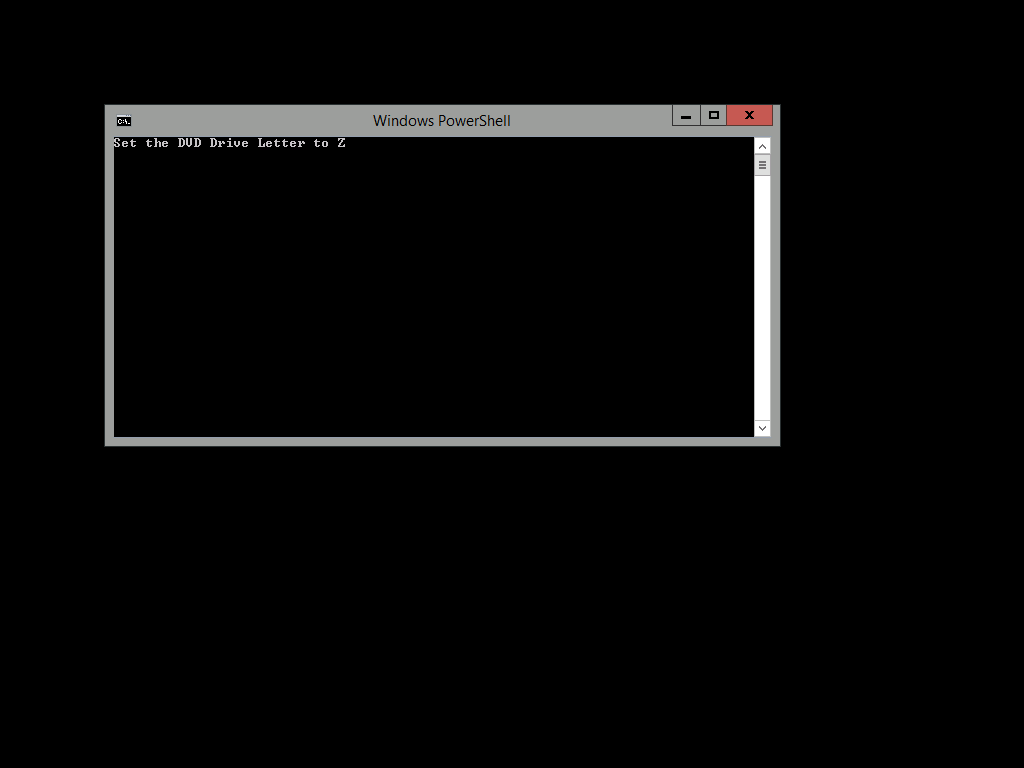
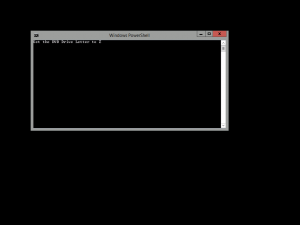
After configuring the commands on the Guest OS Profile in VMM, I deployed a VM into my environment based on the VM Template with the files embedded and using the Guest OS Profile for customisation of the template during deployment. Once the deployment was complete, I logged on to the VM using my normal server administration credentials and I was greeted by the sight of the FirstRun.cmd command prompt script running and as the title bar in the screenshot below shows, we can see it is currently running a Windows PowerShell application which means that the called in PowerShell .ps1 script is running.

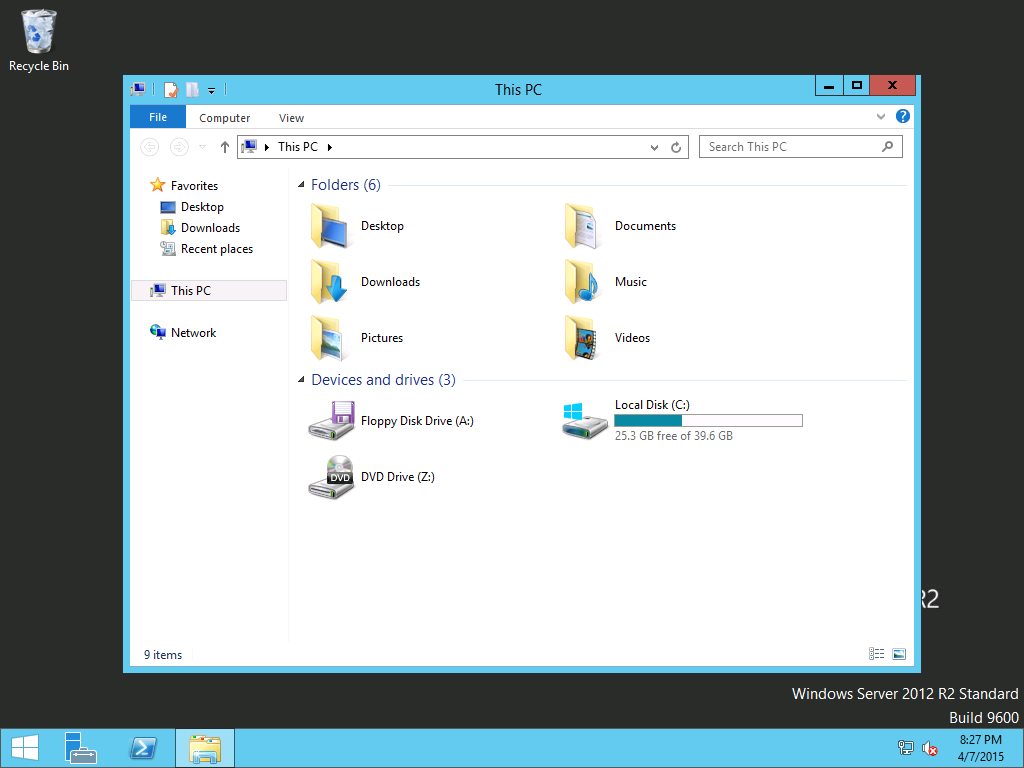
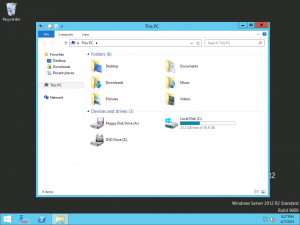
Once the logon is complete, I opened Computer and was greeted with the sight of the DVD Drive on the Z: letter as desired. Browsing the contents of the C: drive, the FirstRun directory has been removed and there is no trace of the scripts or directory having ever been there.

VM First Logon Running Script  VM DVD Drive on Z

It is important to remember that this script will run when a user first logs on to the server and not automatically as part of provisioning. This is how GUI Run Once commands in VMM are designed to work and the expected behaviour.

If you wanted this to be completely seamless, you could use the AutoLogonCredential parameter in VMM on your VM Template to configure VMM to automatically logon as the local administrator account at the end of deployment which would trigger the GUI Run Once script, perform any first run activities and have the final step of your FirstRun.cmd script be to either restart the VM to complete any configuration or to simply log off the server with the logoff command. I may well try this for myself and update the post when I get a chance to let you know how this works for real.

Nvarchar Data Type Error with SCSM 2012 R2 Update Rollup 5

If you are running System Center 2012 R2 in your environment and you have installed Update Rollup 5 but you are based outside of the USA then this post may well be for you.

Update Rollup 5 is the latest of the regular maintenance updates for Service Manager 2012 R2 and includes a wave of updates but it also comes with a nasty bug up it’s sleeve.

I was working with a customer this week trying to get to the bottom of an issue whereby the Data Warehouse jobs where failing. The MPSyncJob was completing successfully but the next jobs in the Data Warehouse job order, the Extract jobs where failing and reviewing the event log on the Data Warehouse server had an error message “The conversion of a nvarchar data type to a datetime data type resulted in an out-of-range value”.

The error message itself isn’t particularly helpful unless you happen to know a bit about SQL and that nvarchar and datetime are both SQL data types for storing row data. I looked back through the logs and found that the jobs started failing the day after we installed an updated version of a custom management pack I had written for them so we uninstalled the MP and I re-ran all of the warehouse jobs which this time succeeded so we knew it was the custom pack at fault.

I reviewed my code in Visual Studio and was happy that everything was as it should be so I turned to the TechNet forums to see what others had to say and sure enough, there where quite a few people on there complaining that after installing Update Rollup 5, they started to see these same Data Warehouse job failures.

It transpires that there is a bug in Update Rollup 5 which only effects systems which use a System Locale that results in a change to the date and time format. US systems store their date and time in the MM/DD/YY format however here in the UK and many other countries, we store the date as DD/MM/YY. The bug in Update Rollup 5 meant that SCSM isn’t able to understand how a month could possibly have more than 12 days as it isn’t able to understand international date formatting with the days and months transposed.

Microsoft have released a hotfix for Service Manager 2012 R2 Update Rollup 5 which updates the Microsoft.EnterpriseManagement.Orchestration.dll file and fixes the issue.

You can obtain the update from http://www.microsoft.com/en-gb/download/details.aspx?id=46368. Once downloaded, apply the update to your Service Manager Management Servers and your Data Warehouse Management Servers. Although not noted as a requirement in the update release notes, I chose to restart the servers just to be certain. After installing the update, Microsoft.EnterpriseManagement.Orchestration.dll will be updated from 7.5.3079.315, the UR5 version, to 7.5.3079.344 to reflect the hotfix installation.

After applying the hotfix, I re-imported the management pack I had written, re-imported the data for the management pack using a CSV Import and I manually triggered the MPSyncJob and the Extract jobs and they all ran without issue and the Data Warehouse is now functional again.

One important note regarding this update is that it states that your Data Warehouse must have completed at least one successful synchronisation before installation. If you are using an existing deployment of SCSM 2012 R2 then this shouldn’t be a problem however if you are working with a new installation then you should pair the Management Group and the Data Warehouse Management Group and complete a sync before you start installing third-party management packs that could trigger the issue. Once the jobs have completed overnight at least once, then install the hotfix and proceed with installing your custom management packs.

SCCM OSD Part 2: Consolidating the Captured Images

In part of one this series, SCCM OSD Part 1: Building Reference Images, we setup task sequences to capture reference images for all of the required operating systems. Further on in this series, we will be using Microsoft Deployment Toolkit to create a User-Driven Installation (UDI) with the Configuration Manager integration and in order for this to work, we need to consolidate our images into a single master .wim file.

This post will focus on this area. There are no screenshots to offer here as this is a purely command driven exercise. In order to complete the steps in this post, you will need to know the path to where you captured the reference image task sequence .wim files. For the purpose of this, I will assume in this post that all of your captured images are stored in the D:\Images\Captured path on your server. To keep this post consistent with my lab environment, I will provide the commands for capturing Windows 7 and Windows 8.1 images for both 32-bit and 64-bit architectures into the consolidated image.

We start the process by capturing the first image with the following command:

Dism /Export-Image /SourceImageFile:”D:\Images\Captured\Windows 7 x86.wim” /SourceIndex:2 /DestinationImageFile:”D:\Images\Consolidated.wim” /DestinationName:”Windows 7 x86″

Dism is a complicated beast and has a lot of switches that we need to throw into our commands to make it work as we want. To make it worse, Dism is a command line tool not a PowerShell tool so we don’t have the luxury of tabbing our commands to completion. When you enter this command for yourself, make sure you include the quote marks around any names or file paths with spaces. If you have no spaces in your names or paths then you can omit the spaces.

To breakdown this command, the Export-Image opening parameter tells Dism that we want to export the contents of one .wim file into another. The SourceImageFile parameter tells Dism where our source file is located and the SourceIndex tells it which image within the .wim file we want to export. The reason we need to target index 2 is that when a machine is captured using the Build and Capture Task Sequence, two partitions will be created on the disk and captured. The first will be a 300MB System Reserved partition used for Boot Files, BitLocker and Windows Recovery Environment if any of these features are configured. The second partition is used to install the actual Windows operating system. DestinationImageFile is obvious in that we are telling Dism where we want the image from the original file to be saved. In essence, we are telling Dism to create a new file with the index from an existing image. The DestinationName parameter is not required but is makes our lives a lot easier down the line. With Destination Name, we provide a friendly name for the index within the .wim file so that when we are using SCCM or MDT to work with the image we are shown not only the index number but a friendly name to help us understand what index in the image file does what.

The command will execute fairly quickly and once complete, we will have a new file called Consolidated.wim with the contents of the original .wim file for Windows 7 x86. Now, we repeat the command for Windows 7 x64.

Dism /Export-Image /SourceImageFile:”D:\Images\Captured\Windows 7 x64.wim” /SourceIndex:2 /DestinationImageFile:”D:\Images\Consolidated.wim” /DestinationName:”Windows 7 x64″

You will notice the two differences heres. Firstly, we specify a different Source Image File to the 64-bit version of Windows 7. The second difference is the Destination Name. When we run this command, Dism sees that the Consolidated.wim file already exists and does not overwrite it but instead, applies our Export Image command as a second index to the Consolidated.wim file and hence you see how we build a consolidated image.

Repeat the command twice more to add the Windows 8.1 iimages:

Dism /Export-Image /SourceImageFile:”D:\Images\Captured\Windows 8.1 x86.wim” /SourceIndex:2 /DestinationImageFile:”D:\Images\Consolidated.wim” /DestinationName:”Windows 8.1 x86″
Dism /Export-Image /SourceImageFile:”D:\Images\Captured\Windows 8.1 x64.wim” /SourceIndex:2 /DestinationImageFile:”D:\Images\Consolidated.wim” /DestinationName:”Windows 8.1 x64″

Once these two commands have completed, it’s time to review our work. Use the following command with Dism once more to list the contents of the new Consolidated.wim file and make sure everything is as we expect it.

Dism /Get-WimInfo /WimFile:”D:\Images\Consolidated.wim”

The result will be that Dism outputs to the command line the name, index number and size of all of the indexes within the image. If you are following my steps above to the letter then you will have a resulting Consolidated.wim file with four indexes, each with a friendly name to match the operating system within that given index.

SCCM OSD Part 1: Building Reference Images

This is the first in what will become a multi-part series of posts on configuring Operating System Deployment in Configuration Manager 2012 R2. The end goal will be to use Configuration Manager with MDT integration to provide a rich end-user experience for deploying operating systems.

In this first part, we will lay the foundation for what will become the core of the deployment – the Windows Operating System images. In this part, we will create task sequences to build and capture the reference images and update them as needed.

Import OEM Media OS Images

We start with our source Windows media. Copy the contents of the Windows .iso file you plan to use for your installations to a suitable directory in your SCCM source structure and import the Operating System Images as shown above. Repeat this for as many Operating System versions and architectures as you need to support. If you are supporting many operating systems, I would highly recommend creating a folder structure to aid locating the images.

Create Task Sequence Wizard Build and Capture

Once you have imported your base Operating System Images, we need to create a new Task Sequence. In the Task Sequence Wizard, select the Build and capture a reference operating system option.

Specify Task Sequence Name and Boot Image

Next, we need to give our Task Sequence a name and specify the boot image to use. You should always use the 32-bit (x86) boot image because with this one image we can support both 32-bit and 64-bit operating system images however if you use the 64-bit boot image, that is only able to support 64-bit operating system images.

Specify OS Image to Use as Reference

Next, we need to specify our source operating system. In this demonstration, I am using Windows 8.1 Enterprise with Update (x64). The install.wim file in the source Windows media only contains a single image so Image 1 automatically selected from the .wim file. If you are using a Windows image that provides multiple Images such as Home Basic, Home Premium and Professional then you need to make sure you specify the correct image from the list.

Specify Join a Workgroup

Next, we need to specify our machine to join a workgroup and not a domain. We don’t want our reference machine to join the domain as joining the domain will cause Group Policy Objects to be applied to the image which could in turn install software, none of which we want included in the base image. Specify any workgroup name you like but I stick to WORKGROUP just for simplicity.

Set ConfigMgr Client Package Properties

On the step shown above, we need to configure the Configuration Manager Client Package that will be used to install the Configuration Manager Client. Configuration Manager will automatically select the package from the site however we need to customise the parameters that get used for the installation. Parameters are automatically detected from the site Client Push Installation parameters and in my case, this added the Fallback Status Point (FSP) record automatically. We need to add to this the SMSP parameter. The SMSMP parameter tells the Configuration Manager Client the name of the Configuration Manager Management Point. A domain client would find this automatically via Active Directory Publishing of Configuration Manager but as we are in a workgroup, we need to add it. Without this parameter, our Install Software Updates steps will fail to find any updates. Add the parameter as SMSMP=RJGCMSITE1.rjglab.local where RJGCMSITE1.rjglab.local is the FQDN of y our Configuration Manager Management Point.

Specify Install All Software Updates

After setting our SMSMP parameter, we need to tell the task sequence wizard that we want to install All Software Updates. This will install any updates which are either Required or Available to the client from any deployments that are visible to the client.

Specify Capture Path and Network Access Account


On the final step, we need to specify the capture path and a network access account. Specify the UNC path to the location where you want the captured reference image to be uploaded. This captured file is not automatically added to Configuration Manager once the capture process is complete. The network access account does not use the account configured in the Site Properties and requires us to re-enter the username and password. This is because we may be saving the captured image to a location or to a server which the normal network access account does not have access.

Once you reach this point, the reference image task sequence will be created with all the default steps and can be used like this if you wish however I like to add a few more steps manually.

Add Install Software Steps to the Reference Image

As you can see from the image above, I have added an Install Software step to the task sequence to install .NET Framework 4.5.1 so that all of my reference machines include this newer version of .NET Framework. Other things you might want to consider including in your reference images are Windows Features such as .NET Framework 3.5.1 or software such as Visual C++ packages that will be required by your end-user applications later on down the road. This is down to personal preference and individual requirements so do as you will here. Use an Install Software step to perform this and reference the package and program as required to do so.

Add Software Update Scan Step

Next, I like to make some changes to the Install Software Updates phase of the sequence. Firstly, I have found, as have others in the community that sometimes the task sequence just fails to find any updates. We can fix this with two steps added to the task sequence. The first step shown above calls the Configuration Manager Client and forces it to perform a Software Update Scan Cycle. To add this yourself, use the following, added as a Run Command Line action in the task sequence.

WMIC /namespace:\\root\ccm path sms_client CALL TriggerSchedule “{00000000-0000-0000-0000-000000000113}” /NOINTERACTIVE

Add Software Update Wait Step

In the step following our forced Software Update Scan Cycle, add a wait timer to the task sequence. This is to give the Software Update Scan Cycle enough time to run, complete and evaluate the updates requirements. Some people will want to use a VBScript to initiate this but doing so requires a package to be downloaded by the client. The easiest way is to use PowerShell and the Sleep command. Use the following added to the task sequence as a Run Command Line action to add a wait timer to the task sequence.

PowerShell.exe -Command Start-Sleep 45

You can change the timer from 45 to any number of seconds that you require but I found that 45 seconds works okay for my requirements.

As you will also see from the two screenshots above, I have added multiple Software Update sections with a Restart Computer step following each wave. As we all know, some Windows Updates require dependencies to be installed or require a restart to complete their installation. Having three iterations (waves) of Install Software Updates in the task sequence does add a chunk of time to the end of the capture process but it is worth it, especially given you won’t be running these too often if at all after the one time. Having three passes of the Install Software Updates step will pretty much ensure that your reference images have 100% of all available updates installed and will be fully up to date.

Once you’ve reached this point, your task sequence for building and capturing a reference image is done. If like me, you are supporting multiple operating systems and architectures then you can now copy the task sequence to create a duplicate of it. For each duplicate you create, edit the Apply Operating System and the Capture the Reference Machine steps to change both the operating system image that gets applied to the reference machine and also the path to which the image is captured.

Once you have created all of the required task sequences, advertise (deploy) them to a collection and run them on your client. At the end of the process, you will have captured a .wim file for each operating system variant you support as a fully patched reference image and we are ready to move on to the next step which is image consolidation which I will be posting in the coming hours or day or so.

Extending SCUP with the Patch My PC Catalog

If you read my two previous posts, Preparing Certificates and GPOs for System Center Update Publisher and Setting Up System Center Update Publisher, you will have already a working SCUP installation and integration with Configuration Manager and you will have the certificates and Group Policy Object settings in place for your clients to trust the updates distributed by SCUP. The downfall to the work done with SCUP up to now is that the out of the box catalogs that Microsoft give you access to are subject to that provided to Microsoft by the software vendors. Adobe, Dell, Fujitsu and HP all provide catalogs however none of these are complete and cover their entire product line but the gesture is most welcome none-the-less.

Where SCUP becomes really powerful is when we look beyond these out of the box catalogs and look at starting to patch other third-party software that doesn’t get delivered through Windows Updates normally and the primary reason is security.

Third-party applications as much as we need them can be the bain of an administrators life and the need to keep them up to date, especially when you look at heavily updated applications like Adobe Flash Player or Google Chrome. We need to keep pace with these updates to make sure that the vulnerabilities and CVEs addressed by the updated versions get into the hands of our users but it is a balance between time, effort and cost as are all things in business. Depending on the sector or organisation you work for, you might have a requirement to keep pace too. UK bodies that use the Public Services Network (or PSN) or organisations accepting credit card payments required to comply with PCI DSS all have compliance requirements to maintain applications within a certain number of versions of the latest available release.

Another reason for considering SCUP for these third-party updates is consistency and efficiency. Google Chrome and Adobe Flash Player for example, both have automatic update engines built into them designed to keep the products up to date however these systems aren’t designed with the enterprise in mind and as a result we not only can find ourselves in a scenario where we start to find divergent versions of software across the estate but also we find a large amount of internet connection bandwidth being consumed by downloading these software updates for each and every client. Yes there are workarounds to this such as caching the updates on a proxy server but that doesn’t really resolve the root issue.

Home Brew Updates and Detectoids

The brave amongst you may be looking around the SCUP console and have realised that you can import your own updates from a Local Update Source and that you can write your own detectoid rules to locate installed software at specific versions but that is time consuming work, requires a lot of testing and prone to error: I tried myself to write custom detectoids for patching Oracle Java in a previous life and it didn’t go so well even though I followed instructions somebody else claimed to have worked.

If we look back to the statement I made about balancing time, effort and cost, creating custom updates in SCUP uses all three of those although the cost is born out of man-hours spent on the endeavour and not a real cost like buying something. Therefore, this isn’t an effective solution so we need to find something else.

Patch My PC SCUP Catalog

As we already know, SCUP provides some out of the box catalogs for getting third-party updates but the list of products and vendors is extremely limited. To my mind, the worst offenders like Oracle with Java and Google with Chrome should be doing more to help enterprises with services like SCUP catalogs but they don’t sadly. Luckily for us though, the market answers our needs and here is where I introduce a company called Patch My PC who have a product simply named SCUP Catalog.

What Patch My PC provide is a subscription based catalog that we can import into our SCUP console and they do all the hard work for you of creating the detectoids, pulling together the update files and crucially, the testing. Unlike most enterprise software that costs the earth, Patch My PC is priced simply and fairly: $1 per managed client per year. There is a minimum order of 250 managed clients so even if you have only 100 devices, you need to license 250 still but at $1 per client, per year, I fail to see how any organisation could manage the patching of third-party applications more cheaply.

Before I get any further into the details on this post, I just want to make one thing clear. As are all of my posts on this blog, nobody is paying me to write a favourable review for a product or say anything nice about their company in exchange for favours. I approached Patch My PC to request the NFR license for my lab so that I could blog about it to show you all the value of the software, not because I’m making revenues of advertising their product for them. There are other products on the market which can perform a similar job to Patch My PC SCUP Catalog but none of them are able to do it with the simplicity that we can here today nor do any of them come even remotely close on value for money and price. As we all know enterprise IT is squeezed year-on-year for budgets, if we can achieve something more effectively and more cost consciously then it is good thing.

Add Patch My PC SCUP Catalog

After registration and payment, you will be emailed a URL to a .cab file. You don’t need to download this file as this file is updated frequently by the team at Patch My PC with the latest updates. In the SCUP Console, on the Catalogs page, select the Add Catalog link in the Ribbon. In the wizard, enter the URL given to you for your unique catalog and enter the details for Patch My PC as shown into the various form fields.

Import Patch My PC SCUP Catalog

Once you have added the catalog, you need to import it. Still on the Catalog page in the console, select the Import button and select the Patch My PC catalog to import it. Unlike the out of the box catalogs I showed in my previous posts, this will take a lot longer to import as there is a lot more here but it shouldn’t take more than a minute or two.

Publish Patch My PC Updates to WSUS

With the catalog imported, head over to the Updates page and take a look at the list of products and updates that the catalog has added to SCUP. The list of products includes too many products for me to mention directly here but you can look at the list they maintain at https://patchmypc.net/supported-products-scup-catalog. To deploy an update to clients, we need to publish it to WSUS. Select the update(s) you want to deploy and select the Publish option from the Ribbon.

Once you have published the updates they will be inserted into WSUS and we now need to make a quick change in Configuration Manager for the remainder of the process to work.

Add Products to SCCM SUP Point

In your Configuration Manager Administration Console, navigate to the Administration page and expand the Site Configuration folder followed by Sites. In the main area, right-click your Configuration Manager site and select the Configure Site Components menu item followed by Software Update Point. In the SUP settings, select the Products tab and check the boxes for all of the products you just published into WSUS as they will currently not be enabled.

SCCM Software Updates with Patch My PC

Once you have done this, the next time your Software Update Point WSUS server performs a synchronisation either automatically on the schedule or if you force one, the updates for the recently added products will appear in the All Software Updates view of the console and will be available for you to deploy to your clients following your normal software update process.

As you can see, with Patch My PC, we can use SCUP to quickly get third-party software updates published into WSUS and made available to Configuration Manager for us to deploy to clients extremely quickly and easily without having to create our own custom updates or detection rules. Furthermore, we no longer need to manually create Software Packages in Configuration Manager for the updated products and Device Collections to locate machines on the network with particular software versions installed to target the deployment of these updates.

The whole process took me in my lab no more than 30 minutes to get setup with a working Update Publisher deployment already in place and now that it is done, it would take less than ten minutes each month to add approvals for the products I am interested in and get them into Configuration Manager to the point that I would be ready to roll them out to clients and to be able to achieve this level of simplicity in third-party patch management for $1 per device per year is frankly amazing.

SCCM OSD Failed Setup Could Not Configure One or More Components

Last week I got asked to look at an issue where a new model of laptop was failing to deploy using a Configuration Manager Operating System Deployment Task Sequence. We knew that the environment was good as other machines were able to complete the task sequence without any issues and the first thought was that it could be a driver issue.

Initially I was sceptical of it being a driver issue as when we see problems with machines completing operating system deployment, problems with drivers normally fall into the category of silent fail whereby the driver is missing all together and we end up with the yellow exclamation mark in Device Manager or the task sequence fails because the driver missing or problematic is related to network or storage and blocks the task sequence from completing.

In this instance however, we knew that the problem was specific to this model. Given that we are failing in the Windows Setup portion of the task sequence, the usual smsts.log file is of no help because the Configuration task sequence has not yet been re-initialized after the reboot at the Setup Windows and ConfigMgr step. in this instance, we need to refer to the setuperr.log and the setupact.log in the Panther directory which you will find in the Windows installation directory. This is where errors and actions relating to Windows Setup live as opposed to the normal smsts.log file.

We rebooted the machine back into WinPE to allow us to open the log file with visual Notepad and began reading the file. Sure enough, we hit an error and the code given was 0x80004005. Looking at the activity either side of this, we can see that the machine is busy at work with the CBS (Component Based Servicing) engine and is initializing and terminating driver operations so we know that something has happened to a driver to cause this problem.

At this point, we had nothing more to go on. Two weeks’ ago, I had a similar issue with another customer whereby the issue was clearly logged to the setuperr.log file and the problem in that instance was an update we had added to the image with Offline Servicing required .NET Framework 4.5 to be present on the machine however Dism didn’t know to check that so we simply removed the update but here, we have no such helpful fault information.

Given that this was a new machine and given that we are deploying Windows 7, I had a thought? What if these drivers being applied require the User or Kernel Mode Driver Framework 1.11 updates that were released for Windows 7 some time ago?

This theory was easy to check. I mounted the Windows 7 .wim file on our SCCM server and then used the Get-Packages switch for Dism to list the installed updated in the image. Sure enough, User-Mode Driver Framework 1.11 (KB2685813) and Kernel-Mode Driver Framework 1.11 (KB2685811) were both absent from the list. I downloaded the updates from the Microsoft Download Center and Offline Serviced the Windows 7 image with the updates and commited the changed back into the .wim file.

After reloading the image in the Configuration Manager Administration Console and updating the .wim file package on the Distribution Points we re-ran the task sequence and by-jove, the machine completed the task sequence with no dramas.

For background reading, the User-Mode and Kernel-Mode Driver Framework 1.11 update is required to install any driver file which was written using the Windows 8 or Windows 8.1 Driver Kit. What I have yet to be able to determine is if there is a way of checking a driver .inf file to determine the version of the Driver Framework required. If there had been a way to determine this, Configuration Manager administrators around the world may rejoice a little so if you do know of a way to check this, please let me know as I would be interested to hear. This would have not been an issue had the reference images been patched with the latest (or at least some) Windows Updates however in this case, I was not so lucky.

Setting Up System Center Update Publisher

In my earlier post Preparing Certificates and GPOs for System Center Update Publisher, I showed you how you can prepare your environment with the appropriate certificate and Group Policy Object to support a System Center Update Publisher installation. With all of this installed and configured, the time is upon us to now install and configure System Center Update Publisher.

I am not going to go through the installation process for SCUP here because it is literally a Next, Next, Finish installation. What I will tell you though is that the latest version of SCUP is 2011 and you can download it from http://www.microsoft.com/en-gb/download/details.aspx?id=11940. The steps in this post can be applied to Configuration Manager 2007 or Configuration Manager 2012 and 2012 R2 but all of my screenshots for the Configuration Manager side of things will be in SCCM 2012 R2.

Configure SCUP Options

Once you have got SCUP installed, you want to open the console, ensuring that you use the Run As Administrator option. If you don’t elevate the console when you launch it, a number of the options and settings will prevent you from changing them. Once open, click the blue icon in the first position on the Ribbon and select Options to get to the settings.

SCUP Configure WSUS Server

First, we want to configure the WSUS Server settings tab. On this tab, you can either specify the hostname for a remote WSUS server or if you are running the SCUP console locally on your WSUS server you can select the option for Connect to a Local Update Server. An important note here is that if you are connecting to a remote WSUS server, the connection must be over SSL on either Port 443 or Port 8531 in order to be able to configure the Signing Certificate settings.

Once you have specified the server, select the Browse button in the Signing Certificate area and locate the .pfx file that has the exported Code Signing certificate including the private key that was exported in the Preparing Certificates and GPOs for System Center Update Publisher post. Once you have located the file and the path is shown in the field, select the Create button and this will publish the certificate into WSUS. You will be prompted to enter the password for the .pfx file at this point.

SCUP Configure SCCM Server

With the WSUS settings configured, we now need to head to the ConfigMgr Server tab. Here, specify whether to connect to a local Configuration Manager server if you are running the SCUP console on your Primary Site Server, otherwise enter the remote server name.

In the fields in the lower part of the screen, you can specify the behaviour of SCUP for transitioning updates between Metadata only and Full Content publishing status according to the required client count. In a nutshell, you can have SCUP publish only the metadata for an update into SCCM to allow you to determine if clients require the update. Once a defined number of clients report the update as required, SCUP will change the status of the update to Full Content and will download the files such as .msp or .exe files for the update.

Adding Catalogs to SCUP

SCUP works by using catalogs which are lists of updates published by manufacturers and included in these catalogs are the update definitions which are called detectoids, working to determine if a client meets the requirements for an update as well as defining the URL where SCUP can download the update from.

In the SCUP console, select the Catalogs button from the left navigation and then hit the Add Catalogs button from the Ribbon.

SCUP Add Catalogs

After clicking the Add Catalogs button, you will be presented with the list of partner catalogs supported by SCUP. These are out of the box and are at no cost to use. To my mind, the Adobe Reader and Adobe Flash Player are the most important. As you can see from the screenshot, I have added these two catalogs from the list of partner catalogs to include in my SCUP catalogs to be used.

Once you have added catalogs to SCUP, we aren’t quite finished as that only adds them to the list of catalogs that can be used however it does not automatically start getting update information. Now, we need to Import the Catalogs. Select the Import button from the Ribbon to access the Import Software Updates Catalog Wizard and here, select one, some or all of the catalogs you just added. Doing this may take a few moments and you might receive a security warning asking you to accept some certificates in the process so go ahead and allow this.

Publishing Updates from SCUP

With the update catalogs added to SCUP and the updates in those catalogs imported, now it is time to look at some actual updates. Head over to the Updates view in the console with the button in the lower-left corner. and expand one of the folders to view a subset of the updates.

SCUP Updates List

Here we can see the name of the updates, if there are any relevant article IDs or CVEs that they address as well as the date the update was released and whether or not it is expired. As you can see for Adobe Flash Player, many of the updates are expired because they have been superseded by later updates. Highlight an update that has not been superseded and select the Publish button in the Ribbon. Click through the wizard to download the update files if required and the update will be published into WSUS ready for SCCM to use.

Configuring SCCM Software Update Point Products

With the updates now published into WSUS for Configuration Manager use, we need to make sure that Configuration Manager will be able to detect the updates. As part of installing and configuring Configuration Manager you will have setup the products and classifications for which you want to download updates and we need to add to this the products that we just published with SCUP.

In the Configuration Manager Administration Console, navigate to the Administration page and then expand the Site Configuration followed by the Sites view. Right-click on your site and then select the Configure Site Components menu item followed by Software Update Point.

SCCM SUP Products

As you can see in the screenshot above, after publishing the Adobe updates into WSUS, there is now some additional products listed for Adobe Systems Inc including Flash Player and Reader. There is also a new product called Local Publisher which is the product SCUP updates for any updates you create manually. Check all of the new products you want to be able to deploy to clients and then save the changes to the Software Update Point role.

Viewing the SCUP Updates in SCCM

SCCM Adobe Updates Available

With the updates now published to WSUS for Configuration Manager and with Configuration Manager’s SUP role configured to accept updates for these products we’re all set. You can either wait for the WSUS server to perform a scheduled synchronisation or you can force it from the Software Updates area of the Software Library page in the console. Once a synchronisation has occurred Configuration Manager will be able to list the new updates for the new products.

As you can see in the screenshot above, I used a criteria to filter the search results for Bulletin ID contains APSB which is the prefix Adobe uses for all of their security updates much like Microsoft use KB to prefix their updates. I can now follow the normal process of downloading the updates into Deployment Packages and approving the updates for distribution to collections.