Office 365 co-existence with volume licensed products is something which has been a bone of contention for many Office 365 users. Traditionally, an enterprise, we have installed Office 2016 ProPlus using a Windows Installer package. The license for this would have come from your Enterprise Agreement (EA) and would typically be licensed using a KMS […]
Office 365 co-existence with volume licensed products is something which has been a bone of contention for many Office 365 users. Traditionally, an enterprise, we have installed Office 2016 ProPlus using a Windows Installer package. The license for this would have come from your Enterprise Agreement (EA) and would typically be licensed using a KMS host. When you move to Office 365, this model changes. These changes can have a major impact on Project and Visio applications for some customers.
To read out what the changes are and how we can work with them, read on below the fold.
The recommended model for Office application deployment with Office 365 uses a technology called Click to Run. Click to Run is ideally suited to Office 365 and it’s rapid cadence approach. Instead of a traditional Windows Installer package, Click to Run uses application virtualisation to host the Office applications within a virtual package. The licensing for this works with your purchased Office 365 services. Users with Office 365 Business Premium, E3 or E5 CALs get the rights to Office applications on the desktop. The licenses are activated by users signing in to Office 365 applications with their Office 365 account.
When you purchase Office 365 Business Premium, E3 or E5, this gives you access to Office ProPlus. It does not give you access to Visio or Project applications. For many organisations, they will continue with the licenses they already own under their EA for this pair. Being totally honest, the pricing for Visio and Project seem pretty steep. When you install Office 2016 applications using the Office 365 ProPlus Click to Run installer and then try to install Visio or Project, you will receive the following error message.
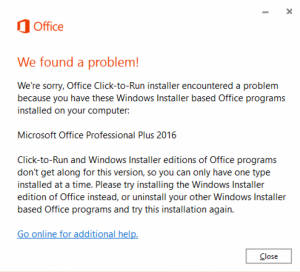
For a change, the error message is quite clear. You cannot combine installation technologies. You cannot have Office 365 ProPlus via Click to Run and Visio or Project via Windows Installer installed side-by-side. When Office 365 ProPlus and Click to Run first appeared, there was not a workaround for this. The solution, sadly, was to continue to install Office 2016 using the Windows Installer application. At some point, this has changed. Based on the release history of the Office Deployment Tool, it seems that this change came about in April.
It is now possible to install Visio and Project 2016 applications using Click to Run whilst still using on-premises traditional licensing. Amazing. The reason this is amazing is because Office 365 ProPlus offers up a number of updates channels to its users. When using the Current Channel, your users will be able to get monthly updates to office and get the newest and best features available. For productivity, new features and tools are always valuable. When compared to Office 2016 with Windows Installer, yes, there are frequent updates but these are purely focused on security and performance, not feature.
Click to Run Installation Scenarios
How you chose to actually do this may vary depending on who you want to get Visio and Project in your organisation. It may also depend on how you are distributing Office currently. Please don’t copy what I show you below verbatim. I will present you with a couple of different options to help cater for most scenarios.
Get the Office Deployment Tool
The first requirement for all of these scenarios is the Office Deployment Tool (ODT). No matter which scenario you want to invoke, you need this. Go ahead and download the latest version from https://www.microsoft.com/en-us/download/details.aspx?id=49117. If you have an existing copy of the tool, I would suggest downloading it again. The April release of the tool, version 16.0.6831.5775 adds the support for Visio and Project Click to Run installations. Without it, your installations will fail.
Note on Access and Publisher
I don’t know about you, but I dislike Access and Publisher. Access databases, as an IT administrator are things we do not want to find anywhere. An Access database means that people in the company have been storing data in a structured database without IT. Shadow IT as some like to call it. Access databases have so many flaws and that’s not even thinking about protection and security. Publisher is a poor mans desktop publishing suite. Most users will use PowerPoint for any posters or publishing needs they have. For marketing or people serious about document publication, they will have a bigger, better third-party package at their disposal.
To this end, I like to disable Access and Publisher in my installation. You will see in all of my examples, two lines which exclude Publisher and Access. Feel free to delete these lines for your use if you want to keep them available.
Install Office Pro Plus, Visio and Project
If you have a new client with no Office software installed currently and you want it all, this is the option for you. Start by creating a configuration XML file as follows.
<Configuration>
  <Add OfficeClientEdition="32" Channel="Current">
  <!-- Project Pro 2016 Installation for Co-Existence with C2R Office 365 ProPlus. -->
    <Product ID="O365ProPlusRetail">
      <Language ID="en-us"/>
      <ExcludeApp ID="Publisher"/>
      <ExcludeApp ID="Access"/>
    </Product>
  </Add>
  <!-- Enable all product updates. -->
  <Updates Enabled="TRUE"Channel="Current" />
  <!-- Enable the installer UI to be displayed and automatically accept the EULAs. -->
  <Display Level="Full" AcceptEULA="TRUE" />
  <!-- Automatically activate the installed products. -->
  <Property Name="AUTOACTIVATE" Value="1" />
  <!-- Force any applications blocking the installation to close. -->
  <Property Name="FORCEAPPSHUTDOWN" Value="TRUE" />
</Configuration>
Install Visio
If you already have Office 365 ProPlus installed and you want to add Visio to an existing installation, this is the option for you. Create a configuration XML file as follows.
<Configuration>
  <Add OfficeClientEdition="32"Channel="Current">
    <!-- Project Pro 2016 Installation for Co-Existence with C2R Office 365 ProPlus. -->
    <Product ID="VisioProXVolume">
      <Language ID="en-us" />
    </Product>
  </Add>
  <!-- Enable all product updates. -->
  <Updates Enabled="TRUE" Channel="Current" />
  <!-- Enable the installer UI to be displayed and automatically accept the EULAs. -->
  <Display Level="Full" AcceptEULA="TRUE" />
  <!-- Automatically activate the installed products. -->
  <Property Name="AUTOACTIVATE" Value="1" />
  <!-- Force any applications blocking the installation to close. -->
  <Property Name="FORCEAPPSHUTDOWN" Value="TRUE" />
</Configuration>
Install Project
If you already have Office 365 ProPlus instaled and you want to add just Project, this is your option. Create an XML configuration as shown below.
<Configuration>
  <Add OfficeClientEdition="32"Channel="Current">
    <!-- Project Pro 2016 Installation for Co-Existence with C2R Office 365 ProPlus. -->
    <Product ID="ProjectProXVolume">
      <Language ID="en-us" />
    </Product>
  </Add>
  <!-- Enable all product updates. -->
  <Updates Enabled="TRUE"Channel="Current" />
  <!-- Enable the installer UI to be displayed and automatically accept the EULAs. -->
  <Display Level="Full" AcceptEULA="TRUE" />
  <!-- Automatically activate the installed products. -->
  <Property Name="AUTOACTIVATE" Value="1" />
  <!-- Force any applications blocking the installation to close. -->
  <Property Name="FORCEAPPSHUTDOWN" Value="TRUE" />
</Configuration>
Download the Packages
Once you have created your XML configuration file, you need to download the packages that relate to that configuration file. This is really easy using ODT. From an administrative command prompt, type the following command:
setup.exe /download <XML Filename>.xml
After entering the command, you will not see any progress right away. If you look in the directory where you have the ODT tool, you will see a directory created called Office with a sub-directory called Data. Inside the Data directory, you will see all of the .cab and .dat files being downloaded for Office 365 ProPlus, Visio and Project. In my test, I created a single .xml file for all three products. The Data directory totalled 1.86GB in size.
Install the Packages
Once you have the package sources downloaded for offline use, it is time to do the installation. The installation is just as simple as the download previously. Simply enter the following command:
setup.exe /configure <XML Filename>.xml
Install times using Click to Run are very impressive. In less than ten minutes on a machine with a fairly run of the the mill i5 processor and SSD I had Office, Visio and Project all installed.
Verify the Products are Licensed
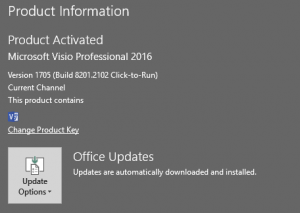
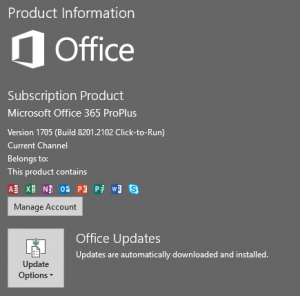
Once you have all of the products installed, you should verify that they have been licensed successfully. Here are some screenshots to show the Account page from Outlook, Visio for comparison. As you can see from the images below, all of the products are reporting as successfully licensed with Outlook getting its license from my Office 365 E3 CAL and and Visio being licensed locally. I have obfuscated the email address from the Outlook screenshot.
This first screenshot is that taken from Outlook.
This second screenshot is that taken from Visio.