Windows

Anything concerning Windows be it Windows client operating system, Windows Server operating system, Windows Mobile, Windows Phone and more.

SMB Multichannel Constraint FQDN and Hostname

Today, whilst working on something in my home lab, I noticed an issue with SMB Multichannel which if you are using SMB Multichannel in your environment you will want to be aware of.

I’ll cover how to make SMB Multichannel actually work in another post, but for now, I’ll just cover the issue. I had configured my SMB networks using the New-SmbMultichannelConstraint Cmdlet to prevent the SMB traffic for my Hyper-V VMs from using my management network and I had assumed that all would work nicely, however when I ran the Get-SmbMultichannelConnection Cmdlet, I noticed that the Client IP and Server IP columns showed the address of my management network adapters and not the SMB adapters when it struck me.

I had registered the SMB Multichannel Constraint using the NetBIOS hostname of the servers however my Hyper-V server is using the FQDN of the storage server to connect to the SMB share with the VM data in it. I ran the New-SmbMultichannelConstraint Cmdlet again but this time registering the FQDN of the hosts on both side of the connections and shortly afterwards, running the Get-SmbMultichannelConnection Cmdlet, I observed that the connections where now being made to and from the Client and Server IPs in the SMB networks.

The bottom line here is that you should register SMB Multichannel Constraints for both your NetBIOS and FQDN server names. You may well design your Hyper-V deployment to use the FQDN after registering the constraint for the FQDN but you don’t know what other administrators are going to do long-term and having both the NetBIOS hostname and FQDN registered will prevent and potential issues down the road.

Windows Server Hyper-V vNext Features

Hyper-V MVP Aidan Finn has a post running over at http://www.aidanfinn.com/?p=17424 where he is maintaining a list of the new features coming in Windows Server vNext specifically around Hyper-V.

His post is worth keeping an eye on if you are in the Hyper-V virtualization business. Reading through it myself, there seems to be a lot of work gone into stabilising clustered Hyper-V which is very welcome. My personal favourites from the list so far are Production Checkpoints to allow you to checkpoint an application service; a number of VMs in a collection that make up an application such as SQL Server, an app server and a web server, all in a single operation for consistent snapshots across multiple service tiers. Network Adapter Identification allows the name of a vNIC from the Hyper-V host to be passed through into the VM Guest OS so our Guest OS will see our vNICs not as Ethernet or Local Area Connection but as Production-VMNetwork or whatever you naming convention is. Rolling Cluster Upgrades is something which Windows Failover Clustering has long needed to allow us to upgrade our nodes whilst retaining the cluster functionality and integrated Backup Change Tracking prevents the need for 3rd party backup APIs to be installed which can commonly destabilise the platform.

All in all, it’s a nice list of features and the changes will be very welcome. There is nothing here which technically blows your mind like the feature gap bridged from Windows Server 2008 R2 Hyper-V to Windows Server 2012 R2 Hyper-V however there is definitely enough here to pip your interest and to make you warrant moving to Windows Server vNext when it ships if only for the platform stability improvements.

Free Fitbit Flex with Windows Phone Purchases

If you’re in the market for both a new smartphone and a fitness aid this year, Windows Phone could defiantly be your friend.

Microsoft UK are currently running a promotion that started on January 12th 2015 and runs until March 31st 2015. If you purchase either Microsoft Lumia 735, 830 or 930 between these dates from one of the eligible retailers (almost all UK high street and network outlets are listed) then you can claim a free Fitbit Flex fitness activity and sleep tracking device.

To find out more information about the detail then visit http://www.microsoft.com/en-gb/mobile/campaign-fitbit/. If you want to skip straight to claiming your Fitbit device or want to know if your device is eligible then download the Fitbit Gift app from the Windows Phone Store at http://www.windowsphone.com/en-gb/store/app/fitbit-gift/ee34cfd1-e302-4820-a3cc-0d4e349ccf6a.

I’m a Fitbit user so I like the idea of this promotion but I equally struggle to see it: Microsoft are now in the fitness and activity and sleep tracking business with the Microsoft Band but as we know, this isn’t available in the UK right now. I have to question whether this promotion would instead be against the Microsoft Band if it was available here. Given that the Flex retails for £60 and the Microsoft Band is $200 in the US, I can’t imagine it would be a free promotion like they have on the Flex but I think it would likely be a discount code for £50 off the price of a Microsoft Band.

Fingers crossed the Microsoft Band makes its was UK-side via official channels one day soon and the promotion will flip on it’s head. Don’t forget that all Windows Phone 8.1 devices are going to be eligible for Windows 10 upgrades once the new OS ships too.

Invalid License Key Error When Performing Windows Edition Upgrade

Last week, I decided to perform the in-place edition upgrade from Windows Server 2012 R2 Essentials to Windows Server 2012 R2 Standard on my home server as part of a multitude of things I’m working on at home right now. Following the TechNet article for the command to run and the impact and implications of doing the edition upgrade at http://technet.microsoft.com/en-us/library/jj247582 I ran the command as instructed in the article but I kept getting a license key error stating that my license key was not valid.

As my server was originally licensed under a TechNet key, I wondered if the problem could be down to different licensing channels preventing me from installing the key. On the server, I ran the command cscript slmgr.vbs /dlv to display the detailed license information and the channel was reported as Retail as I expected for a TechNet key. The key I am trying to use is an MSDN key which also should be reported as part of the Retail channel but to verify that, I downloaded the Ultimate PID Checker from http://janek2012.eu/ultimate-pid-checker/ and my Windows Server 2012 R2 Standard license key, sure enough is good, valid and just as importantly, from the Retail channel.

So my existing and new keys are from the same licensing channel and the new key checks out as being valid so what is the problem? Well it turns out, PowerShell was the problem.

Typically I launch a PowerShell prompt and then I enter cmd.exe if I need to run a something which explicitly requires a Command Prompt. This makes it easy for me to jump back and forth between PowerShell and Command Prompt within a single window hence the reason for doing it. I decided to try it differently so I opened a new Administrative Command Prompt standalone, without using PowerShell as my entry point and the key was accepted and everything worked as planned.

The lesson here is this: If you are entering a command into a PowerShell prompt and it’s not working, try it natively within a Command Prompt as that just maybe is your problem.

Inaccessible Boot Device after Windows Server 2012 R2 KB2919355

Earlier on this week, I finally got around to spending a bit of time towards building my home lab. I know it’s late because I started this project back in February but you know how it is.

On the servers, I am installing Windows Server 2012 R2 with Update which for the uninitiated is KB2919355 for Windows Server 2012 R2 and Windows 8.1. This is essentially a service pack sized update for Windows and includes a whole host of updates. I am using the installation media with the update integrated to same me some time with the updates but also because it’s cleaner to start with the update pre-installed.

The Inaccessible Boot Device Problem

After installing Windows Server 2012 R2, the machine starts to boot and at the point where I would expect to see a message along the lines of Configuring Devices, the machine hits a Blue Screen of Death with the message Stop 0x7B INACCESSIBLE_BOOT_DEVICE and restarts. This happens a few times before it hangs on  a black screen warning that the computer has failed to start after multiple attempts. I assumed it was a BIOS problem so I went hunting in the BIOS in case I had enabled a setting not supported by my CPU or maybe I’d set the wrong ACHI or IDE mode options but everything looked good. I decided to try the Optimized Defaults and Failsafe Defaults options in the BIOS, both of which required an OS re-install due to the AHCI changes but neither worked.

After this I was worried there was either something wrong with my hardware or a compatibility issue with the hardware make-up and I was going to be snookered however after a while of searching online, I found the solution.

KB2919355 included a new version of the storage controller driver Storport. It transpires that this new version of Storport in KB2919355 had an issue with certain SCSI and SAS controllers whereby if the controller device driver was initialized in a memory space beyond 4GB then it would cause the phyiscal boot devices to become inaccessible. This problem hit people who installed the KB2919355 update to previously built servers at the time of release as well as people like me, building new servers with the update slipstreamed. My assumption is that it’s caused by the SCSI or SAS controller not being able to address 64-bit memory addresses hence the 4GB limitation.

The problem hits mainly LSI based SCSI and SAS controllers based on the 2000 series chipset, including but by no means limited to the LSI SAS 2004, LSI SAS 2008, LSI MegaRAID 9211, Supermicro SMC 2008, Dell PERC H200 and IBM X240 controllers. In my case, my Supermicro X8DTH-6F motherboards have the Supermicro SMC 2008 8 Port SAS controller onboard which is a Supermicro branded edition of the LSI SAS 2008 IR controller.

The workaround at the time was to disable various BIOS features such as Intel-VT, Hyperthreading and more to reduce the number of system base drivers that needed to load, allowing the driver to fit under the 4GB memory space but eventually the issue was confirmed and a hotfix released however installing the hofix is quite problematic when the system refuses to boot. Luckily, we can use the Windows installation media to fix the issue.

Microsoft later released guidance on the workaround to use BCDEdit from the Windows Recovery Environment (WinRE) to change the maximum memory.

Resolving the Issue with KB2966870

Workarounds aside, we want to fix the issue not gloss over or around it. First off, download the hotfix KB2966870 which is a hotfix by request so you need to enter your email address and get the link emailed to you. You can get the update from https://support.microsoft.com/kb/2966870. Once you have the update, you need to make it available to your server.

If your Windows Server 2012 R2 installation media is a USB bootable stick or drive then copy the file here. If your installation medium is CD or DVD then burn the file to a disc.

Boot the server using the Windows Server 2012 R2 media but don’t press the Install button. From the welcome screen, press Ctrl + F10 which will open a Command Prompt in Administrator mode. Because of the Windows installation files being decompressed to a RAM disk, your hard disk will have likely been mounted on D: instead of C: but verify this first by doing a dir to check the normal file structure like Program Files, Users and Windows. Also, locate the drive letter of your installation media which will be the drive with your .msu update file on it.

Once you have found your hard disk drive letter and your boot media letter, we will use the following DISM command to install the update using Offline Servicing:

Dism /Image:[Hard Disk]:\ /Add-Package /PackagePath:[Install Media]:\Windows8.1-KB2966870-x64.msu

Once the command completes, exit the Command Prompt and exit the Windows Installation interface to restart the computer. In my case, I had to restart the computer twice for the update to appear to actually apply and take effect but once the update had been taken on-board, the machine boots without issues first time, every time. You can verify that the update has been installed with the View Installed Updates view in the Windows Update Control Panel applet.

KB2992611 Winshock Update and the Broken Cipher Suites

Last week, Microsoft released an update under KB2992611 in response to a security bulletin MS14-066 to address a flaw in SChannel reported to Microsoft. As part of KB2992611, Microsoft not only patched the flaw in SChannel but they also added four new encryption cipher suites. The suites added were as follows:

TLS_DHE_RSA_WITH_AES_256_GCM_SHA384
TLS_DHE_RSA_WITH_AES_128_GCM_SHA256
TLS_RSA_WITH_AES_256_GCM_SHA384
TLS_RSA_WITH_AES_128_GCM_SHA256

Although it was a nice gesture to add some new cipher suites to Windows, there was a knock on effect to installing KB2992611 and adding these new cipher suites as it appears that Google Chrome for one, possibly more browsers depending on the version you have, do not accept these ciphers and the addition would cause browsers to fail to connect to websites and causing TLS sessions to be dropped. There are also other issues although less widely reported about the installation of KB2992611 causing SQL and ODBC based data connections within applications to drop dramatically in performance.

To address the problem, Microsoft have re-released KB2992611 with KB3018238 which is a secondary update which changes the default state of these new ciphers to disabled. It’s important to note that disabling the new ciphers does not remove the fix for the vulnerability in SChannel which is addressed by the original hotfix. Some people are suggesting uninstalling KB2992611 to workaround the issue but doing this will open the SChannel vulnerability again. After hearing conversations about these updates today, there is much confusion about the situation. Microsoft have not pulled KB2992611 and replaced it with KB3018238 but they have instead added KB3018238 as a secondary update. This is in contrast to replacing the update with a version 2 release which is commonplace when there are issues with updates.

If you have already installed KB2992611, you will be offered KB3018238 via Windows Update. Installing KB3018238 will disable the four new cipher suites by default to restore compatibility however you will have the option to re-enable them if you wish via the normal means for editing and selecting cipher suites. The fix for SChannel will remain in place. If you have not yet installed KB2992611, then via Windows Update, you will see KB2992611 advertised as an update for installation but upon installation, both KB2992611 and KB3018238 will be installed and both will be listed in the View Installed Updates pane in Control Panel. In this case, you will have both the cipher suites disabled and that SChannel vulnerability patched.

If you are having issues with SQL Server or ODBC connection based applications, there is no fix for this problem currently and the solution to this is community opinion to remove the previously installed KB2992611 which appears to restore order to the force. Hopefully Microsoft will address whatever the underlying issue with SQL Server and ODBC and the interaction with this fix to SChannel in future update.

In addition to KB3018238 to fix the issues with SChannel, Microsoft yesterday released two other updates. KB3011780 has been released to address a flaw in Kerberos which effects the Key Distribution Center (KDC). This is a service which runs on Domain Controllers so this update is considered critical. Another update under KB3000850 has been released as a November 2014 Rollup Update for Windows 8.1 and Windows Server 2012 R2. This rollup includes all previously released updates for the operating systems and includes the KB2992611 but it is not clear whether it includes the original release of KB2992611 or KB2992611 and the secondary KB3018238 update.

To download KB2992611 with the secondary update KB3018238 visit http://support.microsoft.com/kb/2992611. For the Kerberos update KB3011780 visit http://support.microsoft.com/kb/3011780 and lastly, for the November 2014 Rollup Update, visit http://support.microsoft.com/kb/3000850.

Thoughts on Windows Server 2003 End of Life

A post by me has a just been published over on the Fordway blog at http://www.fordway.com/blog-fordway/windows-server-2003-end-of-life/.

This was written in parallel to my earlier post Windows Server 2003 End of Life Spreadsheet, reproducing the spreadsheet for documenting your Windows Server 2003 environment originally posted by Microsoft. In this new post on the Fordway blog, I talk about some of the areas that we need to focus our attention and other up some food for thought. If you have any questions then please feel free to get in touch either with myself or someone at Fordway who will be happy to help you.

Windows Server 2003 End of Life Plan Spreadsheet

Last week, the folks over at Microsoft published another entry in their blog post series Best Practices for Windows Server 2003 End-of-Support Migration (http://blogs.technet.com/b/server-cloud/archive/2014/10/09/best-practices-for-windows-server-2003-end-of-support-migration-part-4.aspx?wc.mt_id=Social_WinServer_General_TTD&WT.mc_id=Social_TW_OutgoingPromotion_20141009_97469473_windowsserver&linkId=9944146) which included a visually appealing spreadsheet template for helping you keep track of and plan your Windows Server 2003 migrations but to my shock, they didn’t provide the actual Excel file for that design (shame on them).

I’ve copied the design and made it into an Excel spreadsheet which I’ve setup with Conditional Formatting in the relevant cells so that when you add your numeric values and X’s it will automatically colour the cells to help you keep it as pretty as intended as after all, we need a bit of colour and happiness to help us with Windows Server 2003 migrations right?

Click the screenshot of the Excel file below for the download. As a note, make sure you use the Excel desktop application and not the Excel web app to view or use this file as the web app appears to hurt some of the formatting and layout.

Server 2003 Migration Spreadsheet

UPDATE: If you want to read more about Windows Server 2003 End of Life, a post by me has been published on the Fordway blog at http://www.fordway.com/blog-fordway/windows-server-2003-end-of-life/.

Explaining NUMA Spanning in Hyper-V

When we work in virtualized worlds with Microsoft Hyper-V, there are no many things we have to worry about when it comes to processors. Most of these things come with acronyms which people don’t really understand but they know they need and these and one of these is NUMA Spanning which I’m going to try and explain here and convey why we want to avoid NUMA Spanning where possible and I’m going to do it all in fairly simple terms to keep the topic light. In reality, NUMA architectures may be more complex than this.

NUMA Spanning or Non-Uniform Memory Address Spanning was a feature introduced into motherboard chipsets by Intel and AMD. Intel implemented it with the feature set Quick Path Interconnect (QPI) in 2007 and AMD implemented it with HyperTransport in 2003. NUMA uses a construct of nodes in it’s architecture. As the name suggests, NUMA refers to system memory (RAM) and how we use memory and more specifically, how we determine which memory in the system to use.
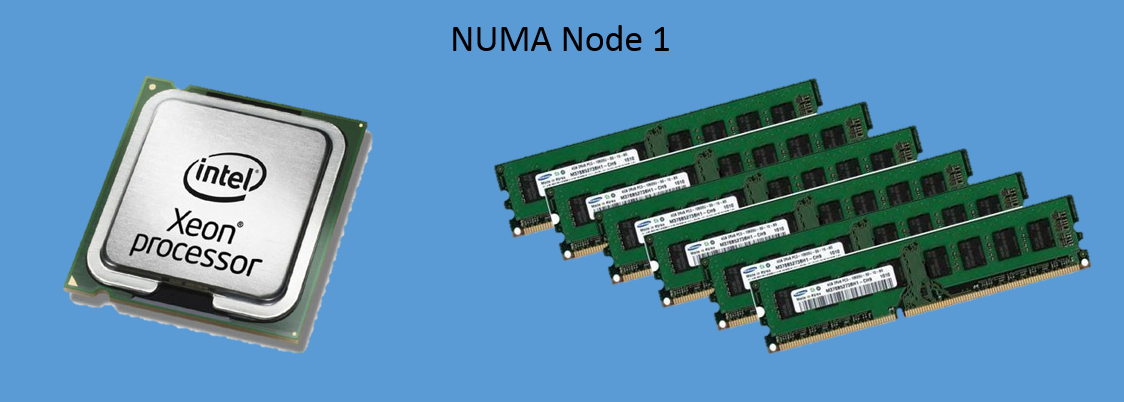
Single NUMA Node

Single NUMA Node

In the most simple system, you have a single NUMA node. A single NUMA node is achieved either in a system with a single socket processor or by using a motherboard and processor combination which does not support the concept of NUMA. With a single NUMA node, all memory is treated as equal and a VM running on a hypervisor on this configuration system would use any memory available to it without preference.
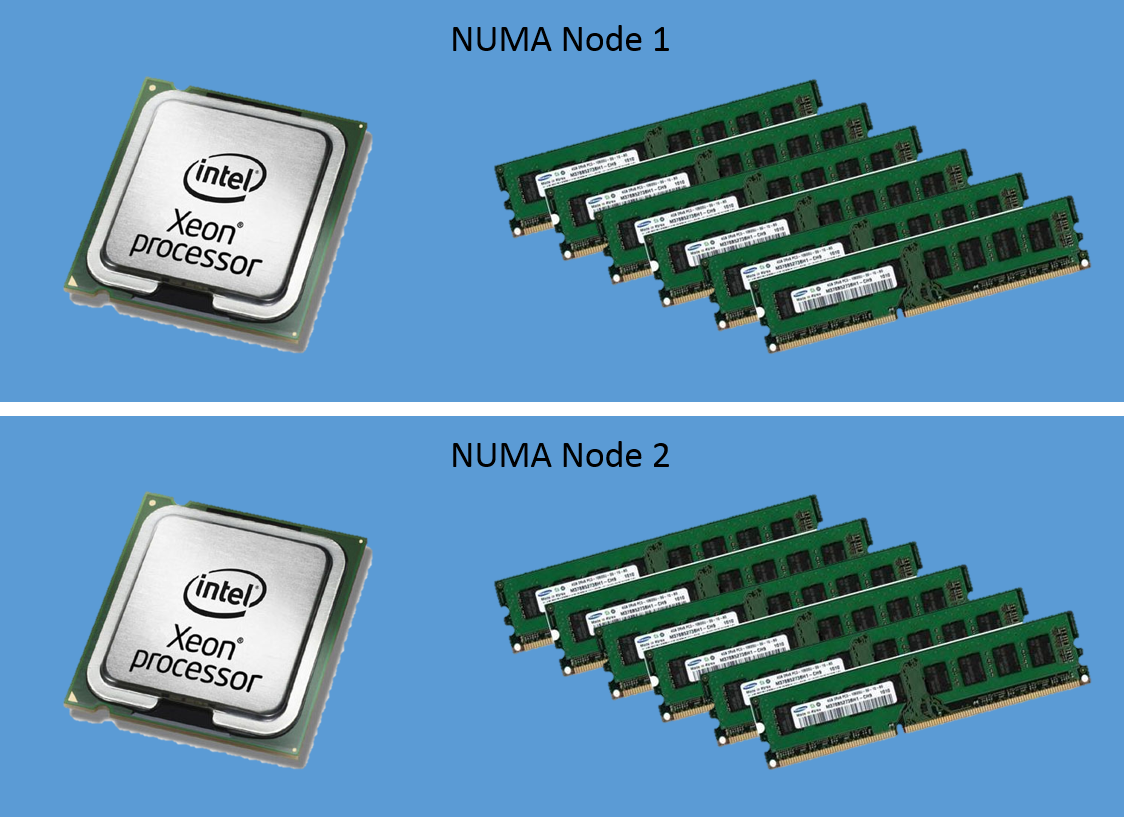
Multiple NUMA Nodes

Two NUMA Nodes

In a typical system that we see today with multiple processor sockets and with a processor and motherboard configuration that supports NUMA, we have multiple NUMA nodes. NUMA nodes are determined by the arrangement of memory DIMMs in relation to the processor sockets on the motherboard. In a hugely oversimplified sample system with two CPU sockets, each loaded up with a single core processor and 6 DIMMs per socket, each DIMM slot populated with an 8GB DIMM (12 DIMMs total). In this configuration we have two NUMA nodes, and in each NUMA node, we have one CPU socket and it’s directly connected 48GB of memory.

The reason for this relates to the memory controller within the processor and the interconnect paths on the motherboard. The Intel Xeon processor for example has an integrated memory controller. This memory controller is responsible for the address and resource management of the six DIMMs attached to the six DIMM slots on the motherboard linked to this processor socket. For this processor to access this memory it takes the quickest possible path, directly between the processor and the memory and this is referred to as Uniform Memory Access.

For this processor to access memory that is in a DIMM slot that is linked to our second processor socket, it has to cross the interconnect on the motherboard and via the memory controller on the second CPU. All of this takes mere nanoseconds to perform but it is additional latency that we want to avoid in order to achieve maximum system performance. We also need to remember that if we have a good virtual machine consolidation ratio on our physical host, this may be happening for multiple VMs all over the place and that adds up to lots of nanoseconds all of the time. This is NUMA Spanning at work. The processor is breaking out of its own NUMA node to access Non-Uniform Memory in another NUMA node.

Considerations for NUMA Spanning and VM Sizing

NUMA Spanning has a bearing on how we should be sizing our VMs that we deploy to our Hyper-V hosts. In my sample server configuration above, I have 48GB of memory per NUMA node. To minimize the chances of VMs spanning these NUMA nodes, we therefore need to deploy our VMs with sizing considerations linked to this. If I deployed 23 VMs with 4GB of memory each, that equals 92GB. This would mean 48GB memory in the first NUMA node could be totally allocated for VM workload and 44GB of memory allocated to VMs in the second NUMA node leaving 4GB of memory for the parent partition of Hyper-V to operate in. None of these VMs would span NUMA nodes because 48GB/4GB is 12 which means 12 entire VMs can fit per NUMA node.

If I deployed 20 VMs but this time with 4.5GB of memory each, this would require 90GB memory for virtual workloads and leave 6GB for hosting the parent partition of Hyper-V. The problem here is that 48GB/4.5GB doesn’t fit, we have left overs and uneven numbers. 10 of our VMs would fit entirely into the first NUMA node and 9 of our VMs would fit entirely within the second NUMA node but our 20th VM would be in no man’s land and would be left to have half its memory in both of the NUMA nodes.

In good design practice, we should try to size our VMs to match our NUMA architecture. Take my sample server configuration of 48GB per NUMA node, we should use VMs with memory sizes of either 2GB, 4GB, 6GB, 8GB, 12GB, 24GB or 48GB. Anything other than this has a real risk to be NUMA spanned.

Considerations for Disabling NUMA Spanning

So now that we understand what NUMA Spanning is and the potential decrease in performance it can cause, we need to look at it with a virtualization lens as this is where it really takes effect to the maximum. The hypervisor understands the NUMA architecture of the host through the detection of the hardware within. When a VM tries to start and the hypervisor attempts to allocate memory for the VM, it will always try to first get memory within the NUMA node for the processor that is being used for the virtual workload but sometimes that may not be possible due to other workloads blocking the memory.

For the most part, leaving NUMA Spanning enabled is totally fine but if you are really trying to squeeze performance from a system, a virtual SQL Server perhaps, NUMA Spanning would be something we would like to have turned off. NUMA Spanning is enabled by default in both VMware and Hyper-V and it is enabled at the host level but we can override this configuration on both a per hypervisor host level and a per VM level.

I am not for one minute going to recommend that you disable NUMA Spanning at the host level as this might impact your ability to run your workloads. If NUMA Spanning is disabled for the host and the host is not able to accommodate the memory demand of the VM within a single NUMA node, the power on request for the VM will fail and you will be unable to turn on the machine however if you have some VMs which have NUMA Spanning disabled and others with it enabled, you can have your host work like a memory based jigsaw puzzle, fitting things in where it can.

Having SQL Servers and performance sensitive VMs running with NUMA Spanning disabled would be advantageous to their performance and having NUMA Spanning disabled on VMs which are not performance sensitive allows them to use whatever memory is available and cross NUMA nodes as required giving you the best combination of maximum performance for your intensive workloads and the resources required to run those that are not.

Using VMM Hardware Profiles to Manage NUMA Spanning

VMM Hardware Profile NUMA Spanning

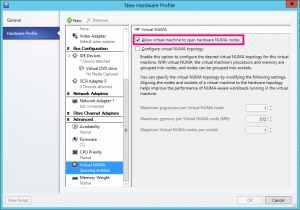
So assuming we have a Hyper-V environment that is managed by Virtual Machine Manager (VMM), we can make this really easy to manage without having to bother our users or systems administrators with understanding NUMA Spanning. When we deploy VMs we can base our VMs on Hardware Profiles. A VMM Hardware Profile has the NUMA Spanning option available to us and simply, we would create multiple Hardware Profiles for our workload types, some of which would be for general purpose servers with NUMA Spanning enabled whilst other Hardware Profiles would be configured specifically to be used by performance sensitive workloads with the NUMA Spanning setting disabled in the profile.

The key to remember here is that if you have VMs that are already deployed in your environment you will need to update their configuration. Hardware Profiles in VMM are not linked to the VMs that we deploy so once a VM is deployed, any changes to the Hardware Profile that it was deployed from do not filter down to the VM. The other thing to note is that NUMA Spanning configuration is only applied at VM Startup and during Live or Quick Migration. If you want your VMs to update the NUMA Spanning configuration after you have changed the setting you will either need to stop and start the VM or migrate it to another host in your Hyper-V Failover Cluster.

Gartner Magic Quadrant Unified Communications

Well here’s one you wouldn’t have expected to see. Gartner have placed Microsoft and Lync ahead of Cisco in their Unified Communications Magic Quadrant.

Gartner have put Cisco and Microsoft level for Ability to Execute however Microsoft have been placed ahead in Vision. You can read the full article at http://www.gartner.com/technology/reprints.do?id=1-1YWQWK0&ct=140806&st=sb. Well done Microsoft. Now if work can be done to address the cautions that Gartner have identified then the position will be even stronger.