Windows

Anything concerning Windows be it Windows client operating system, Windows Server operating system, Windows Mobile, Windows Phone and more.

Cleaning Up Active Directory and Cluster Computer Accounts

Recently at work, I’ve been looking at doing a clean up of our Active Directory domain and namely removing stale user and computer accounts. To do this, I short but sweet PowerShell script which gets all of the computer objects from the domain and include the LastLogonTimestamp and the pwdLastSet attributes to show when the computer account was last active however I came across an interesting problem with cluster computer objects.

Import-Module ActiveDirectory
Get-ADComputer -Filter * -SearchBase “DC=domain,DC=com” -Properties Name, LastLogonTimestamp, pwdLastSet -ResultPageSize 0 | Select Name, @{n='LastLogonTimestamp';e={[DateTime]::FromFileTime($_.LastLogonTimestamp)}}, @{n='pwdLastSet';e={[DateTime]::FromFileTime($_.pwdLastSet)}}, DistinguishedName

When reviewing the results, it seemed as though Network Names for Cluster Resource Groups weren’t updating their LastLogonTimestamp or pwdLastSet attributes even though those Network Names are still in use.

After a bit of a search online, I found a TechNet Blog post at http://blogs.technet.com/b/askds/archive/2011/08/23/cluster-and-stale-computer-accounts.aspx which describes exactly that situation. The LastLogonTimestamp attribute is only updated when the Network Name is brought online so if you’ve got a rock solid environment and your clusters don’t failover or come crashing down too often, this object will appear as although it’s stale.

To save you reading the article, I’ve produced two updated versions of the script. This first amendment simply adds the servicePrincipalName column to the result set so that you can verify them for yourself.

Import-Module ActiveDirectory
Get-ADComputer -Filter * -SearchBase “DC=domain,DC=com” -Properties Name, LastLogonTimestamp, pwdLastSet, servicePrincipalName -ResultPageSize 0 | Select Name, @{n='LastLogonTimestamp';e={[DateTime]::FromFileTime($_.LastLogonTimestamp)}}, @{n='pwdLastSet';e={[DateTime]::FromFileTime($_.pwdLastSet)}}, servicePrincipalName, DistinguishedName

This second amended version uses the -Filter parameter of the Get-ADComputer Cmdlet to filter out any results that include the MSClusterVirtualServer which designates it as a cluster object computer account.

Import-Module ActiveDirectory
Get-ADComputer -Filter 'servicePrincipalName -NotLike "*MSClusterVirtualServer*"' -SearchBase “DC=domain,DC=com” -Properties Name, LastLogonTimestamp, pwdLastSet, servicePrincipalName -ResultPageSize 0 | Select Name, @{n='LastLogonTimestamp';e={[DateTime]::FromFileTime($_.LastLogonTimestamp)}}, @{n='pwdLastSet';e={[DateTime]::FromFileTime($_.pwdLastSet)}}, DistinguishedName

The result set generated by this second amendment of the script will produce exactly the same output as the original script with the notable exception that the cluster objects are automatically filtered out of the results. This just leaves you to ensuring that when you are retiring clusters from your environment that you perform the relevant clean up afterwards to delete the account. Alternatively, you could use some clever automation script like Orchestrator to manage the decommissioning of your clusters and include this as an action for you.
MDOP and EMET for Windows 10

It’s been a while since I’ve posted anything here now which is in part down to me being busy at home and in part due to work being full-on at the moment trying to juggle a handful of internal systems projects as well as dropping in customer engagements but you won’t hear me complaining as it’s all great work.

In the time between I last wrote anything and now, Windows 10 is full swing and we are already looking at the Threshold 2 (or November 2015 Update) for Windows 10 shipping which will see the Skype Messaging experience rolled out to the public as well as the Cortana text messaging and missed call notifications on the desktop, both of which have been available to people running the Windows 10 Insider Preview builds for a few weeks’ now.

With people looking more closely at Windows 10, there’s good news for people who rely on the slew of Microsoft tools in the enterprise as many of them are either now already updated to support Windows 10 or are working their way to support. MDOP 2015 was released back in August 2015 and this included updated service packs for Application Virtualization (App-V) 5.0 SP3, User Experience Virtualization (UE-V) 2.1 SP1 and Microsoft BitLocker Administration and Management (MBAM) 2.5 SP1 to add support for Windows 10. App-V and MBAM are simply service packs to add support whilst UE-V not only gains support for Windows 10 but also gets native support for Office 2013 via the ADMX files which means you no longer need to manually import the Office 2013 .xml templates into your Template Store.

Sadly, UE-V 2.1 SP1 shipped before the release of Office 2016 which means there is no native support for this which seems to be a common theme for UE-V; the product ships ready for a new Windows version but misses the matching Office version so. If you want to use UE-V for Office 2016, you can head over to the TechNet Gallery and download the official Microsoft .xml templates for it from https://gallery.technet.microsoft.com/Authored-Office-2016-32-0dc05cd8.

Aside from MDOP, Microsoft EMET is being updated to version 5.5 which includes support for Windows 10 along with claiming to include much improved Group Policy based management of the clients. I haven’t tried this for myself yet as the product is still in beta but I will be giving it a try soon and I will be sure to post anything I find that can help improve the management position of it.

As a throw-in note, If you are using System Center Endpoint Protection for anti-virus then you might want to have a read of this post by System Center Dudes at http://www.systemcenterdudes.com/sccm-2012-windows-10-endpoint-protection/, which explains the behaviour of Endpoint Protection in Windows 10.

Xbox One Streaming with Windows 10

This week, I decided to give Xbox One Streaming for Windows 10 a try and thought I would just briefly post up my experiences.

First off, I cannot speak highly enough of how well it works. Due to not getting around to installing extra Ethernet ports in my living room, I have only one port which gets used by the Plex Home Theatre PC so the Xbox One right now is wireless on my 802.11n network. I tested the streaming in a number of different scenarios including laptop and Xbox One both wireless connected to the same access point, laptop and Xbox One both wireless but with the laptop in a different part of the house on a different access point and also the Xbox One wireless with the laptop connected to a switch port.

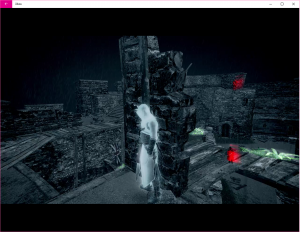
In all scenarios, it worked flawlessly and using the little menu button in the toolbar on the app, you can bring up a bandwidth meter which appears in the bottom left corner of the stream. Over wireless I’ve seen it streaming up to about 6Mbps although I haven’t been watching this extensively so it could be going even higher. Right now I’m playing Assassin’s Creed IV Black Flag which was free on Games on Gold this month in July and even a fast paced high motion game like Assassin’s Creed, I’m not seeing any negative effects compared to being locally on the console in terms of input controls.

Streaming Assassins Creed Black IV Flag

Currently, the only way to use the Xbox One controller is via a Micro USB cable. Microsoft do have an adapter in the works but there is no news on when this is going to ship right now. When the adapter does ship it means you will be able to connect your controller wirelessly to your Windows 10 PC however I personally don’t like the physical look of this adapter based on the images released thus far as it looks pretty darn big and I would have much preferred to see something a bit more sleek and minimalist like the nano receivers we see for mice and keyboards.

The problem with the current scenario and the future one though is that it all hinges on having a USB port available. One of the great potentials with the Xbox One streaming in Windows 10 was the ability to use a low-end specification, cheap and cheerful Windows 10 tablet like a HP Stream (for example) and play your Xbox anywhere in the house however the requirement for a USB port means that actually a lot of tablets are out of favour because they are too thin to incorporate a USB port into their design. I’m really hoping that Microsoft come up with a solution to this – perhaps a Bluetooth to Xbox One controller bridge as most of these small tablets have Bluetooth so it’s an ideal protocol to use and has no physical port requirements on the tablet then.

I have found one flaw with the experience I should point out. It’s only a minor thing and truth be told, I’m not even sure this is a console related issue which is why I didn’t mention it above but a game specific issue. If I am playing the game on the console locally and then I later come back to it with my USB connected controller and streaming, the controller operates the console no problems, the start screen and menus however the game, Assassin’s Creed IV Black Flag doesn’t acknowledge that a controller is connected and sticks at the reconnect a controller page. This is obviously something to do with switching between a local controller and a streaming attached controller mid-session.

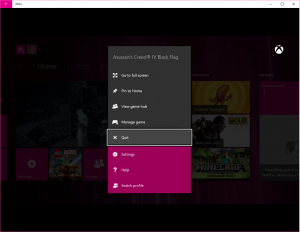
To work around the problem, hit the Xbox button on the controller to return to the home screen. With the large game tile selected, press the menu button on the controller, the button with the hamburger menu three lines just above the right thumb stick and select the Quit option from the menu. This completely closes the game or app that is active. After doing this, I can re-launch the game and the controller is detected no problems.


Pin a File or VHD to a Storage Space Tier

In Windows Server 2012 R2, Microsoft added the ability to tier Storage Spaces such that hard disks and solid state drives where in separate tiers allowing the Storage Pool and the Storage Spaces in the pool to operate like a SAN that offers up hot block technology, automatically moving frequently accessed data up to the faster disks and less frequently accessed data down to the slower tiers.

In some circumstances, you may find that you want to pin a particular file or in the case of Hyper-V a VHD file accessed over an SMB file share to a particular tier. For example, you may want to pin the VHD file that hosts your virtual SQL Server TempDB files onto the SSD tier of your Storage Pool so that they are nice and fast. Inversely, you may want to pin data to the slow tier so that even if the Storage Pool detects the data as frequently accessed, it will never take up valuable space in your SSD tier.

In my lab, I am using Data Protection Manager (DPM) to backup my SQL databases among other things. The DPM server is a Hyper-V VM with the VHDs for the DPM server stored on a Windows Server 2012 R2 Storage Space which is accessed over SMB 3.0. As my Storage Pool consists of two tiers using SSD and spinning HDD disk, I don’t want the backup volumes to be able to ever exist on the SSD tier and storing backup data on fast disk is a waste of time (there is one caveat and that is that you may want to force the backup data onto the SSD tier in the event of a major failure in the datacentre and you are going to be doing a lot of restores over a short period of time).

To achieve pinning of files to a particular tier in the Storage Pool, we need to use the PowerShell Cmdlets for managing Storage Spaces either via PowerShell Remoting or directly on the SMB File Server hosting the files.

Setting the Desired Storage Tier

First, we need to get the name of the Storage Space, otherwise referred to as the Virtual Disk.

Get-VirtualDisk

Once we execute the Get-VirtualDisk Cmdlet, we will see a list of all of the Storage Spaces. You may have multiple in which case you need to determine which you are interested in however in my lab, there is only one. Next, we need to declare the name of our Virtual Disk in a variable.

$VD = Get-VirtualDisk -FriendlyName "VMs"

Using the Cmdlet above, we repeat Get-VirtualDisk however this time, we are setting the output for a specific Virtual Disk named VMs to the $VD variable so that we can re-use it later on.

Set-FileStorageTier -FilePath "V:\VMs\RJGDPM1\RJGDPM1 DPM Pool 1.vhdx" -DesiredStorageTier ($VD | Get-StorageTier -MediaType HDD)

With our Virtual Disk in a variable, we can now set the desired storage tier for a file. Use the Set-FileStorageTier Cmdlet above to achieve this. In my example, I am setting the DPM Pool disk VHDX file such that it will exist only on the hard disk slow disk tier. If you wanted to achieve the opposite and bind a file to the SSD tier then you would simply change the HDD value of the -MediaType parameter to SSD.

Optimize Files to the Desired Tier

Once you have run the Cmdlets above, your Storage Space is now ready and set to pin the file to the tier that you specified however this does not automatically move the files. The files are not moved until the next time a Tier Optimize job runs however we can force this if you want to move the file in a hurry or if you want to move the file to the appropriate tier before you start loading it with data (such as a new blank VHD file).

Optimize-Volume -DriveLetter V -TierOptimize

With the above, we use the Optimize-Volume Cmdlet against the drive letter on which the Storage Space and the files exist. This will start the process of evaluating file tier placement against the heat of a file and move files up and down through the tiers as required. This will also execute any placement rules which have been hard set as we did above. If you happened to be physically looking at your server at this point, you would likely see a flurry of disk activity as files get moved up and down through the drive tiers.

Once the optimization has finished, we can verify that the files are in the appropriate places using the following Cmdlet.

Get-FileStorageTier -VolumeDriveLetter V | FL

This Cmdlet will report any files which have been manually pinned to a particular Storage Space disk tier and will report their placement status. In my example, I have only the one DPM Storage Pool disk pinned to the HDD tier and this file is reporting as “Completely on tier” after the successful completion of the Tier Optimize job.

Windows 10 Build 10122

As we know, I’ve been running the Windows 10 Technical Previews on my daily driver laptop, a Dell Latitude E7440 provided by work since the first builds and there have been moments of greatness as well as moments of sadness.

The defining moment of sadness came with Build 10049 when the Cisco AnyConnect VPN client ceased to work due to stack changes Microsoft were making to the networking. It’s understandable that changes like this would occur but it was an inconvenience too. I resorted to enabling the Hyper-V role on my laptop and running a Windows 8.1 virtual machine so that I could get to my corporate resources.

I reached out to Cisco on Twitter at the time and they responded that they were aware of the issue and they were working with Microsoft on it. Fast forward to present time and I installed the update to move to Build 10122 last night at home after Windows Update prompted me that the update was available for download whilst in the office yesterday.

Cisco got back in touch with me last night with the following response.

The fact that Build 10122 allows VPN clients to function against is obviously positive news but I wasn’t going to build a-fresh with an unofficial .iso built from the .esd file download in part because I don’t want to have to reinstall and re-configure all my applications but also because there are threads circulating online that Windows 10 will fail to activate if it was built using an unofficial media.

You can probably therefore imagine my surprise when after doing the upgrade, I found that the Cisco AnyConnect client in fact was actually working and I responded to Cisco accordingly.

Given that their initial statement was that this would require a fresh install to work, I have no doubt that I could be in an edge case and that some people may still find this to be now working however I want to point out that I hacked or modified nothing to make this work. I didn’t previously have AnyConnect installed due to it not working so this was a clean install of the AnyConnect 3.1.05182 client package.

Although this post largely centres on my relief that VPN is now working, I am having an issue with Cortana right now where she doesn’t want to acknowledge the UK as a functioning region even though I have all the relevant language and speech packs for en-GB installed. Working from home today, when I connected my laptop to my Lenovo USB 3.0 Dock, I also found that ports on the dock weren’t detected the first time around. I had to connect and disconnect a couple of times before the Ethernet and DisplayPort connections for my screens were detected but it is all working okay now.

All in all, I’m pretty happy with Build 10122 thus far and it seems like we are slowly working towards a solid build for RTM. If only the same could be said for the current crop of Windows 10 Phone builds.

Mail Calendar and People Apps in Windows 10 Build 10049

In previous builds of Windows 10, there was a known issue with the default Mail, Calendar and People apps which caused them to become corrupted and you had to use PowerShell to resolve the issue by removing the old app instances and re-installing them from the Windows 8.1 Store. My PC downloaded Build 10049 overnight and this build seems to have the same issue however the catch appears to be that if you follow the old instructions that it doesn’t work off the bat and you have to repeat the process as suggested on the thread http://blogs.windows.com/bloggingwindows/2015/03/30/windows-10-technical-preview-build-10049-now-available/.

First, open a PowerShell prompt with the Run As Administrator option. Once launched, enter the following code.

Get-AppxProvisionedPackage -Online | Where-Object {$_.PackageName -Like "*WindowsCommunicationApps*"} | Remove-AppxProvisionedPackage -Online

Once you have completed this, restart the PC. With the restart complete, open the Administrative PowerShell prompt and re-enter the same command again. I had to do this twice in the end so just hit the up arrow to re-use the command and hit enter to run it twice.

Once you have done this, open the Windows 8.1 Store using the green tiled Store app, not the Windows 10 Store with the grey tiled Store (Beta) app. In the store, search for Mail and install the Mail, Calendar and People app collection.

If the installation fails, try restarting and re-running the PowerShell command above as it will work eventually.

Once the apps are installed, looking at your Start Menu, you may see them appear corrupted still, showing the odd looking app names. If this is the case, unpin them from your Start Menu by right-clicking on the tiles and select the Unpin from Start option and then re-pin them to the Start Menu by right-clicking the odd looking app name from the All Apps list and select the Pin to Start option. Once you re-pin the apps, they should change to show the correct app name and launching the apps should now work.

Microsoft are reporting working on fixing the issue to prevent the corruption of these apps in future builds but for the time being, it looks like removing the apps just once that worked in previous builds isn’t enough.

Delta CRLs are Not Accessible via HTTP When Hosted on IIS

If you are running a Microsoft PKI in your environment then chances are you will have (or at least you should have) configured at least one HTTP based distribution point (CDP) for your Certificate Revocation Lists. If you are only publishing full CRLs then you will have no problems however if you are publishing Delta CRLs, the smaller, faster to process kind which list only certificates revoked since the last full publish then you may encounter an issue if you are using an IIS website to publish these.

The problem lies in the filename used for the CRLs. In my lab for example, my Certificate Authority issues a CRL file name rjglab-CA.crl and the delta files are named the same as the full CRL but they are appended with the plus character making the file name rjglab-CA+.crl. In it’s native configuration, IIS does not permit the use of the plus character because that character falls into the realms of IIS Request Mapping and the request handler.

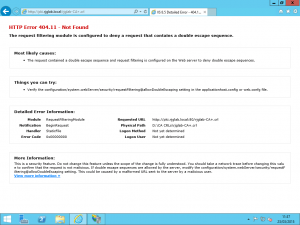
HTTP Error Downloading Delta CRL

We can see in the screenshot above what the error code and message given by IIS is when we try to download the Delta CRL in the default configuration.

For an IIS webserver hosting your CRL and Delta CRL, we need to change the behaviour of IIS to allow this plus character to be permitted which luckily is easily done. First off, open IIS Manager on the server which is hosting and making available to clients your Delta CRL file. From the server home in IIS, open the Request Filtering page and from this page, select the Edit Feature Settings button in the Actions bar.

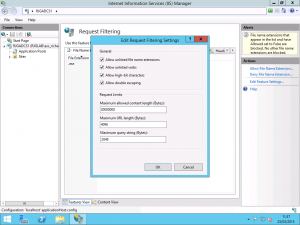
Request Filtering Settings in IIS

On the Edit Request Filtering Settings page under the General section, by default, Allow Double Escaping is disabled. Enable this option and then press OK.

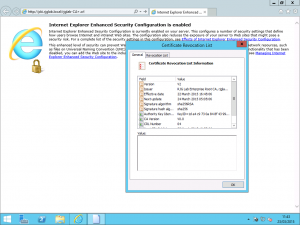
Once you have made the change, try to download the Delta CRL file and you should find that the file is available and you can successfully download it.

Delta CRL Downloaded OK

Extended Validation (EV) with an Internal Certificate Authority

As IT Pro’s, we know that Extended Validation or EV on web server certificates doesn’t actually add a security layer or harden our web servers in any way but it does give users the warm fuzzy feeling that the website they are using is definitely trustworthy and given that we want our users to believe everything we do internally in IT is trustworthy, it would be great to have our internal web services use Extended Validation certificates for user facing websites.

If you are using a Windows Active Directory Certificates Services (ADCS) certificate authority for issuing your certificates then the great news is that we can do this and it can be made to work in an existing environment so you don’t need to build a new Root CA or setup new servers for it to work, we just need to create a new Certificate Template and a Group Policy Object in the domain.

Configure the Certificate Authority

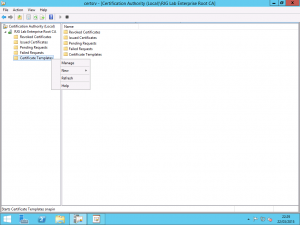
The first step is to create the Certificate Template. On your ADCS server where you issue your Web Server certificates, open the Certificate Authority MMC console. From the console, right-click on the Certificate Templates folder and select Manage.

Manage Certificate Templates

Once you have clicked this, another window will open with the list of Certificate Templates configured in the environment. Find the Web Server certificate, right-click it and select the Duplicate Template option.

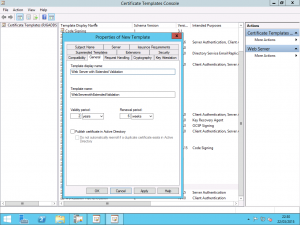
New Template Properties

At the Properties for New Template dialog, enter a display name that is appropriate such as “Web Server with EV” or “Web Server Extended Validation”. From here, click the Extensions tab.

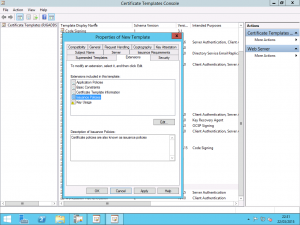
New Template Properties Extensions

On the Extensions tab, highlight the Issuance Policies list item and select Edit. At the window which appears, select the New button to add a new Issuance Policy.

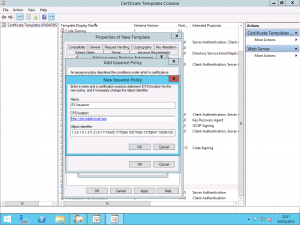
EV Issuance Policy

Give your new issuance policy a name such as “EV Issuance Policy” and if you have one (which you should do for production) enter your Certificate Purpose Statement URI. If you don’t know what a Certificate Purpose Statement (CPS) is then I would suggest the TechNet article Certificate Policies and Certificate Policy Statements as a first primer however in a nutshell, it’s a webpage which gives people information about how the certificates can be used.

Before you hit OK on the New Issuance Policy dialog, note the final field OID. Copy this OID to your clipboard and keep it their for the time being or better yet, save it to a text document in a safe place as we need this for the steps later.

Once you have this, hit OK on the dialog and change any other settings on the template you may need to such as the validity period, the key length or whether you want to allow the private key to be exported. Once you have created the new template, we need to configure the CA to be able to issue it.

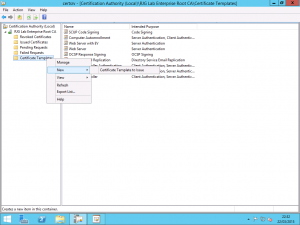
CA Certificate Template to Issue

As shown above, back in the Certificate Authority console, right-click on the Certificate Templates folder and this time, select New followed by the Certificate Template to Issueoption. From the list of templates, select the new template you just created for Web Server with Extended Validation.

After this, the Certificate Authority is configured with a new template that can be used for Extended Validation and the CA is configured to issue certificates based on that template however it’s no good having the certificates if the clients do not know to trust it to the extent required to display the green address bar.

Configure Group Policy in Active Directory

With the CA configured, we need to configure clients to trust this certificate for Extended Validation and the best method for this is going to be Group Policy. If you have an existing Group Policy to apply certificate related settings then use that policy otherwise create a new one and link it either at the root of your domain to apply it to all computers on the domain or to a particular OU if you only want it to apply to sub-set of clients. Just for clarity, I would not recommend putting certificate related settings in the Default Domain Policy nor would I recommend putting any settings into that policy. The Default Domain Policy and the Default Domain Controllers Policy should be left untouched and new policy objects should be created for any settings you want to apply.

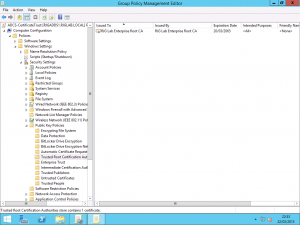
In your Group Policy Object, expand the view in Computer Configuration followed by Security Settings, Public Key Policies and finally Trusted Root Certification Authorities. If you are using an existing policy, you should have here a valid copy of the public key portion of the certificate for your Root CA. If you are creating this as a new policy, you will need to import the public key portion of your Root CA certificate.

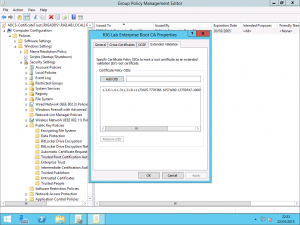
GPO Trusted Root Certificataion Authorities GPO Trust Root CA Extended Validation Properties

Once your certificate is added, right-click it and select the Properties. From the properties, you need to select the Extended Validation tab. On this tab, add the OID that you earlier copied or saved to a text document. Any OIs in this list are considered trusted for Extended Validation when a certificate contains the Issuance Policy matching that OID and the certificate issued by a CA that is part of the issuing or subordinate chain below the specified Root CA.

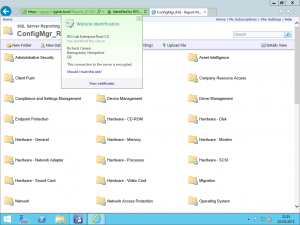
Once you have applied the GPO to your clients, you can issue a new certificate for a web site with the Web Server Extended Validation template and when browsing to that site from a client computer which both trusts your Root CA and understands the OID applied to the Issuance Policy, you will get the green address bar.

Website with EV Certificate

Power On Hosts Out of Band with IPMI and PowerShell

As part of my home lab project, I built my servers using Supermicro X8DTH-6F motherboards for many reasons however one of these reasons was that the motherboard hosts an IPMI base management controller (BMC) interface for managing the power state of the host out-of-band along with the ability to access the IP KVM and virtual media support to allow me to access the server console session remotely and even attach .iso media over the network.

In my quest to make my lab more accessible I wanted to be able to script the procedure for starting it and shutting it down and whilst I haven’t given a whole heap of thought to the whole thing just yet, I have made an interesting discovery in the quest. Windows Server 2008 R2 introduced a PowerShell syntax PcsvDevice with various commands including Get, Start and Stop along with another Cmdlet Set-PcsvDeviceBootConfiguration.

These Cmdlets were first introduced in Windows Server 2008 R2 and the syntax for some of the parameters changed in Windows Server 2012 which is worth noting if you have used these Cmdlets previously. Using the Get-PcsvDevice Cmdlet, we can query IPMI, WS-Man and SMASH based base management controllers and get some information back from them. We need to feed this command some parameters such as a credential and an IP address for the BMC.

$Cred = Get-Credential ADMIN
$Ip = "172.16.150.21"
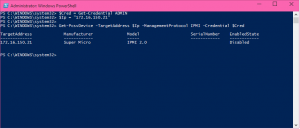
Get-PcsvDevice -TargetAddress $Ip -ManagementProtocol IPMI -Credential $Cred

As you can see, I set variables for $Cred and $Ip to set the username and the IP address to connect with and the ManagementProtocol parameter allows us to specify whether the controller is IPMI or WS-Man based. The result from this command in my environment is as follows.

PowerShell Get-CsvDevice Output

So from the screenshot, we can see that the Get-PcsvDevice Cmdlet can detect my Supermicro IPMI interface and the EnabledState column in the output shows that my host is currently Disabled or in other words, powered off. So now that I know PowerShell can find my BMC, I want to be able to power on the host. By piping the Get-PcsvDevice Cmdlet into the Start-PcsvDevice Cmdlet, we can do just that.

$Cred = Get-Credential ADMIN
$Ip = "172.16.150.21"
Get-PcsvDevice -TargetAddress $Ip -ManagementProtocol IPMI -Credential $Cred | Start-PcsvDevice

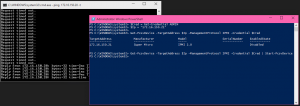
After entering the Cmdlet, I heard my server spin up in the rack downstairs. I opened up a command prompt in a separate window and started pinging the management IP address of the host which would start pinging once Windows Server 2012 R2 started after the boot POST.

PowerShell Start-PcsvDevice Output

As you can see from this second screenshot, the host started to ping on its management address and I assure you, there is no magic here like me running downstairs and hitting the power button, this all happened via PowerShell remotely. Running the Get-PcsvDevice Cmdlet again now would return a similar output except the EnabledState column now reports Enabled as the host is powered on.

The opposing Cmdlet is Stop-PcsvDevice however I won’t be demonstrating this one and I’ll provide a warning to go with it. This PowerShell Cmdlet does not instruct the IPMI or WS-Man interface to perform a graceful soft shutdown using the operating system commands. It performs a hard off as it someone had just held down the power button. If your server is running and accessible via normal in-band management means, power it down that way such as the PowerShell Cmdlet Stop-Computer.

The other command which is available to us is Set-PcsvDeviceBootConfiguration. I won’t demonstrate this one either as I like my server how it’s configured right now but this Cmdlet can be used to change the boot order of a server. If for example, you wanted to set a server to Boot from LAN over PXE so that you could apply some out-of-band update or image to it then you could do that. You can get the syntax for Set-PcsvDeviceBootConfiguration or any of the other Cmdlets from TechNet at https://technet.microsoft.com/en-us/library/dn283384.aspx.


Intel HD Graphics Update for Windows 10 Technical Preview

Today is a good news day for Windows 10 Technical Preview users. I’ve been using the Technical Preview on my Dell Latitude E7440 laptop since it’s release and since upgrading to build 9926, I’ve been having a lot of problems with blue screens of death on startup. So much so, that from a cold boot it normally takes me four BSODs to get logged in and working so my laptop normally only ever goes to sleep to avoid the cold boots.

The problem is caused by the Intel HD Graphics driver which I’ve confirmed for myself using WinDbg to analyze the crash dumps for many of these issues. Today, it looks like my luck is in.

Windows 10 Technical Preview Intel HD Graphics Update

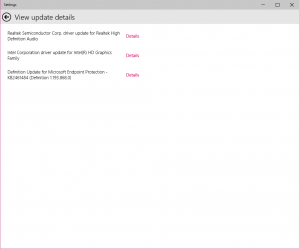
Delivered via Windows Update, I’ve got two new drivers waiting for me, one for the Realtek audio driver and another for the Intel HD Graphics driver. I’m installing it as you read this post but fingers crossed it is going to resolve these issues with the Windows 8.1 driver running under Windows 10.