Posts from February 2015

Updating Configuration Manager 2012 R2 Client Package to UR4

When you install UR4 for Configuration Manager 2012 R2 one of the things it doesn’t do is update your base client install package. As a result of this, newly installed agents will still install the out-of-the-box version 5.00.7958.1000 of the agent not the UR4 version 5.00.7958.1501. It goes without saying that we don’t want newly deployed agents to have to install and them straight away afterwards, update to UR4 because it makes sense to incorporate this update at install time.

One of the most common ways to apply an update rollup is using the PATCH MSI parameter in both your Client Push Client Installation Settings and also in your Setup ConfigMgr step in any Operating System Deployment Task Sequences. Not only does this mean updating it in two places at minimum but if you have a number of task sequences, it could be even more.

In this post, I’m covering to explain a great method of getting UR4 installed with a new agent that was posted by a blogger named Matt at http://www.m4ttmcg.com/2013/05/sccm-2012-client-push-including.html. This process is deemed to be not officially supported however using the PATCH parameter isn’t exactly filled with support and joy and with this method being easier, it makes it all the more promising.

The Configuration Manager Client Agent installation by default looks to a sub-folder of the Client directory called ClientPatch and installs any .msp files it finds as part of the installation, installing multiple patches alphabetically in order.

To do this, on your Primary Site Server, navigate to the local file system path where the update patch .msp file is stored. On my server this is located at D:\Program Files\Microsoft Configuration Manager\hotfix. In the hotfix directory will be a folder for any updates that you have installed which in my case is UR4 or KB3026739 and then there are subsequent subfolders for AdminConsole, Client, SCUP and Server.

Open the Client folder and then you will see more folders for x86 and x64 for the two client architectures.

SCCM Client Hotfix Folder

In another Windows Explorer window, open the folder for the Client Agent in the site which is used by both the Client Package and the path for the Client share on the site server. On my server, the share is located at D:\Program Files\Microsoft Configuration Manager\Client.

In the Client folder are two subfolders for x86 and x64 for the two architectures of the client agent. In each architecture folder (the screenshots herein are all for the x64 architecture but simply repeat for x86) create a folder called ClientPatch.

SCCM Client ClientPatch Folder

In the ClientPatch folder you just created, copy the .msp file for the KB (UR4 in my case) and then repeat this for the other architecture so that both x86 and x64 client folders have a ClientPatch subfolder and the appropriate .msp file to match the architecture.

Once you have updated both of the client folders, head over to your Configuration Manager Admin Console and the Software Library and then navigate your library to locate the Configuration Manager Client Package. Right-click on the software package and select the Update Distribution Points option.

SCCM Client Update Distribution Points

Once your package has been updated on all of your distribution points, you’re set. Your client package now includes the UR4 update .msp file and any new client installations such as Client Push or via an Operating System Deployment Task Sequence will be installed with the UR4 update automatically with no need to update your Installation Parameters with the PATCH option.

Upgrading Configuration Manager 2012 R2 Agents to UR4

In this post I’m going to assume that you’ve already installed UR4 in your Configuration Manager environment as that’s covered by many a post and article online already. I’m also going to assume that your UR4 Software Packages have been distributed to your Distribution Points.

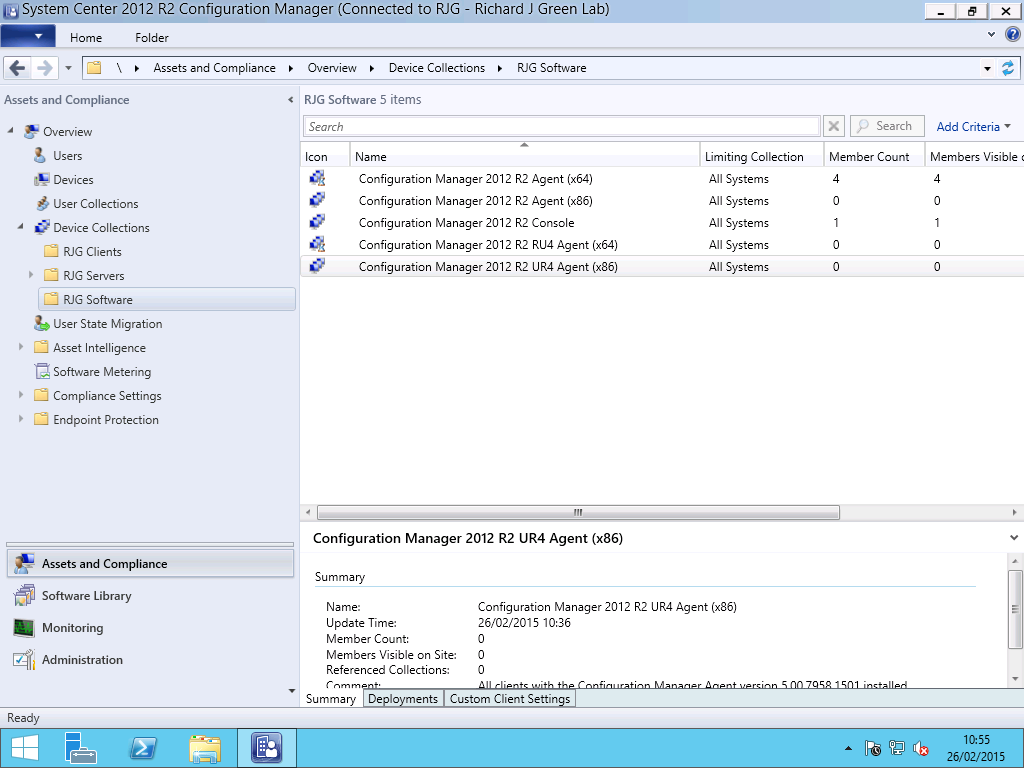
After you’ve installed Update Rollup 4 for Configuration Manager on your Primary Site Server and updated your site database, it’s time to update the rest of the servers in your Configuration Manager hierarchy and then move on to your agents and administration consoles. The first thing to do is we want to create some device collections to help us. I have created the following collections using the included WQL statements for the query based membership.

Creating the Query Based Collections

SCCM UR4 Collections

Configuration Manager 2012 R2 Agent (x64)

SELECT
SMS_R_SYSTEM.ResourceID,SMS_R_SYSTEM.ResourceType,SMS_R_SYSTEM.Name,SMS_R_SYSTEM.SMSUniqueIdentifier,SMS_R_SYSTEM.ResourceDomainORWorkgroup,SMS_R_SYSTEM.Client from SMS_R_System INNER JOIN SMS_G_SYSTEM_COMPUTER_SYSTEM on SMS_G_System_COMPUTER_SYSTEM.ResourceId = SMS_R_System.ResourceId WHERE SMS_R_System.ClientVersion = "5.00.7958.1000" AND SMS_G_System_COMPUTER_SYSTEM.SystemType = "x64-based PC"

Configuration Manager 2012 R2 Agent (x86)

SELECT
SMS_R_SYSTEM.ResourceID,SMS_R_SYSTEM.ResourceType,SMS_R_SYSTEM.Name,SMS_R_SYSTEM.SMSUniqueIdentifier,SMS_R_SYSTEM.ResourceDomainORWorkgroup,SMS_R_SYSTEM.Client from SMS_R_System INNER JOIN SMS_G_SYSTEM_COMPUTER_SYSTEM on SMS_G_System_COMPUTER_SYSTEM.ResourceId = SMS_R_System.ResourceId WHERE SMS_R_System.ClientVersion = "5.00.7958.1000" AND SMS_G_System_COMPUTER_SYSTEM.SystemType = "x86-based PC"

Configuration Manager 2012 R2 Console

SELECT
SMS_R_SYSTEM.ResourceID,SMS_R_SYSTEM.ResourceType,SMS_R_SYSTEM.Name,SMS_R_SYSTEM.SMSUniqueIdentifier,SMS_R_SYSTEM.ResourceDomainORWorkgroup,SMS_R_SYSTEM.Client FROM SMS_R_System INNER JOIN SMS_G_System_ADD_REMOVE_PROGRAMS on SMS_G_System_ADD_REMOVE_PROGRAMS.ResourceID = SMS_R_System.ResourceId WHERE SMS_G_System_ADD_REMOVE_PROGRAMS.DisplayName = "System Center 2012 R2 Configuration Manager Console" AND SMS_G_System_ADD_REMOVE_PROGRAMS.Version = "5.00.7958.1000"

Configuration Manager 2012 R2 UR4 Agent (x64)

SELECT
SMS_R_SYSTEM.ResourceID,SMS_R_SYSTEM.ResourceType,SMS_R_SYSTEM.Name,SMS_R_SYSTEM.SMSUniqueIdentifier,SMS_R_SYSTEM.ResourceDomainORWorkgroup,SMS_R_SYSTEM.Client from SMS_R_System INNER JOIN SMS_G_SYSTEM_COMPUTER_SYSTEM on SMS_G_System_COMPUTER_SYSTEM.ResourceId = SMS_R_System.ResourceId WHERE SMS_R_System.ClientVersion = "5.00.7958.1501" AND SMS_G_System_COMPUTER_SYSTEM.SystemType = "x64-based PC"

Configuration Manager 2012 R2 UR4 Agent (x86)

SELECT
SMS_R_SYSTEM.ResourceID,SMS_R_SYSTEM.ResourceType,SMS_R_SYSTEM.Name,SMS_R_SYSTEM.SMSUniqueIdentifier,SMS_R_SYSTEM.ResourceDomainORWorkgroup,SMS_R_SYSTEM.Client from SMS_R_System INNER JOIN SMS_G_SYSTEM_COMPUTER_SYSTEM on SMS_G_System_COMPUTER_SYSTEM.ResourceId = SMS_R_System.ResourceId WHERE SMS_R_System.ClientVersion = "5.00.7958.1501" AND SMS_G_System_COMPUTER_SYSTEM.SystemType = "x86-based PC"

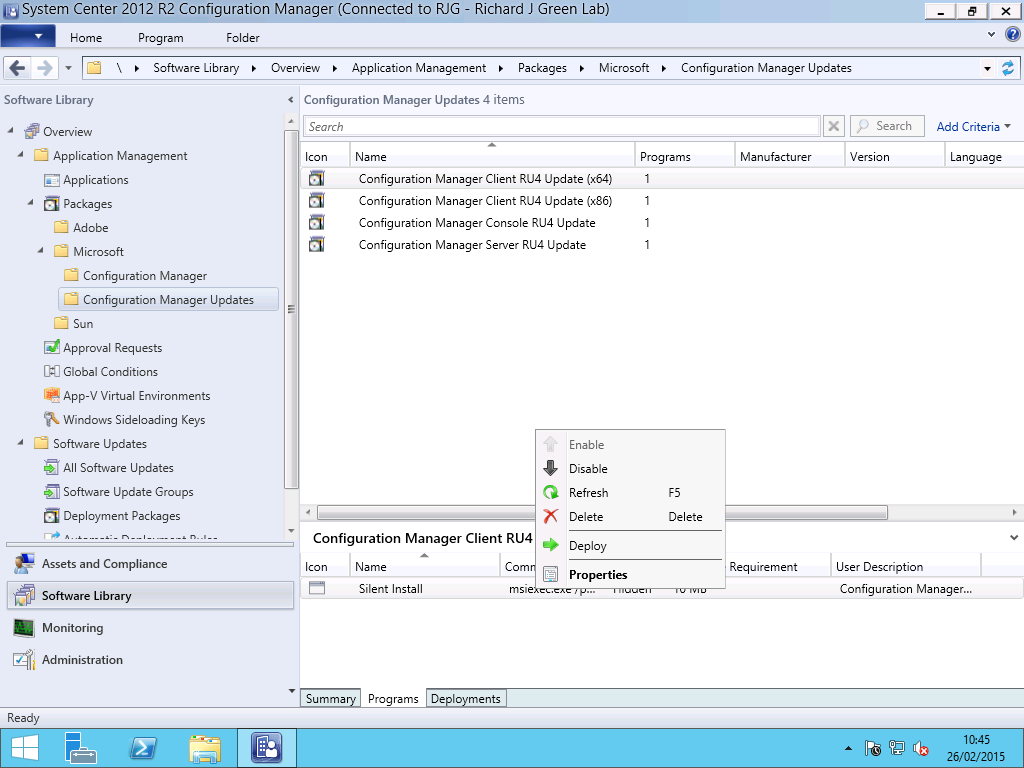
Deploying the Software Packages for Agents

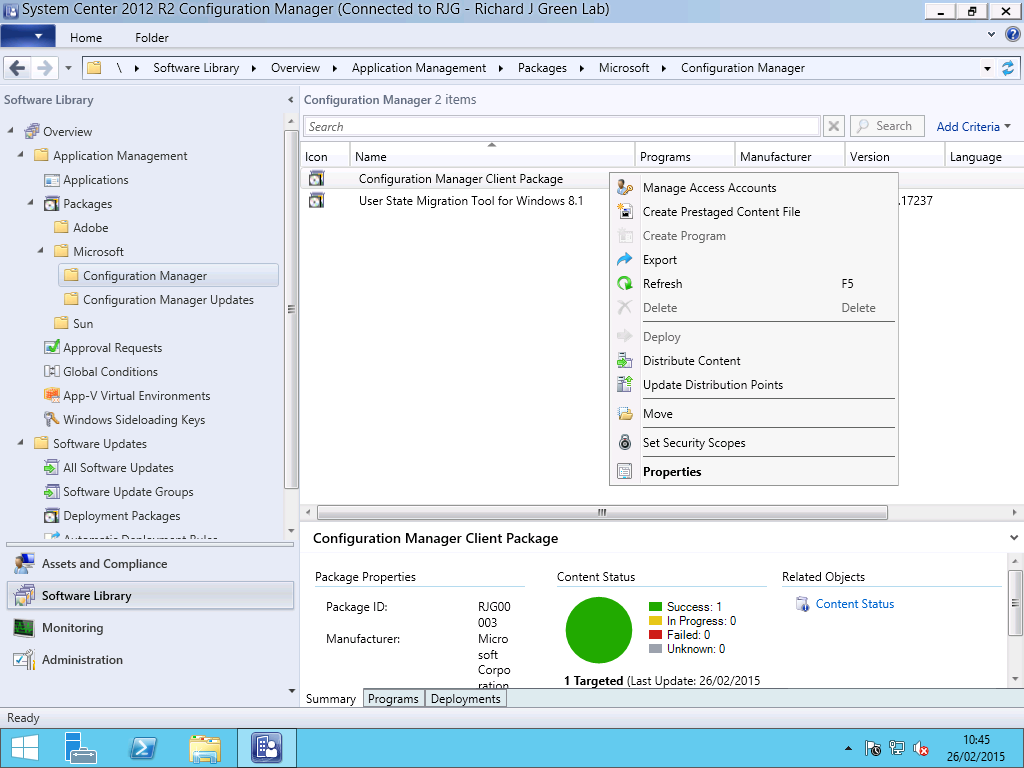
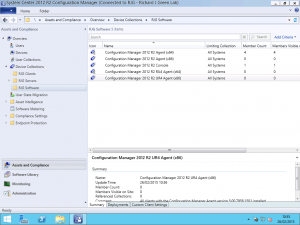
With the collections now created, head over to the Software Library node of the console. As part of installing UR4, the installer will have automatically created four software packages for you, two for the client architectures, one for the console and one for servers.

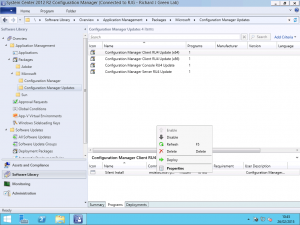
Clicking one of the Software Packages in the upper half of the view reveals the details of the package in the lower half. Select the Programs tab in the lower half and you will see the Program associated with the Software Package. Right-click the Program and select the Deploy option from the context menu as shown below.

SCCM UR4 Deploy Program

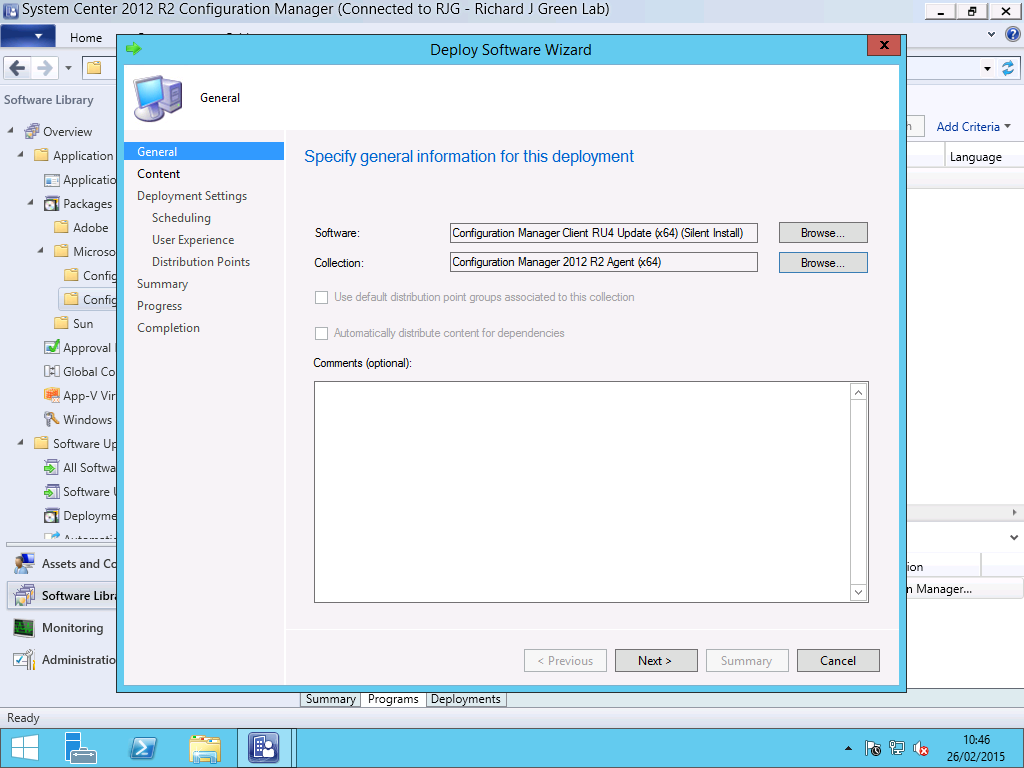
After clicking this, the Deploy Software Wizard will be shown. The Software field will be automatically populated by the wizard; we just need to enter the collection to target the deployment. For example, we want to deploy the UR4 update to all clients which have the out-of-the-box version installed so we need to target the Configuration Manager Client RU4 Update (x64) software program to the Configuration Manager 2012 R2 Agent (x64) collection.

SCCM UR4 Agent Deploy Software Wizard 1

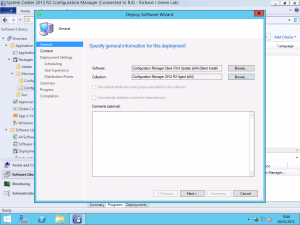
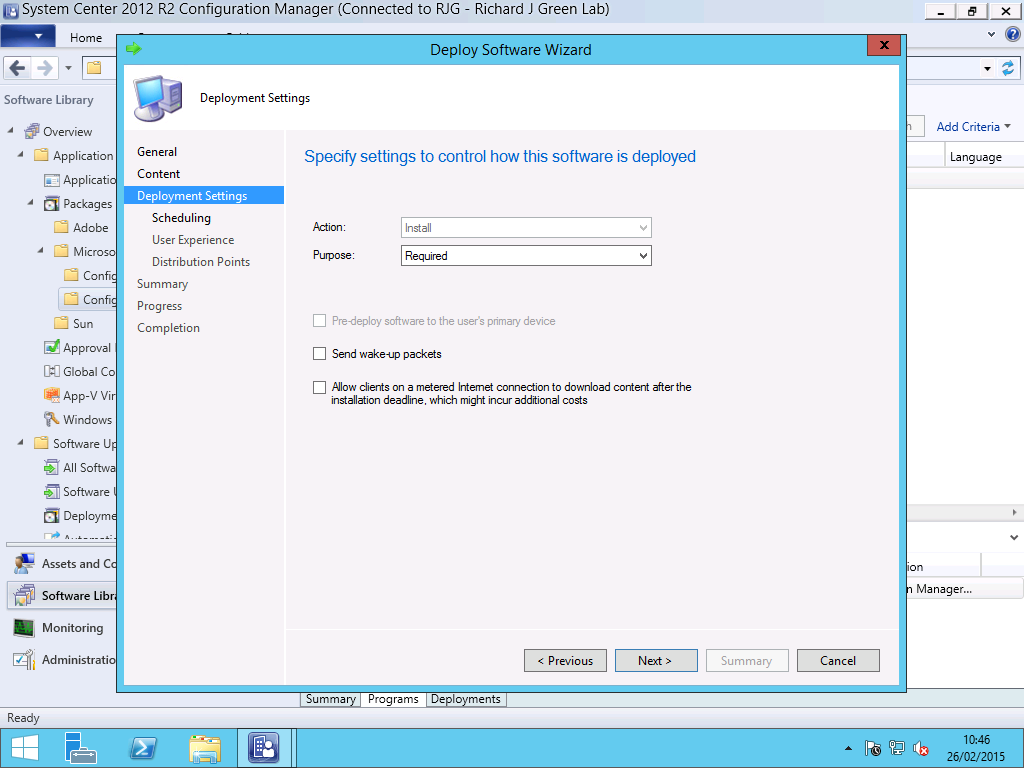
On the next tab, we need to change the default Purpose from Available to Required. This purpose will force the installation to occur according to a schedule which we set on the following panel.

SCCM UR4 Agent Deploy Software Wizard 2

On the scheduling panel next up, we want to configure the schedule in accordance with any change control we may have to comply with. In my lab environment, I simply want to push all of the agent updates out to the servers and clients as soon as possible so the As Soon as Possible option is ideal for me.

SCCM UR4 Agent Deploy Software Wizard 3

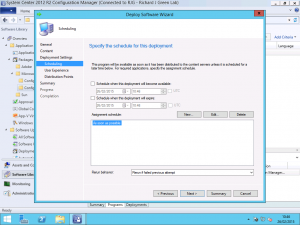
If you aren’t using Maintenance Windows on any of your collections in Configuration Manager you can click next through to finish on the wizard now and have your agent deployment begin. If you are using Maintenance Windows then you will want to pay attention to a setting on the following panel.

SCCM UR4 Agent Deploy Software Wizard 4

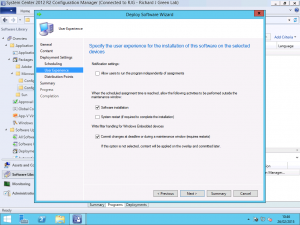
If you are using Maintenance Windows then you may want to select the Software Installation checkbox to allow the agent installation to occur outside of any windows. The agent installation does not require a restart and in most cases, should be updated in a couple of minutes with no fuss so there is really isn’t a reason to not allow this to happen. Ticking the Software Installation checkbox allows the agent upgrade to take place outside of any maintenance windows so it will take place as soon as possible.

SCCM UR4 Agent Deploy Software Wizard 4

Once you have completed the wizard, you can confirm that your Deployment was successfully stored by viewing the Deployments tab in the lower half of the Software Library Packages view. As shown below, you can see that the deployment I just created to deploy the 64-bit agent has been stored. With this completed, you will want to repeat the process for the x86 (32-bit) agent so that both types of client get the UR4 agent update.

Deploying the Software Package for Admin Consoles

I’m not going to walk through the process for this as it is the same as above for the agent update however there is one important difference I will cover.

When you get to the Deployment Settings panel, you need to select the Available deployment option and not the Required option. The reason for this is that when you deploy the UR4 agent updates, the agent version gets updated from 5.00.7958.1000 to 5.00.7958.1501 however installing UR4 for the Admin Console does not update the version number reported for the console in Programs and Features in Control Panel.

With the Admin Console, because the version number does not change, if the deployment was set to Required, clients would install the update package and would continue to re-evaluate it because it would still be detected as the old version not the UR4 version. What we need to do instead is advertise it to computers with the Admin Console installed and make it available for those users to initiate themselves.

If anyone knows of a different way to target the Admin Console UR4 update, perhaps using the installed Software Update detection I would really like to hear how you have been able to have it automatically installed as Required as that would save a tonne of headache and effort. In the meantime, enjoy your UR4 client rollout. In another post, I will be covering how to update your base client package with UR4 so that newly deployed clients get this updated version hassle free.

Power On Hosts Out of Band with IPMI and PowerShell

As part of my home lab project, I built my servers using Supermicro X8DTH-6F motherboards for many reasons however one of these reasons was that the motherboard hosts an IPMI base management controller (BMC) interface for managing the power state of the host out-of-band along with the ability to access the IP KVM and virtual media support to allow me to access the server console session remotely and even attach .iso media over the network.

In my quest to make my lab more accessible I wanted to be able to script the procedure for starting it and shutting it down and whilst I haven’t given a whole heap of thought to the whole thing just yet, I have made an interesting discovery in the quest. Windows Server 2008 R2 introduced a PowerShell syntax PcsvDevice with various commands including Get, Start and Stop along with another Cmdlet Set-PcsvDeviceBootConfiguration.

These Cmdlets were first introduced in Windows Server 2008 R2 and the syntax for some of the parameters changed in Windows Server 2012 which is worth noting if you have used these Cmdlets previously. Using the Get-PcsvDevice Cmdlet, we can query IPMI, WS-Man and SMASH based base management controllers and get some information back from them. We need to feed this command some parameters such as a credential and an IP address for the BMC.

$Cred = Get-Credential ADMIN
$Ip = "172.16.150.21"
Get-PcsvDevice -TargetAddress $Ip -ManagementProtocol IPMI -Credential $Cred

As you can see, I set variables for $Cred and $Ip to set the username and the IP address to connect with and the ManagementProtocol parameter allows us to specify whether the controller is IPMI or WS-Man based. The result from this command in my environment is as follows.

PowerShell Get-CsvDevice Output

So from the screenshot, we can see that the Get-PcsvDevice Cmdlet can detect my Supermicro IPMI interface and the EnabledState column in the output shows that my host is currently Disabled or in other words, powered off. So now that I know PowerShell can find my BMC, I want to be able to power on the host. By piping the Get-PcsvDevice Cmdlet into the Start-PcsvDevice Cmdlet, we can do just that.

$Cred = Get-Credential ADMIN
$Ip = "172.16.150.21"
Get-PcsvDevice -TargetAddress $Ip -ManagementProtocol IPMI -Credential $Cred | Start-PcsvDevice

After entering the Cmdlet, I heard my server spin up in the rack downstairs. I opened up a command prompt in a separate window and started pinging the management IP address of the host which would start pinging once Windows Server 2012 R2 started after the boot POST.

PowerShell Start-PcsvDevice Output

As you can see from this second screenshot, the host started to ping on its management address and I assure you, there is no magic here like me running downstairs and hitting the power button, this all happened via PowerShell remotely. Running the Get-PcsvDevice Cmdlet again now would return a similar output except the EnabledState column now reports Enabled as the host is powered on.

The opposing Cmdlet is Stop-PcsvDevice however I won’t be demonstrating this one and I’ll provide a warning to go with it. This PowerShell Cmdlet does not instruct the IPMI or WS-Man interface to perform a graceful soft shutdown using the operating system commands. It performs a hard off as it someone had just held down the power button. If your server is running and accessible via normal in-band management means, power it down that way such as the PowerShell Cmdlet Stop-Computer.

The other command which is available to us is Set-PcsvDeviceBootConfiguration. I won’t demonstrate this one either as I like my server how it’s configured right now but this Cmdlet can be used to change the boot order of a server. If for example, you wanted to set a server to Boot from LAN over PXE so that you could apply some out-of-band update or image to it then you could do that. You can get the syntax for Set-PcsvDeviceBootConfiguration or any of the other Cmdlets from TechNet at https://technet.microsoft.com/en-us/library/dn283384.aspx.


Intel HD Graphics Update for Windows 10 Technical Preview

Today is a good news day for Windows 10 Technical Preview users. I’ve been using the Technical Preview on my Dell Latitude E7440 laptop since it’s release and since upgrading to build 9926, I’ve been having a lot of problems with blue screens of death on startup. So much so, that from a cold boot it normally takes me four BSODs to get logged in and working so my laptop normally only ever goes to sleep to avoid the cold boots.

The problem is caused by the Intel HD Graphics driver which I’ve confirmed for myself using WinDbg to analyze the crash dumps for many of these issues. Today, it looks like my luck is in.

Windows 10 Technical Preview Intel HD Graphics Update

Delivered via Windows Update, I’ve got two new drivers waiting for me, one for the Realtek audio driver and another for the Intel HD Graphics driver. I’m installing it as you read this post but fingers crossed it is going to resolve these issues with the Windows 8.1 driver running under Windows 10.

SMB Multichannel Constraint FQDN and Hostname

Today, whilst working on something in my home lab, I noticed an issue with SMB Multichannel which if you are using SMB Multichannel in your environment you will want to be aware of.

I’ll cover how to make SMB Multichannel actually work in another post, but for now, I’ll just cover the issue. I had configured my SMB networks using the New-SmbMultichannelConstraint Cmdlet to prevent the SMB traffic for my Hyper-V VMs from using my management network and I had assumed that all would work nicely, however when I ran the Get-SmbMultichannelConnection Cmdlet, I noticed that the Client IP and Server IP columns showed the address of my management network adapters and not the SMB adapters when it struck me.

I had registered the SMB Multichannel Constraint using the NetBIOS hostname of the servers however my Hyper-V server is using the FQDN of the storage server to connect to the SMB share with the VM data in it. I ran the New-SmbMultichannelConstraint Cmdlet again but this time registering the FQDN of the hosts on both side of the connections and shortly afterwards, running the Get-SmbMultichannelConnection Cmdlet, I observed that the connections where now being made to and from the Client and Server IPs in the SMB networks.

The bottom line here is that you should register SMB Multichannel Constraints for both your NetBIOS and FQDN server names. You may well design your Hyper-V deployment to use the FQDN after registering the constraint for the FQDN but you don’t know what other administrators are going to do long-term and having both the NetBIOS hostname and FQDN registered will prevent and potential issues down the road.

Company Branding for Office 365 Apps

In the last two posts, I’ve explained and demonstrated the process for configuring customized branding for your Office 365 and Azure Active Directory login experience to give users a company branded experience when accessing Office 365 applications and extending that experience for international non-English users. Once the user is logged in, we want to ensure that, that company consistent branding identity resumes so in this post, I will be covering just that in how to brand your Office 365 Tenant Portal and Apps and just to reiterate, this is free for all Office 365 Tenants and you don’t need to be on a particular plan or SKU to access this.

To start, we need to login to the Office 365 Admin Center as a Global Administrator. You can access the Admin Center at https://portal.office.com. If you haven’t ever applied any branding to your Office 365 Tenant, then it will probably look something like the following image.

Office 365 Admin Center Home

The default branding uses a blue accent colour which is used for the clickable App shortcut button in the top-left corner and is used to colour the page body text. The default header colour is black. To change the branding, click the Company Profile link in the left navigation bar in the portal. This will take you to the page where you configure your company name and address etc. Once on this page, there is a link in the left navigation for Custom Theming which you want to click.

Office 365 Admin Center Custom Theming

On the Custom Theming page, you can see there are several options for applying your branding to the portals and apps in Office 365. Custom Logo does what you would expect by allowing you to add your company logo to the pages. URL for Clickable Logo allows you to add a hyperlink to the company logo perhaps to direct people to your SharePoint Online intranet site or to your public website.

Background Image allows you to apply an image to the background of the header. If you use a gradient effect header or a patterned image on your public website,  you could apply this here to give a consistent look and feel across your internal and external facing portals.

To the right, we have options for Accent Colour, Nav Bar Background Colour, Text and Icons and App Menu Icon colours.

Accent colour is the colour used for the app shortcut icon in the upper left corner of the Office 365 sites and apps and is also used to colour hyperlinks and buttons on the pages. Nav Bar Background Colour applies to the Nav Bar if you have not applied a background image and applies to the whole bar except for the shortcut icon in the left corner. The Text and Icons colour applies to the title shown in the navigation bar along with the buttons in the upper right corner of the portal next to the user profile picture. Lastly, App Menu Icon applies to the tile like icon used in the upper left shortcut. If you use a light accent colour then you many want use the black option for this icon, otherwise the other option is white.

Office 365 Admin Center Custom Theming Applied

One you have applied your colour and icon selections, click the Save button to apply the changes. The changes will be visible in the Admin Center straight away but they will take a little time to appear in other Office 365 sites and apps. I had to wait about 15 minutes for my Tenant sites and apps to reflect the changes.

One observation I made is the placement of the company logo in the navigation bar appears to be dead centre. To me this looks very odd and in other blogs and instructions I have seen online showing this process, their logos appear in the left corner. Suspecting it to be IE in Windows 10 Technical Preview at fault, I tried a Windows 8.1 machine using IE and Chrome with the same results. I’m not sure when this changed or why but needless to say, it looks odd to me so I’ve opted to remove the logo from my final implementation for my tenant but your results will vary.

One you have given it some time for the changes to be applied across Office 365, here is how is looks in some of the user facing sites.

Office 365 Calendar Themed  Office 365 OneDrive Business Themed

Language Support for Office 365 and AAD Login

In my previous post, Company Branding for Office 365 and AAD Login, I showed you the steps to implement a company branded and customized login experience for Office 365 and Azure Active Directory. This post centred around using the default branding settings which for most organisations will probably be just fine but if you have employees in non-English speaking or English as a second language countries, you may want to provide them with a more regionalised experience using another language.

Luckily, Azure Active Directory allows us to do this with ease. Firstly, you need to configure the default settings so if you haven’t already, follow the steps in my previous post Company Branding for Office 365 and AAD Login to get that setup and working. Once you have it working and tested, you can head back to the Azure management portal at https://manage.windowsazure.com and login as a Global Administrator role user.

Once logged in, go to the Active Directory section from the left navigation pane and select the same directory that you customized previously. Once you are viewing the directory, click the Configure tab in from the top of the page and once again, select the green Customize Branding button.

Last time, you were taken immediately into the Customize Default Branding settings however on this second occasion, you will be shown an option first.

AAD Customize Branding Specific Language

The portal prompts you if you want to Edit Existing Branding Settings or Add Branding for a Specific Language. In this example, I want to add branding for my French users so I select the Add Branding Settings for a Specific Language option and select France from the drop-down language selection. Once you have selected your language, you are prompted to provide the same logos and text as previous for the default branding.

This is especially useful if you have provided the Sign In Page Text as you will likely want to provide this text in a non-English language. It could also be useful if your company trades under a different name or uses a different logo in another region to identify your brand better for those customers.

You can repeat this process as many times as you like for as many languages as you need however it’s worth noting that because each language uses different images and text, if you ever need to update the logos and text, you will need to update them for each language you have specified and configured. You can use this same options page to come back and edit your customizations at a later time also by select the Edit Existing Branding Settings option which is where you can also delete any customizations to return them to the Azure Active Directory defaults if you decide you no longer want to customize a specific language or the defaults at all.

Company Branding Office 365 and AAD Login

Last week, Microsoft announced via a blog post on the Office Blogs site at http://blogs.office.com/2015/02/17/sign-page-branding-cloud-user-self-service-password-reset-office-365/ that they were moving the ability to add company branding to the Azure Active Directory and Office 365 login pages from the Azure Active Directory Basic and Premium tiers down into the Free tier making this feature available to everyone.

This great news as for a lot of customers, Azure Active Directory Free provides all the service they are looking for and being able to have this fit into your corporate identity and branding makes users more comfortable that they are signing into a company authorised login portal.

In order to brand your corporate Azure Active Directory instance and your Office 365 login pages, login to the Azure Management Portal as a user with the Global Administrator role. For now, this needs to be managed via the legacy Azure portal at https://manage.windowsazure.com. Once you are logged into the portal, you need to head to the Active Directory node from the left navigation area.

Azure Portal

Once on the Active Directory page, select your Azure Active Directory instance. If you have more than one instance, select the instance which is responsible for the domains that you want to be branded with your corporate identity for Azure Active Directory and Office 365 sign-in.

Azure Portal AAD

On the properties for your Azure Active Directory instance, you will notice the green button Customize Branding which you would not have seen in the portal previously if you are an Azure Active Directory Free customer. Click the button to open the properties for branding and customization. Assuming this is the first time that your settings have been customized, you will be taken to the Customize Default Branding properties.

AAD Customize Default Branding

The Banner Logo image is used on all of the various sign-in pages for Azure Active Directory and Office 365 and should contain your company logo. The Tile Logo is to provide a square Modern UI version of your logo. I have yet to actually find anywhere that this Tile Logo is used so if you come across it, do let me know. In either case, the logos can be provided in .png or .jpeg format. I would highly recommend using an image minifier such as TinyPNG to compress your images without distortion with the view to help improve load times of these pages.

Sign In Page Text is displayed on all login pages and is used as a legal disclaimer or login help message. You can use this to display a message to provide help information to end-users such as a service desk phone number or you could use it to show a legal message matching your on-premise Windows server and client logon banner. This is entered as plain text and does not support HTML or other formatting such as hyperlinks.

Sign In Page Illustration allows you to provide a large image that is used prominently on the login pages for Azure Active Directory and Office 365 and it works in partnership with the Sign In Page Background Colour setting. The illustration takes either a .png or a .jpeg file to provide a rich client experience. The background colour is applied to the same container on the login page as the illustration and is used when the user is on a low bandwidth device.

Once you have entered all of the logos and text, click the tick button to save the changes. Once saved, give it a couple of minutes before testing to allow time for the Azure Active Directory instance to replicate throughout Azure and all of the login pages to be updated.

If you visit https://login.microsoftonline.com  you will see the generic login page, however once you enter your email address, the page will update to show your new branding.

AAD Default Login  AAD Branded Full Login

In the two images above, we can see the default login on the left and once I enter my email address, the image on the right shows my branding. The default highway image has been replaced by my Seattle skyline image along with the Office 365 logo replaced by my corporate identity. If I was on a low bandwidth device then instead of the Seattle image, I would be shown this portion of the screen as a solid block of colour using the hexadecimal value I provided on the branding page. The banner message I provided is shown at the bottom of the page in the right third.

If you direct clients to the Office 365 or Azure Active Directory login page from internal sites or a link on your public website then you may be interested in updating those hyperlinks to use the Realm URL. The Realm URL is a query string added to the end of the default URL pre-warning the portal which domain you are going to log in to and as such, the portal is pre-branded meaning that your users will never see the default Office 365 branded page.

To use the Realm URL, you need to update your hyperlinks to https://login.microsoftonline.com/?whr=richardjgreen.net replacing the domain name after the ?whr= query string with your own domain name.

AAD Branded Realm URL

As you see on the image above, I have navigated to the Microsoft Online login page using my Ream URL and without entering my email address to provide it with the domain identity for branding, the site is pre-branded for my company.

AAD Branded Compact Login  AAD Branded Mobile Login

In the two images above, you can see how the customized login page scales with the screen real estate. The left image shows a compressed width page on a client with a 4:3 standard aspect ratio. The right portion of the screen remains unchanged but the illustration image on the left is cropped. The crop to the image is applied to the right edge, so when choosing your illustration image, make sure any important parts of the image are on the left as this is the portion which will always be visible regardless of screen size.

The second of the images above shows a mobile device viewing the page. In this view port, the illustration is completely hidden and we see just the login boxes, the corporate banner logo and the message text.

I trust that you will all enjoy seeing a customized login page for your company and enjoy it even more knowing that it’s not freely available for all Azure Active Directory and Office 365 users.

Windows Server Hyper-V vNext Features

Hyper-V MVP Aidan Finn has a post running over at http://www.aidanfinn.com/?p=17424 where he is maintaining a list of the new features coming in Windows Server vNext specifically around Hyper-V.

His post is worth keeping an eye on if you are in the Hyper-V virtualization business. Reading through it myself, there seems to be a lot of work gone into stabilising clustered Hyper-V which is very welcome. My personal favourites from the list so far are Production Checkpoints to allow you to checkpoint an application service; a number of VMs in a collection that make up an application such as SQL Server, an app server and a web server, all in a single operation for consistent snapshots across multiple service tiers. Network Adapter Identification allows the name of a vNIC from the Hyper-V host to be passed through into the VM Guest OS so our Guest OS will see our vNICs not as Ethernet or Local Area Connection but as Production-VMNetwork or whatever you naming convention is. Rolling Cluster Upgrades is something which Windows Failover Clustering has long needed to allow us to upgrade our nodes whilst retaining the cluster functionality and integrated Backup Change Tracking prevents the need for 3rd party backup APIs to be installed which can commonly destabilise the platform.

All in all, it’s a nice list of features and the changes will be very welcome. There is nothing here which technically blows your mind like the feature gap bridged from Windows Server 2008 R2 Hyper-V to Windows Server 2012 R2 Hyper-V however there is definitely enough here to pip your interest and to make you warrant moving to Windows Server vNext when it ships if only for the platform stability improvements.

Public Cloud Security Verses On-Premise

Our MD at Fordway authored an article on freshbusinessthinking.com back in November 2014 which I was drawn to today which for me really hits the nail on the head about security and how public cloud addresses it and the simple fact is, is your organisation fully PCI DSS compliant or do you hold an ISO 27001 certification? How about the myriad of other industry security certifications such as SOC, FIPS 140-2, HIPAA or EAL?

Well public cloud providers often are accredited with a number of these certifications which makes their environments actually more secure than the majority of environments run by in-house IT.

You can read the full article by Richard Blanford at http://www.freshbusinessthinking.com/business_advice.php?CID=0&AID=13699&PGID=1#.VNTgpPkYt9A