Posts from 2014

Configuration Manager 2012 OSD Fails After Restart

I was working today testing the operating system deployment capability of System Center Configuration Manager 2012 (not R2) for a Windows 7 task sequence. In the environment, I am using a VMware vSphere virtual machine as my target for the deployment but sadly, the networks available to the host don’t have access to client DHCP enabled VLANs which means that everything needs to be done manually including booting the pre-execution environment as there is no way of getting this from the network as without DHCP to provide the Option Codes 66 and 67 which contain the TFTP server name and the boot image path the client doesn’t know what to do.

By creating a .iso file using the Bootable Media Wizard in Configuration Manager and attaching the .iso file to the virtual machine we can boot into the pre-execution environment. Ensure that Connect at Power On is selected for the .iso file attached to the virtual machine so that you can actually boot from it. Configuration Manager 2012 environment welcomes you with a boot media welcome panel which allows you to set a static IP address and other network parameters you may need to be able to contact the Management Point and Distribution Point roles for the Configuration Manager deployment.

Once the Operating System Deployment (OSD) Task Sequence (TS) has reached the point at which it applies the Windows operating system .wim image to the target computer however, it restarts and exits Windows PE environment and boots into the Windows operating system from the local disk and applies an overlay user interface so that you continue to see the task sequence progress. At this point, if you are unable to reach a DHCP server, the task sequence will fail as the static address set in Windows PE is lost due to the transition between environments.

In order for your task sequence to continue successfully, you need to set a static IP address on the client. The issue herein however lies in the fact that you need to be quick. If you aren’t quick enough, the Task Sequence will abort with an error code of 80070057. The easiest way to do this is to hit F8 which opens a command prompt and then enter the following commands.

netsh interface ipv4 set address name=”Local Area Connection” static 10.10.10.10 255.255.255.0 10.10.10.1
netsh interface ipv4 set dnsservers name=”Local Area Connection” static 10.10.10.100 primary

The IP addresses in both commands are examples so make sure you change the addresses to those which suit your environment. The first command sets the interface IP parameters on the client and the second command sets the DNS server address to use for name resolution. The first command is in the format IP Address, then Subnet Mask and finally the Default Gateway.

If your machine has multiple network adapters installed, the Name parameter will be different for each of the adapters. To further confuse matters, the above command works for Windows 7. If you are using Windows 8 or Windows 8.1 then you need to change the default interface name from Local Area Connection to Ethernet as this is the new naming standard used Windows 8 and onwards. netsh interface show interface or good old ipconfig will give you a list of the interfaces and their physical connection status if you are in any doubt in either situation.

RSA SecurID Software Token for Windows Phone

After waiting and wanting for several years since the start of the Windows Phone operating system era, it looks like EMC (nee RSA) have finally decided that Windows Phone is worth it’s salt as a platform and released an app. The page on the EMC/RSA site which led me to the discovery is at http://www.emc.com/security/rsa-securid/rsa-securid-software-authenticators/ms-windows.htm.

I was actually on the site looking for a download of the Windows client app for the RSA SecurID but my eyes caught glance of an image in the bottom left of the page (screenshot below). The image on the site clearly depicted a Windows Phone (although the image actually a screenshot of the Windows Phone emulator) which left me intruiged.

RSA SecurID for Windows Phone

Excited about the prospect of finally getting the RSA SecurID app for Windows Phone (yes, I am a sad individual), I looked at the Windows Phone Store and sure enough, there is an RSA app there at http://www.windowsphone.com/en-gb/store/app/rsa-securid/5bb8f454-7a2f-4818-b3fb-2570fe7e2f6a. The date and time stamp on the store listing suggests that version 1.0.0.0 was published to the store on the 19th December 2012, but I’m sure this is wrong because I’ve definatly looked for the RSA SecurID app in the last three to six month period and found nothing. The app description states that it is supporting Windows Phone 7.5 and Windows Phone 8 so there’s good news for owners of Windows Phone handsets which don’t run the latest edition.

I’m pretty suprised that there hasn’t been more noise about this from Microsoft as having this app on Windows Phone opens the platform up to a lot more business customers to whom their RSA powered VPN is mission critical.

Digital Download Isn’t Always the Cheapest Way

The Xbox One gives you the option to download quite a few games as digital downloads, sparing you the time and effort to order games from online or high street retailers, waiting for Royal Mail to deliver them or going into the high street to collect them, but just because you get the option to use your internet bandwidth to download them, doesn’t mean it’s going to be cheaper.

The wife decided today that she wanted Just Dance 2014 so headed into the Xbox One store and made the purchase without even looking at the prices. The game was £39.99 from the Xbox One store as a digital download, so remember you don’t get a physical media for that price.

A quick check on Amazon reveals that you can get the same game, but this time with a physical media disk for £24.99 or on Play for £32.23. With that Amazon price, you save £15 and you get the physical media in exchange for a one to two day wait for the goods to be delivered.

Next time you think about buying something from the Xbox One store, bear this in mind. Convenience comes at a cost.

Roaming Profiles and Windows 8.1 SkyDrive App

When I updated my PC sometime ago from Windows 8 to Windows 8.1, I encountered an issue where the SkyDrive app and all of the operating system SkyDrive integration ceased to work. It took me quite some time to get to the bottom of it, but the issue stems from the fact that I use a roaming profile, stored on my Windows Server 2012 Essentials R2 server to allow me to get a consistent experience across my home devices.

The cause of the issue was a multiple factor one but it stems from the fact that the SkyDrive app in Windows 8.1 makes assumptions about the current configuration of your PC rather than provisioning everything properly. If you’ve got issues with the SkyDrive app or integration, check the following steps and hopefully this will resolve your issues too.

Force Close the SkyDrive App

Before doing anything else, we need to force the SkyDrive app to close. Right-click the taskbar and select Task Manager. In the running application list in Task Manager, if SkyDrive is shown, right-click it and select the End Task option to forcibly close it completely.

Updating Group Policy

If you are using group policy to control your roaming profiles then this is the first place to check. I have been making useof the Exclude directories in roaming profile User Policy setting to prevent large folders which I’m happy to remain only on my primary computer from roaming onto my other secondary devices.

Group Policy Exclude Directories in Roaming Profile

I use this policy setting to exclude the Downloads, Music, Videos and Pictures directories from roaming into the profile. The reason for this is that I also do not use Folder Redirection for these folders. As the folders are not redirected, Windows will try to by default include them in the roaming profile and with ~30GB of family pictures, that would make for one seriously large profile. Specify multiple folders in this setting by separating them with a semi-colon. I’ve also added the legacy Windows XP folder names here for backward compatibility.

When you use the SkyDrive app in Windows 8.1, it creates a folder in your profile called SkyDrive. This folder will by default attempt to become part of your roaming profile which we obviously don’t want to happen. I’ve also added the folder Dropbox to this exclusion in the event that anyone else in my household tries to use Dropbox and to save their profile from the pain.

My Exclude directories in roaming profile setting is now “Downloads;My Music;Music;My Pictures;Pictures;My Videos;Videos;Dropbox;Skydrive” but your values for this may well vary.

Delete Old SkyDrive Folders from the Profile

When the SkyDrive app has a rough time of it, it creates additional directories. The primary directory is called SkyDrive but failed attempts to sync end up in directories named SkyDrive (x).old where X denotes an ever incrementing number. I had about 50 of these. Delete the SkyDrive directory and any SkyDrive (x).old directories.

Check the SkyDrive UserFolder Registry Key

SkyDrive App Registry Settings

The SkyDrive app uses a registry key to determine the folder in use for syncing and this value needs to be correct otherwise nothing will ever sync. Open regedit and browse to HKEY_CURRENT_USERSOFTWAREMicrosoftSkyDrive. Here you will find a REG_SZ string value called UserFolder. The path here should match the folder path to your user profile. You can cross check this either by browsing the %SystemDrive%Users path or to the %UserProfile% path.

Set the SkyDrive App Attribute in the Registry

This, the final part is actually the most pivotal. The SkyDrive app requires the presence of a registry key to function but the team at Microsoft who made the app didn’t think that someone might be logging onto the PC with a profile built from a previous version of Windows and therefore the required key wouldn’t exist. Ideally the app should check and if this key doesn’t exist, it should create it itself.

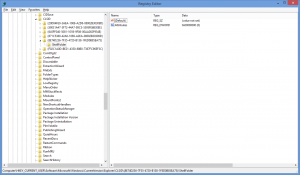
Open regedit and browse to HKEY_CURRENT_USERSOFTWAREMicrosoftWindowsCurrentVersionExplorerCLSID{8E74D236-7F35-4720-B138-1FED0B85EA75}ShellFolder. In this key, right-click in the main area and select New followed by DWORD (32-bit) Value.

SkyDrive App Shell Folder Registry

Name the DWORD value Attributes and set it’s value to 0 (zero).

Launch the SkyDrive App

Once you’ve done all the above, launch the SkyDrive app from the Start screen in Windows 8.1. If you have a lot of files in SkyDrive, you will need to be pretty patient and even if you only have a handful of files, still don’t be too impatient as the app is essentially provisioning for the first time now. After a short delay, you should see all your files and folders appear. Using Windows Explorer at the desktop, you will also now see your SkyDrive files start to sync into the %UserProfile%SkyDrive folder.

SkyDrive App Syncing

Failed Windows Server 2012 Essentials R2 Azure Backup Integration

Just before Christmas, I upgraded my Windows Server 2012 Essentials server at home to Windows Server 2012 Essentials R2. After re-deploying the server as R2, I re-configured my Windows Azure Backup and my Office 365 Integration. Since re-configuring the Windows Azure Backup, I’ve been having a problem with the integration with the Windows Server 2012 Essentials R2 Dashboard.

The Windows Azure Backup Integration is dependant on two things: The Windows Azure Backup Agent (cbengine) and the Windows Azure Backup Integration Service  (WSS_OnlineBackupProviderSvc). The Windows Azure Backup Integration Service is dependant on the Windows Azure Backup Agent.

With both services started, launching the Dashboard and accessing the Online Backup tab is empty reporting No Data.

Windows Server 2012 Essentials R2 Dashboard Online Backup No Data

When this occurred, I observed that the Windows Azure Backup Integration Service would stop after launching the Dashboard. Restarting the service and the Dashboard did nothing except cause the service to crash again. This crash could be observed in the Application Event Log as follows:

Error .NET Runtime Event ID 1026

Application: OnlineBackupProvider.exe

Framework Version: v4.0.30319

Description: The process was terminated due to an unhandled exception.

Exception Info: System.NullReferenceException

Stack:

at Microsoft.WindowsServerSolutions.DataProtection.OnlineBackup.OnlineBackupJob.Equals(Microsoft.WindowsServerSolutions.DataProtection.OnlineBackup.OnlineBackupJob)

at Microsoft.WindowsServerSolutions.DataProtection.OnlineBackup.OnlineBackupProviderCore+<>c__DisplayClass46`1[[System.__Canon, mscorlib, Version=4.0.0.0, Culture=neutral, PublicKeyToken=b77a5c561934e089]].<GetOnlineBackupObjectUpdateList>b__44(System.__Canon)

at System.Linq.Enumerable.FirstOrDefault[[System.__Canon, mscorlib, Version=4.0.0.0, Culture=neutral, PublicKeyToken=b77a5c561934e089]](System.Collections.Generic.IEnumerable`1<System.__Canon>, System.Func`2<System.__Canon,Boolean>)

at Microsoft.WindowsServerSolutions.DataProtection.OnlineBackup.OnlineBackupProviderCore.GetOnlineBackupObjectUpdateList[[System.__Canon, mscorlib, Version=4.0.0.0, Culture=neutral, PublicKeyToken=b77a5c561934e089]](System.Collections.Generic.List`1<System.__Canon>, System.Collections.Generic.List`1<System.__Canon>)

at Microsoft.WindowsServerSolutions.DataProtection.OnlineBackup.OnlineBackupProviderCore.UpdateOnlineBackupData()

at System.Threading.ExecutionContext.RunInternal(System.Threading.ExecutionContext, System.Threading.ContextCallback, System.Object, Boolean)

at System.Threading.ExecutionContext.Run(System.Threading.ExecutionContext, System.Threading.ContextCallback, System.Object, Boolean)

at System.Threading.QueueUserWorkItemCallback.System.Threading.IThreadPoolWorkItem.ExecuteWorkItem()

at System.Threading.ThreadPoolWorkQueue.Dispatch()

Searching online for the issue turned up nothing, so I decided to report the issue on the TechNet community forum (http://social.technet.microsoft.com/Forums/en-US/eb718279-3da9-4544-9e0f-50b0ba440ef5/windows-azure-backup-integration-service-fails?forum=winserveressentials) and Pan Chen from Microsoft turned up with an unexpected answer.

The Windows Azure Backup Agent logs the status of backups and their success or failure to a separate event log in Applications and Services LogsCloudBackupOperational. Pan believed that an unexpected or corrupt event log entry was preventing the integration service from reading this event log properly.

I cleared the log file, restarted the Windows Azure Backup Integration Service and re-launched the Dashboard, and after some delay, presumably while the Dashboard pulled new data from the Azure Backup Agent, I am now able to see the status data in the Dashboard.

My personal feeling is that a bad event log entry shouldn’t cause this integration to fail, but suffice to say, it looks like it does.

Permit PPTP VPN GRE Traffic via a Cisco PIX Firewall

Earlier this week, I tried to connect to a PPTP VPN connection. My Windows 8.1 PC gave me the following error:

Error 806: a connection between your computer and the VPN server has been established but the VPN connection cannot be completed.  The most common cause for this is that there is at least one internet device between your computer and the VPN server is not configured to allow GRE protocol packets Verify that protocol 47 GRE is allowed on all personal firewall devices or routers.  if the problem persists, contact your administrator.

At home, I use a Cisco PIX 515E firewall as my edge firewall device. My configuration isn’t particularly locked down in the sense that I don’t deny much traffic outbound (it causes too many internal support tickets with the wife and kids).

The error momentarily filled me with dread as I knew it was going to be an issue at my end as other people could connect to the service without any issues. The main reason though is that I know that from previous experience with VPNs, firewall and network devices getting in the stream and blocking traffic can be fraught with problems trying to resolve it.

A few Bing searches later and I was none the wiser. All of the details online seem to focus around people trying to host their own PPTP VPN servers and having issues with inbound connections, however with thru absence of other assistance, I figured I would try once of the recommendations I found which works to allow inbound PPTP connections and low-and-behold, a fix.

fixup protocol pptp 1723

Simply enter this command via the command line interface of the PIX or using Cisco ADSM and the command line entry dialog. The PIX will return with a slightly bizarre looking response and now you’re all set to place outgoing PPTP VPN connections.

The reason and rationale? The PIX does not by default inspect the IP Protocol 47 traffic (GRE) which is used by a PPTP VPN connection and therefore is dropped. Entering this command adds GRE to the inspection ruleset on the PIX so that the traffic can be seen and permitted to pass, assuming you don’t have an ACL which will then block it (the system level inspections happen before ACLs are taken into account).