pki

RDS and the Case of the Mistaken PKI OID

Earlier this morning, I was working with our support team to work out an issue they were having in an environment where Remote Desktop Services had stopped working. Trying to connect to a server via RDS simply failed with a Network Level Authentication warning, strange, given it was a domain environment and everything should be trusted and all good. The issue started life as support seeing Event ID 1058 and Event ID 36870 errors in the event log and they had been looking at https://blogs.technet.microsoft.com/askperf/2014/10/22/rdp-fails-with-event-id-1058-event-36870-with-remote-desktop-session-host-certificate-ssl-communication/ for guidance to this point with no success.

I quickly discovered that a GPO had recently been implemented that enforced NLA for RDS and also assigned a certificate template to use for Remote Desktop instead of the default self-signed version. I hopped onto the certificate authority to check out the certificate template that had been configured and compared it to the recommendations of the Microsoft article for assigning certificates to RDS sessions at https://blogs.technet.microsoft.com/enterprisemobility/2010/04/09/configuring-remote-desktop-certificates/ as this is an article I have referred to before and know it works.

Read more…

Setting Up System Center Update Publisher

In my earlier post Preparing Certificates and GPOs for System Center Update Publisher, I showed you how you can prepare your environment with the appropriate certificate and Group Policy Object to support a System Center Update Publisher installation. With all of this installed and configured, the time is upon us to now install and configure System Center Update Publisher.

I am not going to go through the installation process for SCUP here because it is literally a Next, Next, Finish installation. What I will tell you though is that the latest version of SCUP is 2011 and you can download it from http://www.microsoft.com/en-gb/download/details.aspx?id=11940. The steps in this post can be applied to Configuration Manager 2007 or Configuration Manager 2012 and 2012 R2 but all of my screenshots for the Configuration Manager side of things will be in SCCM 2012 R2.

Configure SCUP Options

Once you have got SCUP installed, you want to open the console, ensuring that you use the Run As Administrator option. If you don’t elevate the console when you launch it, a number of the options and settings will prevent you from changing them. Once open, click the blue icon in the first position on the Ribbon and select Options to get to the settings.

SCUP Configure WSUS Server

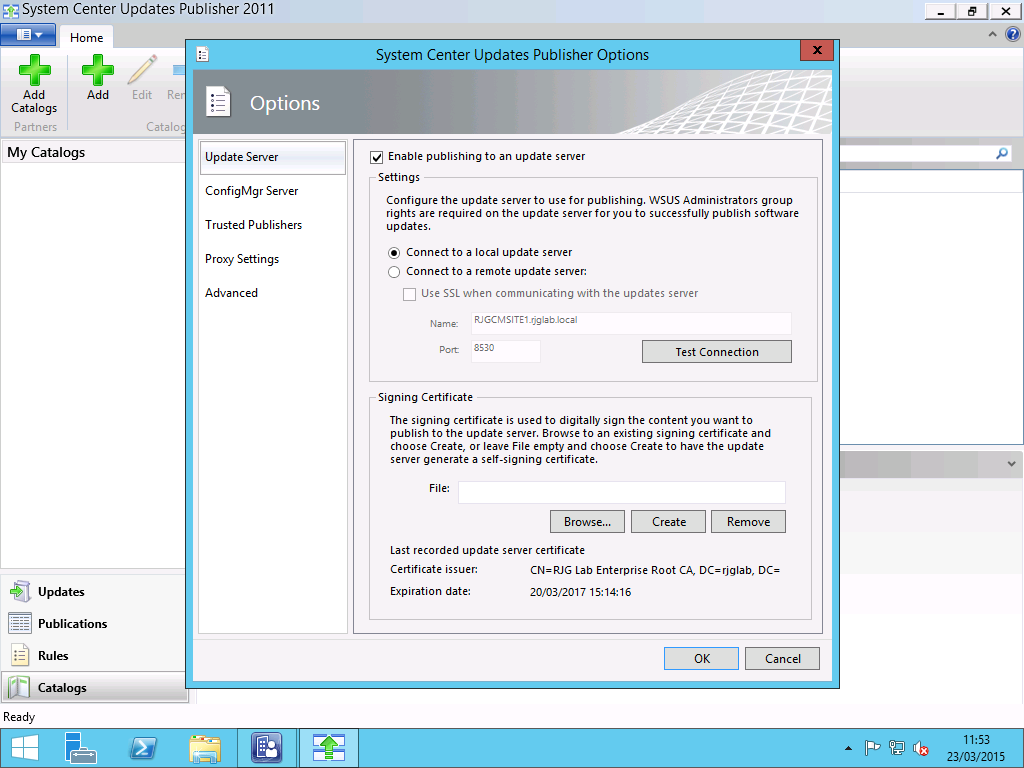
First, we want to configure the WSUS Server settings tab. On this tab, you can either specify the hostname for a remote WSUS server or if you are running the SCUP console locally on your WSUS server you can select the option for Connect to a Local Update Server. An important note here is that if you are connecting to a remote WSUS server, the connection must be over SSL on either Port 443 or Port 8531 in order to be able to configure the Signing Certificate settings.

Once you have specified the server, select the Browse button in the Signing Certificate area and locate the .pfx file that has the exported Code Signing certificate including the private key that was exported in the Preparing Certificates and GPOs for System Center Update Publisher post. Once you have located the file and the path is shown in the field, select the Create button and this will publish the certificate into WSUS. You will be prompted to enter the password for the .pfx file at this point.

SCUP Configure SCCM Server

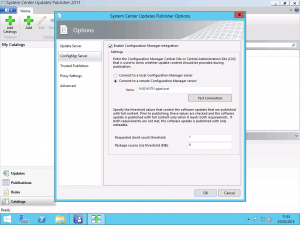
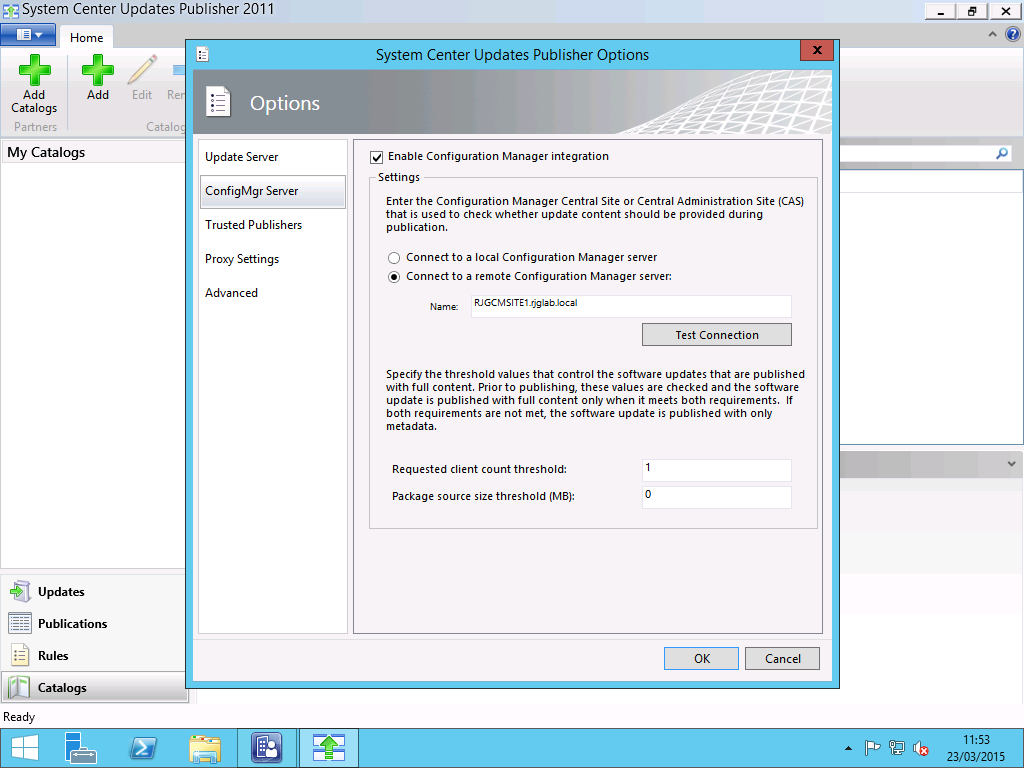
With the WSUS settings configured, we now need to head to the ConfigMgr Server tab. Here, specify whether to connect to a local Configuration Manager server if you are running the SCUP console on your Primary Site Server, otherwise enter the remote server name.

In the fields in the lower part of the screen, you can specify the behaviour of SCUP for transitioning updates between Metadata only and Full Content publishing status according to the required client count. In a nutshell, you can have SCUP publish only the metadata for an update into SCCM to allow you to determine if clients require the update. Once a defined number of clients report the update as required, SCUP will change the status of the update to Full Content and will download the files such as .msp or .exe files for the update.

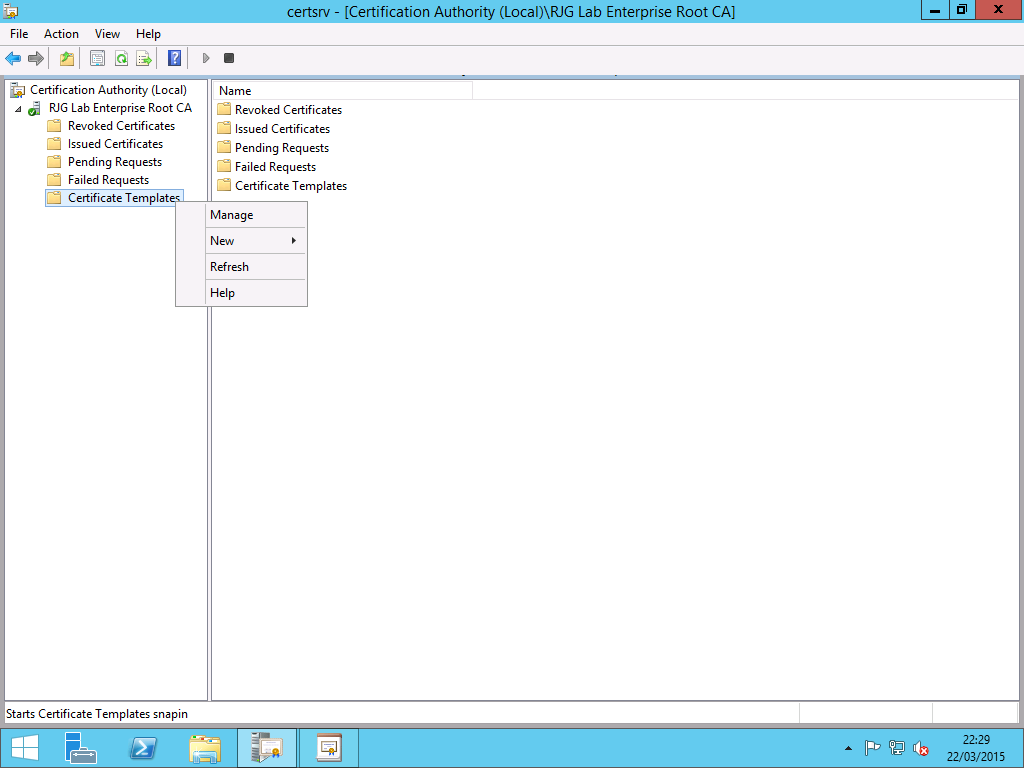
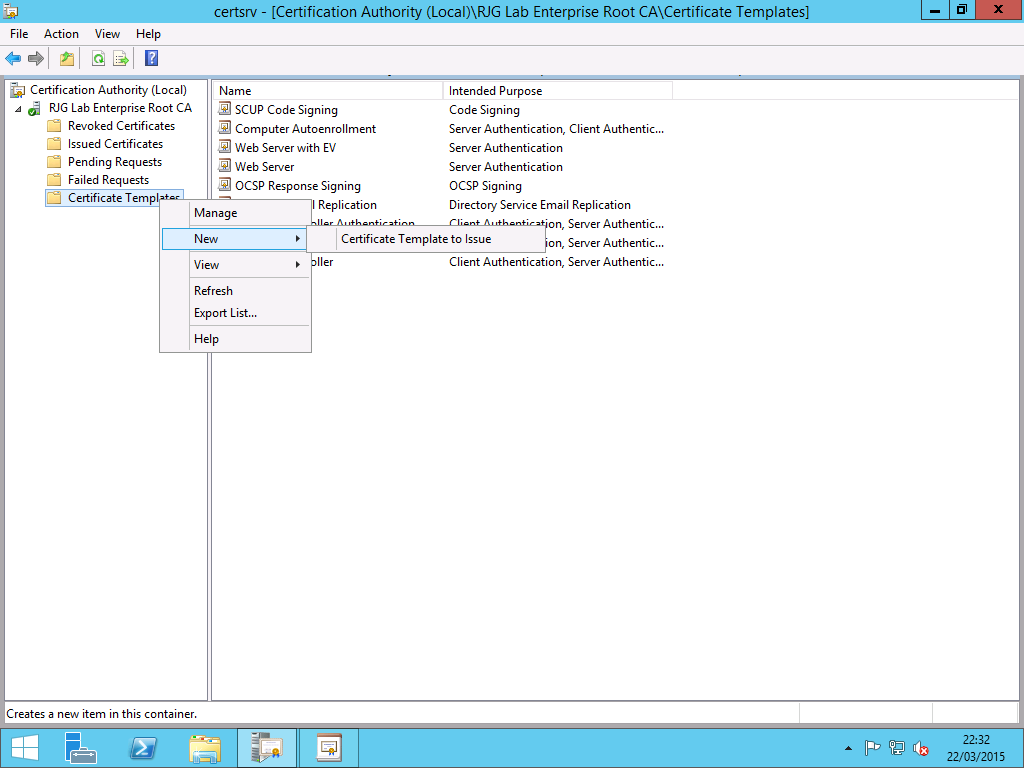
Adding Catalogs to SCUP

SCUP works by using catalogs which are lists of updates published by manufacturers and included in these catalogs are the update definitions which are called detectoids, working to determine if a client meets the requirements for an update as well as defining the URL where SCUP can download the update from.

In the SCUP console, select the Catalogs button from the left navigation and then hit the Add Catalogs button from the Ribbon.

SCUP Add Catalogs

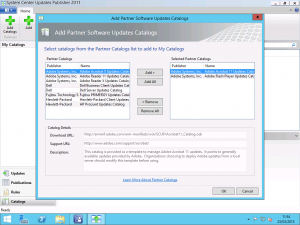
After clicking the Add Catalogs button, you will be presented with the list of partner catalogs supported by SCUP. These are out of the box and are at no cost to use. To my mind, the Adobe Reader and Adobe Flash Player are the most important. As you can see from the screenshot, I have added these two catalogs from the list of partner catalogs to include in my SCUP catalogs to be used.

Once you have added catalogs to SCUP, we aren’t quite finished as that only adds them to the list of catalogs that can be used however it does not automatically start getting update information. Now, we need to Import the Catalogs. Select the Import button from the Ribbon to access the Import Software Updates Catalog Wizard and here, select one, some or all of the catalogs you just added. Doing this may take a few moments and you might receive a security warning asking you to accept some certificates in the process so go ahead and allow this.

Publishing Updates from SCUP

With the update catalogs added to SCUP and the updates in those catalogs imported, now it is time to look at some actual updates. Head over to the Updates view in the console with the button in the lower-left corner. and expand one of the folders to view a subset of the updates.

SCUP Updates List

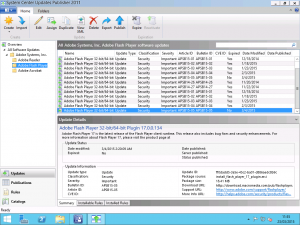
Here we can see the name of the updates, if there are any relevant article IDs or CVEs that they address as well as the date the update was released and whether or not it is expired. As you can see for Adobe Flash Player, many of the updates are expired because they have been superseded by later updates. Highlight an update that has not been superseded and select the Publish button in the Ribbon. Click through the wizard to download the update files if required and the update will be published into WSUS ready for SCCM to use.

Configuring SCCM Software Update Point Products

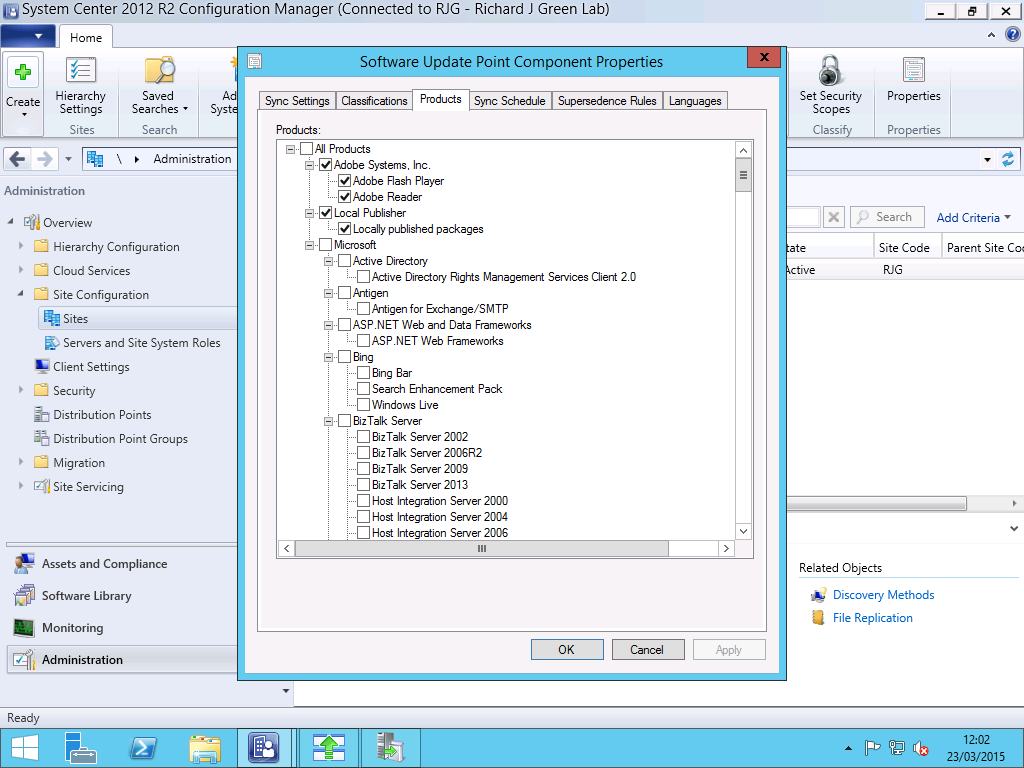
With the updates now published into WSUS for Configuration Manager use, we need to make sure that Configuration Manager will be able to detect the updates. As part of installing and configuring Configuration Manager you will have setup the products and classifications for which you want to download updates and we need to add to this the products that we just published with SCUP.

In the Configuration Manager Administration Console, navigate to the Administration page and then expand the Site Configuration followed by the Sites view. Right-click on your site and then select the Configure Site Components menu item followed by Software Update Point.

SCCM SUP Products

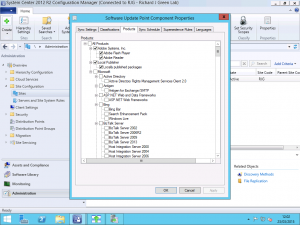
As you can see in the screenshot above, after publishing the Adobe updates into WSUS, there is now some additional products listed for Adobe Systems Inc including Flash Player and Reader. There is also a new product called Local Publisher which is the product SCUP updates for any updates you create manually. Check all of the new products you want to be able to deploy to clients and then save the changes to the Software Update Point role.

Viewing the SCUP Updates in SCCM

SCCM Adobe Updates Available

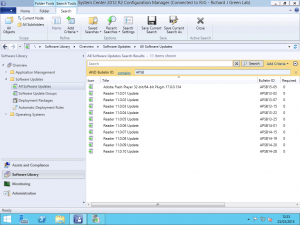
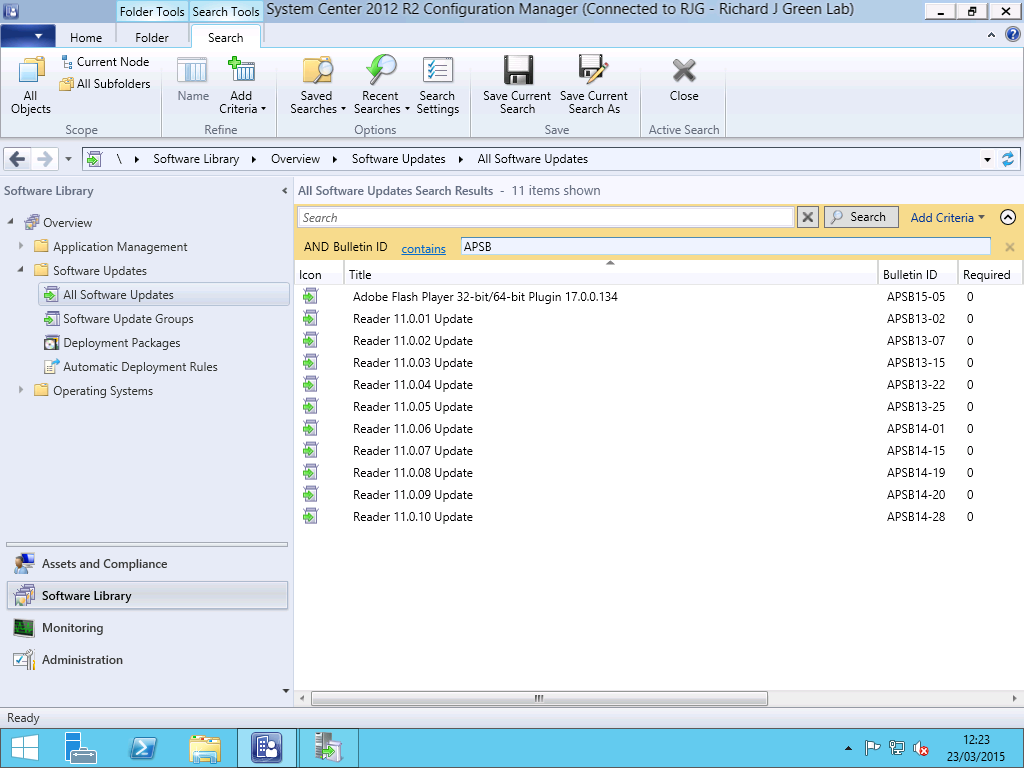
With the updates now published to WSUS for Configuration Manager and with Configuration Manager’s SUP role configured to accept updates for these products we’re all set. You can either wait for the WSUS server to perform a scheduled synchronisation or you can force it from the Software Updates area of the Software Library page in the console. Once a synchronisation has occurred Configuration Manager will be able to list the new updates for the new products.

As you can see in the screenshot above, I used a criteria to filter the search results for Bulletin ID contains APSB which is the prefix Adobe uses for all of their security updates much like Microsoft use KB to prefix their updates. I can now follow the normal process of downloading the updates into Deployment Packages and approving the updates for distribution to collections.


Preparing Certificates and GPOs for System Center Update Publisher

If you are using Configuration Manager to manage and patch your client estate then you already know that it’s great to have your Software Updates in the same console as your Application Delivery and the way in which Configuration Manager 2012 R2 manages Software Updates is a big leap on usability over Configuration Manager 2007 however the missing piece of the puzzle for many is managing non-Microsoft updates and for that, we need to enlist the help of a free product from Microsoft called System Center Update Publisher.

Before we start anything with Configuration Manager, WSUS or SCUP however, we do have the small matter of prerequisites to cover off and in this case it requires a certificate and a Group Policy setting or two. The certificate we are interested in is a Code Signing certificate which unless you are familiar with signing PowerShell scripts that you author, you may not have come across previously and your internal CA may not be setup to issue. You can buy these certificates for Code Signing from an external third-party CA if you wish but it is easiest and best done internally as after all, the code you are going to be signing is for updates to your internal clients.

Creating the Code Signing Certificate Template

On your Certificate Authority, we need to configure it to issue a Code Signing certificate. You can either use the native Code Signing template or you can create a custom template just for SCUP so that you can limit the scope of the certificate template to selected users or a group of users accordingly. If you want to create a new template then duplicate the existing Code Signing certificate for the purpose.

Once you have decided on the template to use, configure the CA to issue the certificate. In my lab, my template is called SCUP Code Signing and the security on the template limits users in an Active Directory Group called SCUP Code Signing Users to being able to Enroll the certificate which prevents users, malicious or otherwise from requesting the certificate.

SCUP Code Signing CA Template

Request the Code Signing Certificate

Once you have configured everything on the CA, you need to request a certificate based on this template. Using the Certificates MMC snap-in for your user account, you can request to enrol the certificate from your Active Directory Enrollment Policy.

SCUP Code Signing Certificate Request

If you based your new Certificate Template on the Code Signing template or you used the Code Signing template, you don’t need to enter additional information and the request will be built from Active Directory user attributes. Once you have created the certificate, you need to export it twice. For the first export, export the certificate only in .cer format and do not export the private key. This portion of the certificate will be used in the Group Policy Object shortly. The second export is required to be in .pfx format and include the private key and is used in SCUP for configuring it once installed.

Configure the Trusted Publishers Group Policy Setting

Once you have issued the certificate and you have exported it twice; once as a .cer file and once as a .pfx file, we need to configure the Group Policy for the Trusted Publishers. Put simply, in order for your client PCs to install updates that are not signed by Microsoft, the clients need to trust the updates. In order for the updates to be trusted, they need to be signed with a certificate that the clients trust. Having a certificate from your internal CA isn’t enough for this though. Once you have a certificate, a client will trust it as it is from a Trusted Root Certification Authority but it will not be trusted for code signing unless added to the appropriate certificate store.

Using ether a new Group Policy Object or an existing object which contains your other Certificate Services related settings, we need to add the .cer certificate exported earlier to the policy.

Trusted Publishers GPO Setting

Within the Group Policy Object, expand the Computer Configuration folder and then drill into Security Settings followed by Public Key Policies. Within the Public Key Policies folder, open the Trusted Publishers folder. In here, you need to import the Code Signing certificate .cer file that was previously exported. Doing this allows your clients to trust updates signed with this certificate for the publishing of software and applications.

Make sure you use the .cer export and not the .pfx export here as we only want the clients to have and trust the public key portion of the certificate. Distributing the .pfx would give these clients the private key also and that would be bad to have sent throughout the entire environment on every machine linked with the GPO.

Next, we need to change one setting in relation to the Windows Update Agent on the clients. In the same GPO or in another GPO if you have one dedicated to Windows Update related settings, navigate to Computer Configuration, Administrative Templates, Windows Components, Windows Update. Here, you need to change the status of the Allow signed updates from an intranet Microsoft update service location setting from Not Configured to Enabled. This second setting allows the Windows Update Agent to actually detect and download updates from your WSUS and SCCM environment if they are not signed by Microsoft and this setting is paired with the Trusted Publisher certificate above to make non-Microsoft updates trusted on the client.

With these all the above completed, you are now set and ready to deploy System Center Update Publisher and a follow-up post I will be publishing soon will cover the SCUP installation and setup.

Delta CRLs are Not Accessible via HTTP When Hosted on IIS

If you are running a Microsoft PKI in your environment then chances are you will have (or at least you should have) configured at least one HTTP based distribution point (CDP) for your Certificate Revocation Lists. If you are only publishing full CRLs then you will have no problems however if you are publishing Delta CRLs, the smaller, faster to process kind which list only certificates revoked since the last full publish then you may encounter an issue if you are using an IIS website to publish these.

The problem lies in the filename used for the CRLs. In my lab for example, my Certificate Authority issues a CRL file name rjglab-CA.crl and the delta files are named the same as the full CRL but they are appended with the plus character making the file name rjglab-CA+.crl. In it’s native configuration, IIS does not permit the use of the plus character because that character falls into the realms of IIS Request Mapping and the request handler.

HTTP Error Downloading Delta CRL

We can see in the screenshot above what the error code and message given by IIS is when we try to download the Delta CRL in the default configuration.

For an IIS webserver hosting your CRL and Delta CRL, we need to change the behaviour of IIS to allow this plus character to be permitted which luckily is easily done. First off, open IIS Manager on the server which is hosting and making available to clients your Delta CRL file. From the server home in IIS, open the Request Filtering page and from this page, select the Edit Feature Settings button in the Actions bar.

Request Filtering Settings in IIS

On the Edit Request Filtering Settings page under the General section, by default, Allow Double Escaping is disabled. Enable this option and then press OK.

Once you have made the change, try to download the Delta CRL file and you should find that the file is available and you can successfully download it.

Delta CRL Downloaded OK

Extended Validation (EV) with an Internal Certificate Authority

As IT Pro’s, we know that Extended Validation or EV on web server certificates doesn’t actually add a security layer or harden our web servers in any way but it does give users the warm fuzzy feeling that the website they are using is definitely trustworthy and given that we want our users to believe everything we do internally in IT is trustworthy, it would be great to have our internal web services use Extended Validation certificates for user facing websites.

If you are using a Windows Active Directory Certificates Services (ADCS) certificate authority for issuing your certificates then the great news is that we can do this and it can be made to work in an existing environment so you don’t need to build a new Root CA or setup new servers for it to work, we just need to create a new Certificate Template and a Group Policy Object in the domain.

Configure the Certificate Authority

The first step is to create the Certificate Template. On your ADCS server where you issue your Web Server certificates, open the Certificate Authority MMC console. From the console, right-click on the Certificate Templates folder and select Manage.

Manage Certificate Templates

Once you have clicked this, another window will open with the list of Certificate Templates configured in the environment. Find the Web Server certificate, right-click it and select the Duplicate Template option.

New Template Properties

At the Properties for New Template dialog, enter a display name that is appropriate such as “Web Server with EV” or “Web Server Extended Validation”. From here, click the Extensions tab.

New Template Properties Extensions

On the Extensions tab, highlight the Issuance Policies list item and select Edit. At the window which appears, select the New button to add a new Issuance Policy.

EV Issuance Policy

Give your new issuance policy a name such as “EV Issuance Policy” and if you have one (which you should do for production) enter your Certificate Purpose Statement URI. If you don’t know what a Certificate Purpose Statement (CPS) is then I would suggest the TechNet article Certificate Policies and Certificate Policy Statements as a first primer however in a nutshell, it’s a webpage which gives people information about how the certificates can be used.

Before you hit OK on the New Issuance Policy dialog, note the final field OID. Copy this OID to your clipboard and keep it their for the time being or better yet, save it to a text document in a safe place as we need this for the steps later.

Once you have this, hit OK on the dialog and change any other settings on the template you may need to such as the validity period, the key length or whether you want to allow the private key to be exported. Once you have created the new template, we need to configure the CA to be able to issue it.

CA Certificate Template to Issue

As shown above, back in the Certificate Authority console, right-click on the Certificate Templates folder and this time, select New followed by the Certificate Template to Issueoption. From the list of templates, select the new template you just created for Web Server with Extended Validation.

After this, the Certificate Authority is configured with a new template that can be used for Extended Validation and the CA is configured to issue certificates based on that template however it’s no good having the certificates if the clients do not know to trust it to the extent required to display the green address bar.

Configure Group Policy in Active Directory

With the CA configured, we need to configure clients to trust this certificate for Extended Validation and the best method for this is going to be Group Policy. If you have an existing Group Policy to apply certificate related settings then use that policy otherwise create a new one and link it either at the root of your domain to apply it to all computers on the domain or to a particular OU if you only want it to apply to sub-set of clients. Just for clarity, I would not recommend putting certificate related settings in the Default Domain Policy nor would I recommend putting any settings into that policy. The Default Domain Policy and the Default Domain Controllers Policy should be left untouched and new policy objects should be created for any settings you want to apply.

In your Group Policy Object, expand the view in Computer Configuration followed by Security Settings, Public Key Policies and finally Trusted Root Certification Authorities. If you are using an existing policy, you should have here a valid copy of the public key portion of the certificate for your Root CA. If you are creating this as a new policy, you will need to import the public key portion of your Root CA certificate.

GPO Trusted Root Certificataion Authorities GPO Trust Root CA Extended Validation Properties

Once your certificate is added, right-click it and select the Properties. From the properties, you need to select the Extended Validation tab. On this tab, add the OID that you earlier copied or saved to a text document. Any OIs in this list are considered trusted for Extended Validation when a certificate contains the Issuance Policy matching that OID and the certificate issued by a CA that is part of the issuing or subordinate chain below the specified Root CA.

Once you have applied the GPO to your clients, you can issue a new certificate for a web site with the Web Server Extended Validation template and when browsing to that site from a client computer which both trusts your Root CA and understands the OID applied to the Issuance Policy, you will get the green address bar.

Website with EV Certificate