In what feels like a long time ago, Microsoft released Office 2016 which includes the Outlook client. In the 2016 release of Outlook, Microsoft introduced a new feature called Mentions.
For anyone who is a user of Twitter, Facebook or other social media platforms, the notion of a mention will not be something new. For those two are not familiar with these platforms, a mention is the process of name-dropping somebody within a message. The objective of a mention is to draw the attention of somebody to something. An example of this could be during an email exchange between two parties, introducing a third party to the conversation. This could be to ask the third party to respond to a specific question.
One of the reasons I really like mentions is due to the misuse of To and CC fields in an email today. In an idyllic world, messages sent to you require your action or consultation. Messages which you are copied on (CC) are sent for informational purposes. In theory, you should be able to delete any message you have ever been copied on and nothing would be lost. The CC field takes its name from traditional carbon copy paper where writing on one piece of paper would press through multiple layers; these were very useful for sales order paperwork or contracts where multiple parties need a copy of one document.
Sending a Mention
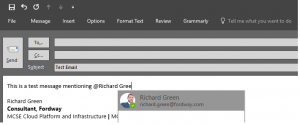
A mention starts by typing the ampersand symbol (@). Once typed, you can start typing the name of somebody within your organisation. As you can see from the image below, I have drafted an example email. In the example, there is nobody listed in the To or CC field. I have typed the ampersand symbol and started to enter my own name. A flyout menu will appear filtering the name results as you type. This is very helpful in larger organisations where many people can share the same name. With the integration with Active Directory, Office 365, and more, profile pictures, where present, are displayed for the users too.

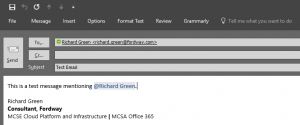
Once you complete the name entry, the name of the person will be highlighted in the message body. You will also notice that the user mentioned is automatically added to the To line of the message. This links to my earlier statement that using a mention is intended to draw the attention of a user to a message and potentially elicit an action from them.
IMPORTANT: Always remember that the mentioned party is added to the message distribution list. You cannot blindly mention somebody in a message. In this scenario, you would type the name as normal without a mention. I cannot be held responsible for any embarrassing moments where you mention somebody in an email when talking about them negatively to another party.
Receiving a Mention
When you receive a mention in Outlook 2016, Outlook makes it clear that you have been sent the email as the result of a mention. As the screenshot below shows, I have received an email. All looks normal; the message is your average email. The key difference is the addition of the ampersand (@) symbol to the right of the email view. This symbol indicates that you were mentioned.
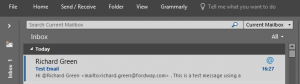

If you are working to filter and sort your received messages, Outlook also includes a dedicated view for mentions. To the top right of the message list, as shown in the previous screenshot, the word All is visible. This indicates that all messages in the current view or folder are being displayed. Selecting this will present a drop-down menu to provide filtering options. These options include All, Unread and Mentioned. By selecting the Mentioned option, the view will be filtered to only display messages which explicitly name-drop you. This makes it very easy to find and identify messages which may require your action.


Give mentions a spin and let me know how you find them. I have only recently started using them myself and I am hoping that I can try and help proliferate their use within our organisation to make using email that little bit more modern and manageable.