SharePoint Online

Managing Offline Sync in OneDrive for Business

Yesterday, I released a post explaining how we can control and manage some of the sharing capabilities of SharePoint Online. Those changes applied not only to SharePoint Online but also to OneDrive for Business such as whether or not a user can share a file publicly with an anonymous link.

In this post, I am going to focus on the offline sync capability of OneDrive for Business. This feature allows a user to have access to their OneDrive for Business files on their PC or Mac device and work on them offline and when they come back online, changes are synchronised back up to OneDrive for Business. The OneDrive for Business client allows not only syncing for offline access of a users personal site folders but also of team site folders and data. In some cases, people are even using this feature to replace their Folder Redirection shares on the local network to a file server and have users work go up to OneDrive for Business by default making the most of that 1TB per user allowance and reducing your on-premise storage management and purchasing costs. In other cases, you could use this to allow employees working remotely to have access to a central team site that contains all of your document templates or marketing collateral.

While this offline sync capability is very useful, it also comes with a price. Imagine a scenario with a disgruntled employee: Using their home PC, they login to OneDrive for Business and configure their client to sync their folders and files at home. Now, this user has copies of all of their corporate work product at home, free to take it or sell it to a competitor or such. Another scenario is that somebody gains access to your SharePoint Online environment and takes a copy of a sensitive folder of documents and then publishes them online, exposing your company.

Luckily, after all this scaremongering, we can control it although this is a new feature so it’s not something we could have done before.

Turn Off Offline Sync for a Library

The easiest way to protect sensitive content is to prevent it from being synchronised for offline access so that OneDrive for Business clients cannot take copies of it with them offline. Yes, this method as no neither of the methods given stop someone physically downloading a copy of files but it stops them doing it en-masse using the OneDrive for Business client as a bulk collection tool.

Within SharePoint Online, access the Library Settings for your particular library type and then head into the Advanced Settings section.

SharePoint Online Disable Offline Sync

As you can see, in the Advanced Settings, we have the option to disable offline sync. As I said before, this is a great option for really sensitive areas that you just flat-out do not want kept offline but it’s not ideal for your honest corporate employee nor is it very scalable as this is a per library setting so unless you want to iterate all your libraries with PowerShell or some automation tool, this will get old and very time consuming fast.

Limiting Offline Sync to Domain Clients

With this new feature for OneDrive for Business, we can now control whether or not a client is able to sync offline content based on whether their computer is a member of a given number of Active Directory domains. With this feature, we can allow our employees to sync files offline but we can limit the scope of it to our domain managed client PCs.

There are two caveats that come with this new capability. First, this is a tenant-wide setting so once you apply this, you will not be able to perform offline sync with OneDrive for Business for any library in your tenant outside of one of the configured domains. The second is in the detail in the previous paragraph – PCs. Because a domain joined Mac client is not really a fully-fledged domain member like a Windows Client OS, changing this setting disables offline sync for Mac devices regardless of whether they are joined to your domain or not. We can hope this is something that might get fixed in the future as this is the first release of this feature but we just don’t know right now.

Right now, this change does not effect or limit mobile OneDrive for Business apps in any way just as an FYI but that is where Office 365 MDM comes in to play which I will hopefully get a chance to cover in a future post.

So to get started implementing this, we first need to get the GUIDs for our domains. These are unique hexadecimal strings which uniquely identify our domain. To get the GUIDs for all of the domains in our forest, we can use the following PowerShell Cmdlets from a PC with the Active Directory PowerShell Module installed from the RSAT Tools.

Import-Module ActiveDirectory
$Domains = (Get-ADForest).Domains; ForEach($D in $Domains) {Get-ADDomain -Identity $D | Select Name, ObjectGuid}

This Cmdlet comes from the Microsoft TechNet page at https://technet.microsoft.com/en-us/library/dn938435.aspx on how to get domain GUIDs but I have added the Name column to the output. I know that it is likely in the real world that we may have resource or selected domains that we don’t want to allow sync to occur in so this way, we can see which domains relate to which GUID and we can filter them out as needed.

With the domain GUIDs in hand, we can now configure SharePoint Online. Using a PC with the SharePoint Online PowerShell Module installed, enter the following Cmdlets:

Connect-SPOService -Url https://tenantname-admin.sharepoint.com -Credential admin@domain.com
Set-SPOTenantSyncClientRestriction  -Enable -DomainGuids "786548DD-877B-4760-A749-6B1EFBC1190A; 877564FF-877B-4760-A749-6B1EFBC1190A"

So as you will be able to see in the example above, firstly, you need to change the Url parameter to match your Tenant Admin URL and you also need to enter your Global Administrator or SharePoint Online Administrator credentials. On the second line, I’ve entering the domain GUID for two domains which are semi-colon separated. If you have just one then omit the semi-colon.

Once the change is applied, users will no longer be able to sync content for offline access with OneDrive for Business unless they are using a corporate managed, domain joined machine in one of the domains you have specified or from any Mac clients. Any users who have configured offline sync with OneDrive for Business on non-domain joined machines prior to the change will stop syncing any new changes but the existing content will not be deleted from the client so it is important to implement this change early if you are starting out in Office 365 today.
 

Managing Sharing and Access in SharePoint Online

For many organisations using SharePoint on-premise, SharePoint Online is a very appealing proposition. For administrators, it’s easy to deploy as you no longer have to worry about farm topology design and sizing your SQL Server disks to meet your capacity and performance objectives nor do you have to open firewall holes left, right and centre to give your users the collaboration tools they require when they are on the move as access to your corporate SharePoint sites and OneDrive for Business is all done in the cloud.

For some organisations, SharePoint Online and it’s broad sharing capabilities will present a headache at the same time because managing the risk that comes with this open accessibility of information can add up and depending on your particular circumstances, you may want to restrict certain aspects of this to ensure that your corporate data stays safe. In this post, I’m going to address some of the things we can do to configure SharePoint Online to manage those risks using both some existing features and some newly added features.

Default Sharing Settings

By default, SharePoint is actually a pretty open book allowing your end-users to share anything with potentially anyone. We can share files with selected users within our organisation, all users within our organisation or external parties. The default configuration allows us to generate a sharing link that we can send out to third-parties and they will be able to view the file without needing to authenticate or prove who they are.

Get the SharePoint Online PowerShell Module

For this post, we are going to be working with the SharePoint Online PowerShell Module and you will need to have the latest version which includes all of the new Cmdlet parameters. To download this, you can get it from http://www.microsoft.com/en-gb/download/details.aspx?id=35588.

Connect to Your SharePoint Online Tenant

In order to use the SharePoint Online PowerShell Cmdlets, you need to be either a SharePoint Administrator a Global Administrator in your Office 365 tenant. Once you have the relevant permissions, open PowerShell and enter the Connect-SPOService to authenticate as follows:

Connect-SPOService -Url https://tenantname-admin.sharepoint.com -Credential admin@domain.com

You will be prompted to enter your password for the credential provided and once entered you will be connected to your SharePoint Online tenant. We can view the current configuration of the tenant sharing configuration using the Cmdlet Get-SPOTenant.

Restricting External User and Guest Sharing Setting

By default, SharePoint Online allows us to share with both registered external users and guest users with a link. We can control this setting with the SharingCapability parameter with the following examples:

Set-SPOTenant -SharingCapability ExternalUserAndGuestSharing
Set-SPOTenant -SharingCapability ExternalUserSharingOnly
Set-SPOTenant -SharingCapability Disabled

The top setting, ExternalUserAndGuestSharing is the default and allows sharing links to be sent to both authenticated users who sign in to access content with a Microsoft Account and guest users. The risk with this is that the links sent to guest users could be forwarded to other people once sent out or even shared publicly online exposing your content.

The second setting, ExternalUserSharingOnly allows sharing to take place but limits it to users who sign in with a Microsoft Account to access the content. Additionally, these links are one-time use which means once a user has accessed the link they will continue to be able to view that content but forwarding or outwardly sharing the link will not allow anyone else access to it without the original Microsoft Account credentials.

When applied using the above Cmdlets, this is set at the tenant level. Administrators of Site Collections within the tenant can change this setting on a per Site Collection basis however they cannot make the setting less secure that the tenant level setting. If for example, you set the tenant level setting to only allow authenticated users to access shared content, a Site Collection administrator would only be able to select between externally authenticated sharing or no sharing at all and the guest sharing option would be disabled.

We can couple the above setting for only allowing external users who are authenticated with another PowerShell Cmdlet.

Set-SPOTenant -RequireAcceptingAccountMatchInvitedAccount $True

This setting which is disabled by default but can be enabled, ensures that only the person who is sent an authenticated user sharing link can use the link. In it’s default state, a link for sharing can be sent out to a third-party user for them to authenticate with using a Microsoft Account however if they do not click the link to perform the initial binding to their Microsoft Account and instead, forwarded it to somebody else who signed in using their Microsoft Account would allow this alternate individual access to the document. Although this is quite a rare scenario to consider, it is still possible none-the-less.

For example, you send a link to dave@richardjgreen.net but Dave forwards the link to bill@richardjgreen.net and Bill opens the link and binds it to his Microsoft Account allowing Bill access to the document rather than Dave as you had intended.

This setting when enabled records the email address that the sharing link was sent to and will only allow the Microsoft Account named in the original invitation to use it and bind to it. My personal take on this is that if you are changing the default sharing behaviour to only allow authenticated user sharing then this setting is a must have.

Hiding Wide-Scoped Sharing Options

In SharePoint Online, not only can we share content externally but we can share content internally. Sometimes, especially in large organisations, this over-sharing can lead to people seeing things they perhaps shouldn’t. Microsoft have very recently added new Cmdlets to the PowerShell library for SharePoint Online to allow us to control this as shown below:

Set-SPOTenant -ShowAllUsersClaim $False
Set-SPOTenant -ShowEveryoneClaim $False
Set-SPOTenant -ShowEveryoneExceptExternalUsersClaim $False

These settings when configured as False using these Cmdlets remove certain groups from the people pickers in SharePoint Online when we invoke a sharing request.

The first setting, ShowAllUsersClaim controls whether users have the ability to share something with everyone within your Azure Active Directory tenant. This object includes both users who are internal to your organisation and users who have previously accepted sharing invitations. When this is disabled, users will not be able to see the All Users objects listed in the people picker so will not be able to broadly share anything to the entire organisation

The second setting, ShowEveryoneClaim controls whether to show or hide the Everyone object. The everyone object includes both internal users and external users but it includes external users of the authenticated and unauthenticated varieties so this object is the most damaging in terms of scope. You could argue this is less of an issue if you have already disabled the ability to share with unauthenticated users using the Cmdlets in the previous section but if that is the case, why confuse your end-users with the two different entities.

The final setting option is ShowEveryoneExceptExternalUsersClaim. This last option controls the Everyone Except External Users object. This object controls whether or not you are able to share something to your entire organisation but not to individuals outside it whether they are authenticated or not.

My personal feeling on this is that All Users and Everyone should be hidden for most people and that you could leave the final option for Everyone Except External Users enabled if you want to give your users the ability to broadly share within the organisation.

Limiting OneDrive for Business Sync Capabilities

UPDATE: In a partner post which I released the day after this was published, I have covered how we can manage and limit the OneDrive for Business client and it’s offline synchronisation capabilities to managed devices. You can see that post at http://richardjgreen.net/managing-offline-sync-onedrive-for-business/.

Office 365 Limited Administration Roles

In the past when managing Office 365 permissions, we had several options for granting ‘super user’ rights to users however these stopped somewhat short of allowing us to be selective over what parts of our Office 365 deployment an administration could have control. You could either make somebody a Global Admin which essentially gave them the keys to the kingdom or you could assign them one of the reduced adminsitration roles such as Password Admin or User Management Admin.

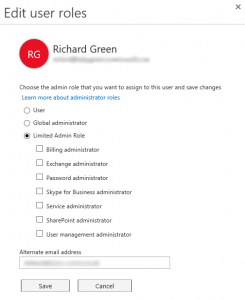
Fortunately, Microsoft listened to the vast feedback they must have recieved about this and in Office 365 we now have three new limited administration roles for Exchange Online Admin, SharePoint Online Admin and Skype for Business Admin as well as the existing roles including Global Admin. These new roles allow us to assign users permissions more appropriately scoped to their role in the organisation. If an admin is only responsible for SharePoint then no longer do we need to him them unnecessary rights to amnage Exchange so that they can perform Site Collection administration in SharePoint for example.

To take advantage of these new roles, you need to ensure that you are using the Office 365 Admin site to manage the permissions and not the Azure Active Directory settings in the Azure Management Portal (you knew that you could manage users there too right).

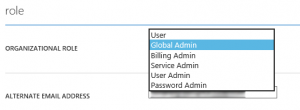
Azure Active Directory Organisational Roles

The image above shows the roles that are available if you are managing a user through the Azure Management Portal and as you can see, the same old options limiting you to using a Global Admin role are present. If you use the Office 365 Admin site however as shown below, you can see the new roles.

Office 365 User Roles

When changing permissions of your users, be careful that you don’t take away permissions from users that they actually need. As always, an element of caution should be applied.

If you want to see what permissions map to each role and how they differ, you can view the full table at https://support.office.com/en-us/article/Assigning-admin-roles-d58b8089-cbfd-41ec-b64c-9cfcbef495ac#__choose_an_admin


Hide Quick Launch in SharePoint 2013

In SharePoint 2010, we had a method for hiding the Quick Launch on a SharePoint site to clean the interface look and feel if you are building out a site which doesn’t benefit from having a quick launch.

In SharePoint 2010, we did this using a Content Editor Web Part and editing the source HTML code of the Web Part to include some custom CSS however in SharePoint 2013, those same CSS Selectors don’t work because Microsoft have changed the names of some of the CSS Selectors. In SharePoint 2013 to hide the Quick Launch we now do it using the following approach.

Add a Script Edit Web Part from the Media and Content category.

Once you’ve added the Web Part, Edit the Web Part and add the following code snippet.

<style>
#contentBox {margin-left:0px}
#contentRow {margin-left:19px}
</style>

If you want to take this a step further and hide the top navigation links, you can add an additional line of inline CSS code to achieve this. Edit the Web Part and add the following line in addition to the code already specified for the Quick Launch.

.ms-core-navigation {display:none}

Automating SharePoint Online with System Center Orchestrator

Recently, I’ve been working with a customer who uses Office 365 SharePoint Online and were looking to automate the creation of new sub sites in SharePoint Online with System Center Orchestrator. In addition to the requirement for automating the creation of the sub sites, the customer wanted this to be available as a self-service offering which they can make available to their users.

The customer asked me to put together a video on how we achieved this. This has been put up on YouTube as a four part video series.

You can see the series in the Automating SharePoint Online with System Center Orchestrator playlist at https://www.youtube.com/playlist?list=PLAKHPB7NYKVWBHi778g3LoQmtZ-cBMgsb or with the embedded video below.

The four parts are broken down as follows:

Part 1: Introduction and Prerequisites
Part 2: System Center Orchestrator Configuration
Part 3: System Center Service Manager Configuration
Part 4: Finished Product Demonstration