osd

SCCM OSD Part 1: Building Reference Images

This is the first in what will become a multi-part series of posts on configuring Operating System Deployment in Configuration Manager 2012 R2. The end goal will be to use Configuration Manager with MDT integration to provide a rich end-user experience for deploying operating systems.

In this first part, we will lay the foundation for what will become the core of the deployment – the Windows Operating System images. In this part, we will create task sequences to build and capture the reference images and update them as needed.
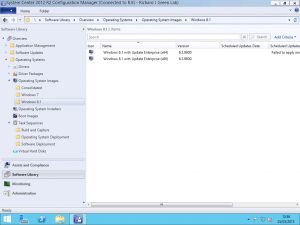
Import OEM Media OS Images

We start with our source Windows media. Copy the contents of the Windows .iso file you plan to use for your installations to a suitable directory in your SCCM source structure and import the Operating System Images as shown above. Repeat this for as many Operating System versions and architectures as you need to support. If you are supporting many operating systems, I would highly recommend creating a folder structure to aid locating the images.

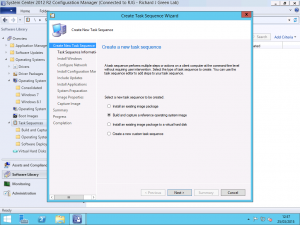
Create Task Sequence Wizard Build and Capture

Once you have imported your base Operating System Images, we need to create a new Task Sequence. In the Task Sequence Wizard, select the Build and capture a reference operating system option.

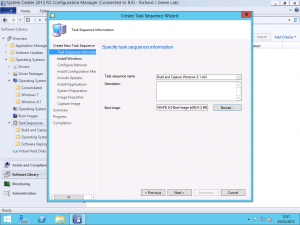
Specify Task Sequence Name and Boot Image

Next, we need to give our Task Sequence a name and specify the boot image to use. You should always use the 32-bit (x86) boot image because with this one image we can support both 32-bit and 64-bit operating system images however if you use the 64-bit boot image, that is only able to support 64-bit operating system images.

Specify OS Image to Use as Reference

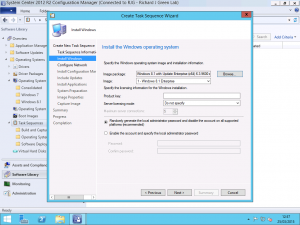
Next, we need to specify our source operating system. In this demonstration, I am using Windows 8.1 Enterprise with Update (x64). The install.wim file in the source Windows media only contains a single image so Image 1 automatically selected from the .wim file. If you are using a Windows image that provides multiple Images such as Home Basic, Home Premium and Professional then you need to make sure you specify the correct image from the list.

Specify Join a Workgroup

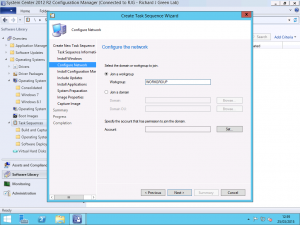
Next, we need to specify our machine to join a workgroup and not a domain. We don’t want our reference machine to join the domain as joining the domain will cause Group Policy Objects to be applied to the image which could in turn install software, none of which we want included in the base image. Specify any workgroup name you like but I stick to WORKGROUP just for simplicity.

Set ConfigMgr Client Package Properties

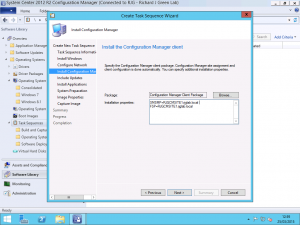
On the step shown above, we need to configure the Configuration Manager Client Package that will be used to install the Configuration Manager Client. Configuration Manager will automatically select the package from the site however we need to customise the parameters that get used for the installation. Parameters are automatically detected from the site Client Push Installation parameters and in my case, this added the Fallback Status Point (FSP) record automatically. We need to add to this the SMSP parameter. The SMSMP parameter tells the Configuration Manager Client the name of the Configuration Manager Management Point. A domain client would find this automatically via Active Directory Publishing of Configuration Manager but as we are in a workgroup, we need to add it. Without this parameter, our Install Software Updates steps will fail to find any updates. Add the parameter as SMSMP=RJGCMSITE1.rjglab.local where RJGCMSITE1.rjglab.local is the FQDN of y our Configuration Manager Management Point.

Specify Install All Software Updates

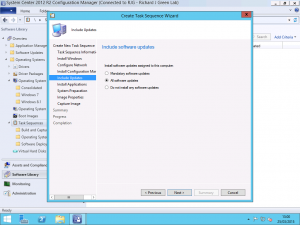
After setting our SMSMP parameter, we need to tell the task sequence wizard that we want to install All Software Updates. This will install any updates which are either Required or Available to the client from any deployments that are visible to the client.

Specify Capture Path and Network Access Account


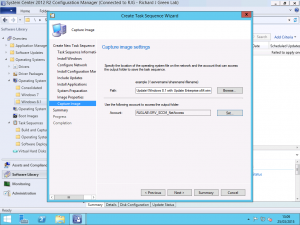
On the final step, we need to specify the capture path and a network access account. Specify the UNC path to the location where you want the captured reference image to be uploaded. This captured file is not automatically added to Configuration Manager once the capture process is complete. The network access account does not use the account configured in the Site Properties and requires us to re-enter the username and password. This is because we may be saving the captured image to a location or to a server which the normal network access account does not have access.

Once you reach this point, the reference image task sequence will be created with all the default steps and can be used like this if you wish however I like to add a few more steps manually.

Add Install Software Steps to the Reference Image

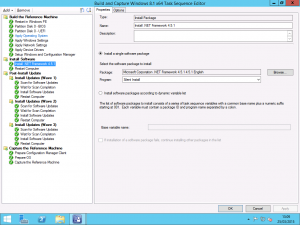
As you can see from the image above, I have added an Install Software step to the task sequence to install .NET Framework 4.5.1 so that all of my reference machines include this newer version of .NET Framework. Other things you might want to consider including in your reference images are Windows Features such as .NET Framework 3.5.1 or software such as Visual C++ packages that will be required by your end-user applications later on down the road. This is down to personal preference and individual requirements so do as you will here. Use an Install Software step to perform this and reference the package and program as required to do so.

Add Software Update Scan Step

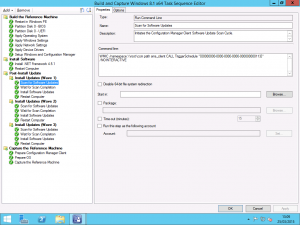
Next, I like to make some changes to the Install Software Updates phase of the sequence. Firstly, I have found, as have others in the community that sometimes the task sequence just fails to find any updates. We can fix this with two steps added to the task sequence. The first step shown above calls the Configuration Manager Client and forces it to perform a Software Update Scan Cycle. To add this yourself, use the following, added as a Run Command Line action in the task sequence.

WMIC /namespace:\\root\ccm path sms_client CALL TriggerSchedule “{00000000-0000-0000-0000-000000000113}” /NOINTERACTIVE

Add Software Update Wait Step

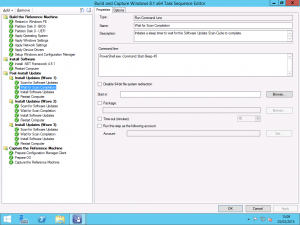
In the step following our forced Software Update Scan Cycle, add a wait timer to the task sequence. This is to give the Software Update Scan Cycle enough time to run, complete and evaluate the updates requirements. Some people will want to use a VBScript to initiate this but doing so requires a package to be downloaded by the client. The easiest way is to use PowerShell and the Sleep command. Use the following added to the task sequence as a Run Command Line action to add a wait timer to the task sequence.

PowerShell.exe -Command Start-Sleep 45

You can change the timer from 45 to any number of seconds that you require but I found that 45 seconds works okay for my requirements.

As you will also see from the two screenshots above, I have added multiple Software Update sections with a Restart Computer step following each wave. As we all know, some Windows Updates require dependencies to be installed or require a restart to complete their installation. Having three iterations (waves) of Install Software Updates in the task sequence does add a chunk of time to the end of the capture process but it is worth it, especially given you won’t be running these too often if at all after the one time. Having three passes of the Install Software Updates step will pretty much ensure that your reference images have 100% of all available updates installed and will be fully up to date.

Once you’ve reached this point, your task sequence for building and capturing a reference image is done. If like me, you are supporting multiple operating systems and architectures then you can now copy the task sequence to create a duplicate of it. For each duplicate you create, edit the Apply Operating System and the Capture the Reference Machine steps to change both the operating system image that gets applied to the reference machine and also the path to which the image is captured.

Once you have created all of the required task sequences, advertise (deploy) them to a collection and run them on your client. At the end of the process, you will have captured a .wim file for each operating system variant you support as a fully patched reference image and we are ready to move on to the next step which is image consolidation which I will be posting in the coming hours or day or so.
SCCM OSD Failed Setup Could Not Configure One or More Components

Last week I got asked to look at an issue where a new model of laptop was failing to deploy using a Configuration Manager Operating System Deployment Task Sequence. We knew that the environment was good as other machines were able to complete the task sequence without any issues and the first thought was that it could be a driver issue.

Initially I was sceptical of it being a driver issue as when we see problems with machines completing operating system deployment, problems with drivers normally fall into the category of silent fail whereby the driver is missing all together and we end up with the yellow exclamation mark in Device Manager or the task sequence fails because the driver missing or problematic is related to network or storage and blocks the task sequence from completing.

In this instance however, we knew that the problem was specific to this model. Given that we are failing in the Windows Setup portion of the task sequence, the usual smsts.log file is of no help because the Configuration task sequence has not yet been re-initialized after the reboot at the Setup Windows and ConfigMgr step. in this instance, we need to refer to the setuperr.log and the setupact.log in the Panther directory which you will find in the Windows installation directory. This is where errors and actions relating to Windows Setup live as opposed to the normal smsts.log file.

We rebooted the machine back into WinPE to allow us to open the log file with visual Notepad and began reading the file. Sure enough, we hit an error and the code given was 0x80004005. Looking at the activity either side of this, we can see that the machine is busy at work with the CBS (Component Based Servicing) engine and is initializing and terminating driver operations so we know that something has happened to a driver to cause this problem.

At this point, we had nothing more to go on. Two weeks’ ago, I had a similar issue with another customer whereby the issue was clearly logged to the setuperr.log file and the problem in that instance was an update we had added to the image with Offline Servicing required .NET Framework 4.5 to be present on the machine however Dism didn’t know to check that so we simply removed the update but here, we have no such helpful fault information.

Given that this was a new machine and given that we are deploying Windows 7, I had a thought? What if these drivers being applied require the User or Kernel Mode Driver Framework 1.11 updates that were released for Windows 7 some time ago?

This theory was easy to check. I mounted the Windows 7 .wim file on our SCCM server and then used the Get-Packages switch for Dism to list the installed updated in the image. Sure enough, User-Mode Driver Framework 1.11 (KB2685813) and Kernel-Mode Driver Framework 1.11 (KB2685811) were both absent from the list. I downloaded the updates from the Microsoft Download Center and Offline Serviced the Windows 7 image with the updates and commited the changed back into the .wim file.

After reloading the image in the Configuration Manager Administration Console and updating the .wim file package on the Distribution Points we re-ran the task sequence and by-jove, the machine completed the task sequence with no dramas.

For background reading, the User-Mode and Kernel-Mode Driver Framework 1.11 update is required to install any driver file which was written using the Windows 8 or Windows 8.1 Driver Kit. What I have yet to be able to determine is if there is a way of checking a driver .inf file to determine the version of the Driver Framework required. If there had been a way to determine this, Configuration Manager administrators around the world may rejoice a little so if you do know of a way to check this, please let me know as I would be interested to hear. This would have not been an issue had the reference images been patched with the latest (or at least some) Windows Updates however in this case, I was not so lucky.

Automatically Select a Configuration Manager Task Sequence

With Configuration Manager, we have a great amount of power and control over how we deploy computers using Task Sequences. Many people go to great lengths to make their operating system deployment experience a great one be it for end-users with User Driven Installation or for their support technicians driving the builds instead. One way which we can streamline the process is to use a consolidated task sequence which handles all of our various operating systems, languages, drivers and applications in a single task sequence with intelligence.

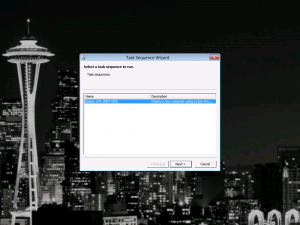
If you have gone to the great lengths to make this happen in your environment, you may be left with a sinking feeling that everytime you PXE Boot or USB Media Boot a client to deploy, you still have to select a task sequence to run even though you only have one as shown in the sample below.

Select TS Task Sequence Wizard

Luckily, we have a solution to this and a way to allow us to skip the Task Sequence Selection wizard and automatically enter our one task sequence to rule them all and it is done using Prestart Commands on our Boot Images in Configuration Manager. You don’t need MDT or any other fancy software integration with Configuration Manager to do this as it is done using the default boot images.

To start, we need to know the Deployment ID for the Task Sequence. This is not to be confused with the Package ID. The Deployment ID is the unique ID assigned to a single instance of the task sequence deployed to a collection.

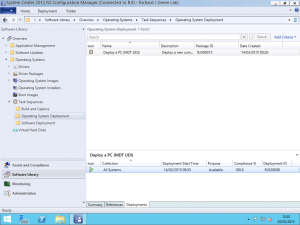
We can get the Deployment ID for the Task Sequence by navigating to the Software Library portion of the Configuration Manager Administration Console and then expanding Operating Systems followed by Task Sequences and then locate your sequence from any folder structure you may have created. With the Task Sequence selected, the lower half of the screen will show the summary properties for it. Click the Deployments tab at the bottom here to see where your Task Sequence is deployed, in my example, to the All Systems collection.

In this area, right-click on the column titles and add the Deployment ID column to the view. This is the value we need.

Task Sequence Deployment ID

With this value in hand, we now need to create a very simple VBScript file. I store this file in a directory called OSD Prestart Files on my Primary Site Server but where you store it is up to you. Create a VBScript with the following contents.

Set DefaultOSDTS = CreateObject("Microsoft.SMS.TSEnvironment")
DefaultOSDTS("SMSPreferredAdvertID") = "RJG20008"

In your case, you will need to change the value of DefaultOSDTS to the Deployment ID shown in your console. My Deployment ID was RJG20008 as set.

Once you have created and saved this file, head over to the Boot Images section of the Operating System portion in the Software Library and view the Properties for your boot image.

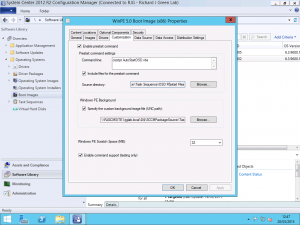
Boot Image Prestart Command Setting

As you can see from the image above, we need to check the box for the option Enable Prestart Command on the Customisation tab of the properties. Once this is checked, we can add the command to call our VBScript file which in my case will be cscript AutoStartOSD.vbs. Once you have entered this, check the box for Include files for the prestart command and specify the path to the script file you created so that this file is integrated into the Boot Image file.

When you save the changes, you will be prompted to update your Boot Image files and the file will be rebuilt and updated on your Distribution Points. Once complete, if you are using PXE to boot your clients you need to do nothing more and you can start enjoying your automatically starting task sequence. If you are using USB or ISO Boot Media to start your task sequence process, you will need to update your image as the Boot Image that the media is based on has been updated.

Configuration Manager 2012 OSD Fails After Restart

I was working today testing the operating system deployment capability of System Center Configuration Manager 2012 (not R2) for a Windows 7 task sequence. In the environment, I am using a VMware vSphere virtual machine as my target for the deployment but sadly, the networks available to the host don’t have access to client DHCP enabled VLANs which means that everything needs to be done manually including booting the pre-execution environment as there is no way of getting this from the network as without DHCP to provide the Option Codes 66 and 67 which contain the TFTP server name and the boot image path the client doesn’t know what to do.

By creating a .iso file using the Bootable Media Wizard in Configuration Manager and attaching the .iso file to the virtual machine we can boot into the pre-execution environment. Ensure that Connect at Power On is selected for the .iso file attached to the virtual machine so that you can actually boot from it. Configuration Manager 2012 environment welcomes you with a boot media welcome panel which allows you to set a static IP address and other network parameters you may need to be able to contact the Management Point and Distribution Point roles for the Configuration Manager deployment.

Once the Operating System Deployment (OSD) Task Sequence (TS) has reached the point at which it applies the Windows operating system .wim image to the target computer however, it restarts and exits Windows PE environment and boots into the Windows operating system from the local disk and applies an overlay user interface so that you continue to see the task sequence progress. At this point, if you are unable to reach a DHCP server, the task sequence will fail as the static address set in Windows PE is lost due to the transition between environments.

In order for your task sequence to continue successfully, you need to set a static IP address on the client. The issue herein however lies in the fact that you need to be quick. If you aren’t quick enough, the Task Sequence will abort with an error code of 80070057. The easiest way to do this is to hit F8 which opens a command prompt and then enter the following commands.

netsh interface ipv4 set address name=”Local Area Connection” static 10.10.10.10 255.255.255.0 10.10.10.1
netsh interface ipv4 set dnsservers name=”Local Area Connection” static 10.10.10.100 primary

The IP addresses in both commands are examples so make sure you change the addresses to those which suit your environment. The first command sets the interface IP parameters on the client and the second command sets the DNS server address to use for name resolution. The first command is in the format IP Address, then Subnet Mask and finally the Default Gateway.

If your machine has multiple network adapters installed, the Name parameter will be different for each of the adapters. To further confuse matters, the above command works for Windows 7. If you are using Windows 8 or Windows 8.1 then you need to change the default interface name from Local Area Connection to Ethernet as this is the new naming standard used Windows 8 and onwards. netsh interface show interface or good old ipconfig will give you a list of the interfaces and their physical connection status if you are in any doubt in either situation.