lsi

Project Home Lab: Server Surgery Aftermath

So it seems that in my last post about relocating the Home Server into the new chassis was spoken a little too soon. Over New Year, a few days after the post, I started to have some problems with the machine.

It first happened when I removed the 3TB drive from the chassis to replace it with the new 5TB drive which caused a Storage Spaces rebuild and all of the drives started to chatter away copying blocks around and about half-way through the rebuild, the server stopped responding to pings. I jumped on to the IPMI remote console expecting to see that I was using so much I/O on the rebuild that it had decided to stop responding on the network but in actual fact, the screen was blank and there was nothing there. I tried to start a graceful shutdown using the IMPI but that failed to I had to reset the server.

When Windows came back up, it greeted me with the unexpected shutdown error. I checked Storage Spaces and the rebuild had resumed with no lost data or drives and eventually (there’s a lot of data there) it completed and I thought nothing more of it all until New Years day when the same thing happened again. This time, after restarting the server and realising this was no one off event, I changed the Startup and Recovery settings in Windows to generate a Small Memory Dump (256KB) otherwise known as a Minidump and I also disabled the automatic restart option as I wanted to try and get a chance to see the Blue Screen of Death (BSOD) if there was one.

Nothing happened on this front until yesterday. The server hung again and I restarted it but within two minutes of hanging, it did the same thing again. I decided to leave the server off for about five minutes to give it a little rest and then power it back up and since then I’ve had no issues but I have gathered a lot of data and information in the time wisely.

I used WinDbg from the Windows Debugging Tools in the Windows SDK to read the Minidump file and the resultant fault code was WHEA Uncorrectable Error with a code of 0x124. To my sadness, this appears to be one of the most vague error messages in the whole of Windows. This code means that a hardware fault occurred which Windows could not recover from but because the CPU is the last device to be seen before the crash, it looks as if the fault is coming from the CPU. The stack trace includes four arguments for the fault code and the first argument is meant to contain the ID of the device which was seen by the CPU to have faulted but you guessed it, it doesn’t.

So knowing that I’ve got something wierd going on with my hardware, I considered the possibilities. The machine is using a new motherboard so I don’t suspect that initially. It’s using a used processor and memory from eBay which are suspects one and two and it’s using the LSI MegaRAID controller from my existing build. The controller is a suspect due to the fact that on each occasion the crash has occurred, there has been a relative amount of disk I/O taking place (Storage Spaces rebuild the first time and multiple Plex Media Server streams taking place on the other occasions).

The Basic Tests

First and foremost, I checked against Windows Update and all of my patches are in order which I already knew but wanted to verify. Next, I checked my drivers as a faulting driver could cause something bad to get to the hardware and generate the fault. All of the components in the system are using WHQL signed drivers from Microsoft which have come down through Windows Update except for the RAID Controller. I checked the LSI website and there was a newer version of the LSI MegaRAID driver for my 9280-16i4e card available as well as a new version of the MegaRAID Storage Manager application so I applied both of these requiring a restart.

I checked the Intel website for drivers for both the Intel 82576 network adapters in the server and the Intel 5500 chipset and even though the version number of the Intel drivers is higher than those from Windows Update, the release date on the Windows Update drivers is later so upon trying to install them, Windows insists that the drivers installed are the best available so I’ll leave these be and won’t try to force drivers into the system.

Next up, I released that the on-board Supermicro SMC2008 SAS controller (an OEM embedded version of the LSI SAS2008 IR chipset) was enabled. I’m not using this controller and don’t have any SAS channels connected to it so I’ve disabled the device in Windows to stop it from loading for now but eventually I will open the chassis and change the pin jumper to physically disable the controller.

Earlier, I mentioned that I consider the LSI controller to be a suspect. The reason for this is not reliability of any kind as the controller is amazing and frankly beyond what I need for simple RAID0 and RAID1 virtual drives but because it is a very powerful card, it requires a lot of cooling. LSI recommend a minimum of 200 Cubic Feet per Minute (CFM) of cooling on this card and with the new chassis I have, the fans are variably controlled by the CPU temperature. Because I have the L5630 low power CPU with four cores, the CPU is not busy in the slightest on this server and as a result, the fan speed stays low.

According to the IPMI sensors, the fan speed is at 900 RPM constant with the currently system and CPU temperatures. The RAID controller is intentionally installed in the furthest possible PCI Express 8x slot from the CPU to ensure that heat is not bled from one device into the other but a byproduct of this is that the heat on the controller is likely not causing a fan speed increase. Using the BIOS, I have changed the fan configuration from the default setting of most efficient which has a minimum speed of 900 RPM to the Better Cooling option which increases the lower limit to 1350 RPM.

Lastly, I raised a support incident with LSI to confirm if there is a way to monitor the processor temperature on the controller however they have informed me that only the more modern dual core architecture controllers have the ability to see the processor temperature either via the WebBIOS or via the MSM application. If I have more problems going forwards, I have a USB temperature probe which I could temporarily install in the chassis but this isn’t going to be wholely accurate however in the meantime, the support engineer at LSI has taken an LSIGET dump of all of the controller and system data and is going to report back to me if there are any problems he can see.

The Burn Tests

Because I don’t want reliability problems on-going, I want to drive the server to crash under my own schedule and see the problems happening in live so that I can try and resolve them, I decided to perform some burn tests.

Memory Testing

Memory corruption and issues with memory is a common cause of BSODs in any system. I am using ECC buffered DIMMs can can correct memory bit errors automatically but that doesn’t mean we want them still so I decided to do a run on Memtest86.

Memtest86 Memory Speed Screenshot

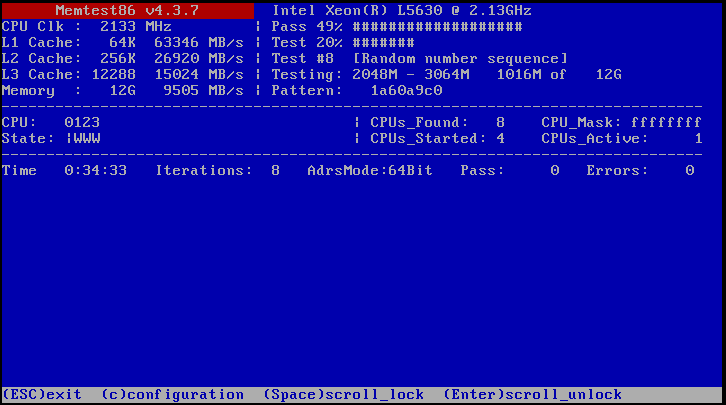
I left this running for longer than the screenshot shows, but as you can see, there are no reported errors in Memtest86 so the memory looks clear of blame. What I really like about these results is that it shows you have incredibly fast the L1 and L2 caches are on the processor and I’m even quite impressed with how fast the DDR3-10600R memory in the DIMMs themselves are.

CPU Testing

For this test, I used a combination of Prim95 and Real Temp to both make the CPU hurt and also to allow me to monitor the temperatures vs. the Max TDP of the processor. I left the test running for over an hour, 100% usage on all four physical cores and here’s the results.

RealTemp CPU Temperature


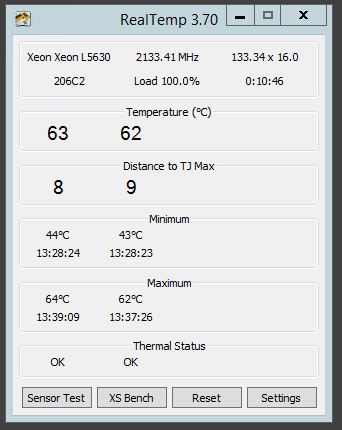
As you can see, the highest the temperature got was 63 degrees Celsius which is 9 degrees short of the Max TDP of the processor. When I log in to the server normally when there are multiple Plex Media Server transcoding sessions occurring the CPU isn’t as utilized as heavily as this test so the fact that it can run at full load and the cooling is sufficient to keep it below Max TDP makes me happy. As a result of the CPU workload, the fan speed was automatically raised by the chassis. Here’s a screenshot of the IPMI Sensor output for both the system temperatures and the fan speed, remembering that the normal speed is 1350 RPM after my change.

IPMI Fan Speed Sensors

IPMI Temperature Sensors


To my suprise, the system temperature is actually lower under the load than it is at idle. The increased airflow from the fans at the higher RPM is pushing so much air that it’s able to cool the system to two degrees below the normal idle temperature, neither of which are high by any stretch of the imagination.

Storage I/O Testing

With all of the tests thus far causing me no concern, I was worried about this one. I used ioMeter to test the storage and because ioMeter will fill a volume with a working file to undertake the tests, I created a temporary Storage Space in the drive pool of 10GB and I configured the drive with Simple resiliency level and 9 columns so that it will use all the disks in the pool to generate as much heat in the drives and on the controller as possible.

I ran three tests, 4K block 50% Read, 64K block 50% Read and lastly 256KB block 50% Read. I ran the test for minutes and visiting the garage to look at the server in the rack while this was happening, I was greeted to an interesting light show on the drive access indicator lights. After ten minutes of the sustained I/O, nothing bad happened so I decided to stop the test. Whilst I want to fix any issues, I don’t want to burn out any drives in the process.

Conclusion

At the moment, I’m really none the wiser as to the actual cause of the problem but I am still in part convinced that it is related to the RAID controller overheating. The increased baseline fan speed should hopefully help with this by increasing the CFM of airflow in the chassis to cool the controller. I’m going to be leaving the server be now until I hear from LSI with the results from their data collection. If LSI come up with something useful then great. If LSI aren’t able to come up with anything then I will probably run another set of ioMeter tests but let it run for a longer period to really try and saturate some heat into the controller.

With any luck, I won’t see the problems again and if I do, at least I’m prepared to capture the dump files and understand what’s happening.

Inaccessible Boot Device after Windows Server 2012 R2 KB2919355

Earlier on this week, I finally got around to spending a bit of time towards building my home lab. I know it’s late because I started this project back in February but you know how it is.

On the servers, I am installing Windows Server 2012 R2 with Update which for the uninitiated is KB2919355 for Windows Server 2012 R2 and Windows 8.1. This is essentially a service pack sized update for Windows and includes a whole host of updates. I am using the installation media with the update integrated to same me some time with the updates but also because it’s cleaner to start with the update pre-installed.

The Inaccessible Boot Device Problem

After installing Windows Server 2012 R2, the machine starts to boot and at the point where I would expect to see a message along the lines of Configuring Devices, the machine hits a Blue Screen of Death with the message Stop 0x7B INACCESSIBLE_BOOT_DEVICE and restarts. This happens a few times before it hangs on  a black screen warning that the computer has failed to start after multiple attempts. I assumed it was a BIOS problem so I went hunting in the BIOS in case I had enabled a setting not supported by my CPU or maybe I’d set the wrong ACHI or IDE mode options but everything looked good. I decided to try the Optimized Defaults and Failsafe Defaults options in the BIOS, both of which required an OS re-install due to the AHCI changes but neither worked.

After this I was worried there was either something wrong with my hardware or a compatibility issue with the hardware make-up and I was going to be snookered however after a while of searching online, I found the solution.

KB2919355 included a new version of the storage controller driver Storport. It transpires that this new version of Storport in KB2919355 had an issue with certain SCSI and SAS controllers whereby if the controller device driver was initialized in a memory space beyond 4GB then it would cause the phyiscal boot devices to become inaccessible. This problem hit people who installed the KB2919355 update to previously built servers at the time of release as well as people like me, building new servers with the update slipstreamed. My assumption is that it’s caused by the SCSI or SAS controller not being able to address 64-bit memory addresses hence the 4GB limitation.

The problem hits mainly LSI based SCSI and SAS controllers based on the 2000 series chipset, including but by no means limited to the LSI SAS 2004, LSI SAS 2008, LSI MegaRAID 9211, Supermicro SMC 2008, Dell PERC H200 and IBM X240 controllers. In my case, my Supermicro X8DTH-6F motherboards have the Supermicro SMC 2008 8 Port SAS controller onboard which is a Supermicro branded edition of the LSI SAS 2008 IR controller.

The workaround at the time was to disable various BIOS features such as Intel-VT, Hyperthreading and more to reduce the number of system base drivers that needed to load, allowing the driver to fit under the 4GB memory space but eventually the issue was confirmed and a hotfix released however installing the hofix is quite problematic when the system refuses to boot. Luckily, we can use the Windows installation media to fix the issue.

Microsoft later released guidance on the workaround to use BCDEdit from the Windows Recovery Environment (WinRE) to change the maximum memory.

Resolving the Issue with KB2966870

Workarounds aside, we want to fix the issue not gloss over or around it. First off, download the hotfix KB2966870 which is a hotfix by request so you need to enter your email address and get the link emailed to you. You can get the update from https://support.microsoft.com/kb/2966870. Once you have the update, you need to make it available to your server.

If your Windows Server 2012 R2 installation media is a USB bootable stick or drive then copy the file here. If your installation medium is CD or DVD then burn the file to a disc.

Boot the server using the Windows Server 2012 R2 media but don’t press the Install button. From the welcome screen, press Ctrl + F10 which will open a Command Prompt in Administrator mode. Because of the Windows installation files being decompressed to a RAM disk, your hard disk will have likely been mounted on D: instead of C: but verify this first by doing a dir to check the normal file structure like Program Files, Users and Windows. Also, locate the drive letter of your installation media which will be the drive with your .msu update file on it.

Once you have found your hard disk drive letter and your boot media letter, we will use the following DISM command to install the update using Offline Servicing:

Dism /Image:[Hard Disk]:\ /Add-Package /PackagePath:[Install Media]:\Windows8.1-KB2966870-x64.msu

Once the command completes, exit the Command Prompt and exit the Windows Installation interface to restart the computer. In my case, I had to restart the computer twice for the update to appear to actually apply and take effect but once the update had been taken on-board, the machine boots without issues first time, every time. You can verify that the update has been installed with the View Installed Updates view in the Windows Update Control Panel applet.

Moving Drives on an LSI MegaRAID Controller

As part of my home lab project which is still on-going (yes, I have been very quiet on this one of late), my plan has been to move my home server into a new chassis to match the other chassis I am using for the home lab. I use Storage Spaces on my home server but as I use an LSI MegaRAID card, I have all of my drives setup as individual RAID0 sets because the MegaRAID family of cards do not support JBOD.

My biggest worry with moving to the new chassis has been the storage and whether or not my RAID0 sets will come across and manage to keep all of my Storage Space data in tact as I have a lot of it and I’d obviously not like to lose it all. This worry is because of the changes in design. My current chassis uses a Reverse Breakout SATA cable to connect the drives, with an SFF-8087 SAS Multilane connection at the controller end and four conventional SATA connections at the drive enclosure end times four for the quad SAS channels on the controller card. The new chassis uses SFF-8087 to SFF-8087 SAS Multilane cables end-to-end and the backplane of the chassis handles the breakout to the individual drives. As a result, I can’t guarantee that all of the drives will be reconnected to the same channel and port on the controller during the move.

I got the chance this week to test this out as I had to add a new 3TB drive to the pool to add capacity. I added the drive to the server, configured a RAID0 for it but I set it up as a Simple NTFS partition disk and not a member of the Storage Space. I put some files on the disk and played around with different options moving the drive around. I pulled the new drive and re-inserted it in a different slot, now connected to a different channel and port but it came up with a foreign configuration on the drive, not exactly what I wanted.

I cleared the foreign configuration on the drive as importing these foreign configurations scares the hell out of me in the event that it overwrites the local configuration and blows away all of the drives including my RAID1 SSD pair for the operating system installation. After clearing the configuration, I created a new RAID0 set and added the drive to it however this time, I did not initialize the drive. After the virtual disk came online, instead of being uninitialized, it came up with the existing formatted partition and my existing test data, good but not perfect as I had to recreate the RAID0 set.

I was looking online for answers and nobody online seems to clearly answer the question how best to move disks around with an LSI MegaRAID controller, strange with these being some of the most dependable and popular cards on the market but I found my answer in the LSI documentation and a little under referenced feature called Drive Roaming.

Drive Roaming occurs when a disk is moved from one port or channel on the controller to another such as my case where I want to move to a new chassis and I am unsure whether all the drives will come back on the same ports and channels. Drive Roaming occurs at start-up when the controller starts up and reads the configuration in NVRAM on the controller and compares it to the configuration stored on each of the drives. This reading of the configuration allows a drive to be moved within the controller to another port or channel and remain configured as before but the emphasis here is on the at start-up.

When I first tested this, I moved the drive online so the drive did not roam, it was pulled and re-inserted. When I did a second test after reading the documentation, I moved the drive with the server shut down and indeed, the drive came back online with the same RAID0 set as configured before and all was working nicely. This is perfect because when I move between the chassis, I will be doing it with the server offline, shutdown and inert so I can now move all of my drives, safe in the knowledge that everything will be retained as was.

Because I know that nothing in IT goes as smoothly as planned however, my fallback option is to re-configure the RAID sets but select the No Initialization option for the drives. To this end, I have recorded the exact configuration of all of my RAID sets. I have recorded the RAID levels, Stripe Sizes, IO and Read Through settings. I have also recorded the current Port and Channel for each drive and the Model and Serial Number for each drive so that I can match the configuration back exactly as it is now. Consistency makes my life easier here. All my drives are 3TB, all Western Digital Caviar Red drives and all are in their own unique RAID0 set and all RAID0 sets are using the same Direct IO and Read Through setting so re-creating the sets is actually a cinch. The only exception is my operating system set which is configured as a RAID1 with two Intel 520 Series SSD drives and I’ve got the settings recorded for them too.

Last but not least, I’ve got my backups. My personal and important data is backed up to Microsoft Azure Backup using the integration with Windows Server 2012 R2 Essentials. To protect the operating system, I’ve got a Windows Backup created locally to a USB hard drive of the operating system partitions so that I can perform a bare metal recovery of the operating system if needed to the RAID1 SSD drives.

This post has been a bit of a waffle and a ramble but I hope that my learning of the LSI MegaRAID Drive Roaming feature helps somebody out there trying to investigate the same thing as me.