Hyper-V

Windows Server Hyper-V vNext Features

Hyper-V MVP Aidan Finn has a post running over at http://www.aidanfinn.com/?p=17424 where he is maintaining a list of the new features coming in Windows Server vNext specifically around Hyper-V.

His post is worth keeping an eye on if you are in the Hyper-V virtualization business. Reading through it myself, there seems to be a lot of work gone into stabilising clustered Hyper-V which is very welcome. My personal favourites from the list so far are Production Checkpoints to allow you to checkpoint an application service; a number of VMs in a collection that make up an application such as SQL Server, an app server and a web server, all in a single operation for consistent snapshots across multiple service tiers. Network Adapter Identification allows the name of a vNIC from the Hyper-V host to be passed through into the VM Guest OS so our Guest OS will see our vNICs not as Ethernet or Local Area Connection but as Production-VMNetwork or whatever you naming convention is. Rolling Cluster Upgrades is something which Windows Failover Clustering has long needed to allow us to upgrade our nodes whilst retaining the cluster functionality and integrated Backup Change Tracking prevents the need for 3rd party backup APIs to be installed which can commonly destabilise the platform.

All in all, it’s a nice list of features and the changes will be very welcome. There is nothing here which technically blows your mind like the feature gap bridged from Windows Server 2008 R2 Hyper-V to Windows Server 2012 R2 Hyper-V however there is definitely enough here to pip your interest and to make you warrant moving to Windows Server vNext when it ships if only for the platform stability improvements.

Project Home Lab Hyper-V Server

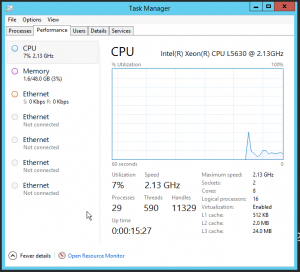
This is a really quick post but something exciting I wanted to share. Last night, I did a bit of work to help get the home lab up and running and after finishing some bits and pieces, I’ve now got the Hyper-V server up and running with the Windows Server 2012 R2 installation. Here’s a screenshot of Task Manager showing the memory and CPU sockets and cores available on the machine.

Lab Hyper-V Server Task Manager

As you can see, there are two CPU sockets installed with four cores per socket giving me 8 physical cores and 16 virtual cores. There is 24GB of RAM per CPU socket currently installed giving me 48GB of memory and I am using 6 out of 12 available slots so when the time comes that I need more memory, I can double that current number to 96GB or more should I swap out my current 8GB DIMMs for 16GB DIMMs.

I should have some more posts coming up soon as I’m actually (after far too long) reaching the point of starting to put all of this together and building out some System Center and Azure Pack goodness at home, including, finishing off the series introduction where I actually explain all the hardware pieces I’m using.

Explaining NUMA Spanning in Hyper-V

When we work in virtualized worlds with Microsoft Hyper-V, there are no many things we have to worry about when it comes to processors. Most of these things come with acronyms which people don’t really understand but they know they need and these and one of these is NUMA Spanning which I’m going to try and explain here and convey why we want to avoid NUMA Spanning where possible and I’m going to do it all in fairly simple terms to keep the topic light. In reality, NUMA architectures may be more complex than this.

NUMA Spanning or Non-Uniform Memory Address Spanning was a feature introduced into motherboard chipsets by Intel and AMD. Intel implemented it with the feature set Quick Path Interconnect (QPI) in 2007 and AMD implemented it with HyperTransport in 2003. NUMA uses a construct of nodes in it’s architecture. As the name suggests, NUMA refers to system memory (RAM) and how we use memory and more specifically, how we determine which memory in the system to use.

Single NUMA Node

Single NUMA Node

In the most simple system, you have a single NUMA node. A single NUMA node is achieved either in a system with a single socket processor or by using a motherboard and processor combination which does not support the concept of NUMA. With a single NUMA node, all memory is treated as equal and a VM running on a hypervisor on this configuration system would use any memory available to it without preference.

Multiple NUMA Nodes
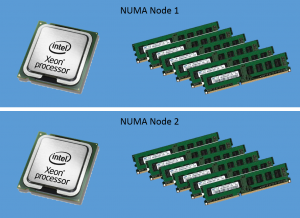
Two NUMA Nodes

In a typical system that we see today with multiple processor sockets and with a processor and motherboard configuration that supports NUMA, we have multiple NUMA nodes. NUMA nodes are determined by the arrangement of memory DIMMs in relation to the processor sockets on the motherboard. In a hugely oversimplified sample system with two CPU sockets, each loaded up with a single core processor and 6 DIMMs per socket, each DIMM slot populated with an 8GB DIMM (12 DIMMs total). In this configuration we have two NUMA nodes, and in each NUMA node, we have one CPU socket and it’s directly connected 48GB of memory.

The reason for this relates to the memory controller within the processor and the interconnect paths on the motherboard. The Intel Xeon processor for example has an integrated memory controller. This memory controller is responsible for the address and resource management of the six DIMMs attached to the six DIMM slots on the motherboard linked to this processor socket. For this processor to access this memory it takes the quickest possible path, directly between the processor and the memory and this is referred to as Uniform Memory Access.

For this processor to access memory that is in a DIMM slot that is linked to our second processor socket, it has to cross the interconnect on the motherboard and via the memory controller on the second CPU. All of this takes mere nanoseconds to perform but it is additional latency that we want to avoid in order to achieve maximum system performance. We also need to remember that if we have a good virtual machine consolidation ratio on our physical host, this may be happening for multiple VMs all over the place and that adds up to lots of nanoseconds all of the time. This is NUMA Spanning at work. The processor is breaking out of its own NUMA node to access Non-Uniform Memory in another NUMA node.

Considerations for NUMA Spanning and VM Sizing

NUMA Spanning has a bearing on how we should be sizing our VMs that we deploy to our Hyper-V hosts. In my sample server configuration above, I have 48GB of memory per NUMA node. To minimize the chances of VMs spanning these NUMA nodes, we therefore need to deploy our VMs with sizing considerations linked to this. If I deployed 23 VMs with 4GB of memory each, that equals 92GB. This would mean 48GB memory in the first NUMA node could be totally allocated for VM workload and 44GB of memory allocated to VMs in the second NUMA node leaving 4GB of memory for the parent partition of Hyper-V to operate in. None of these VMs would span NUMA nodes because 48GB/4GB is 12 which means 12 entire VMs can fit per NUMA node.

If I deployed 20 VMs but this time with 4.5GB of memory each, this would require 90GB memory for virtual workloads and leave 6GB for hosting the parent partition of Hyper-V. The problem here is that 48GB/4.5GB doesn’t fit, we have left overs and uneven numbers. 10 of our VMs would fit entirely into the first NUMA node and 9 of our VMs would fit entirely within the second NUMA node but our 20th VM would be in no man’s land and would be left to have half its memory in both of the NUMA nodes.

In good design practice, we should try to size our VMs to match our NUMA architecture. Take my sample server configuration of 48GB per NUMA node, we should use VMs with memory sizes of either 2GB, 4GB, 6GB, 8GB, 12GB, 24GB or 48GB. Anything other than this has a real risk to be NUMA spanned.

Considerations for Disabling NUMA Spanning

So now that we understand what NUMA Spanning is and the potential decrease in performance it can cause, we need to look at it with a virtualization lens as this is where it really takes effect to the maximum. The hypervisor understands the NUMA architecture of the host through the detection of the hardware within. When a VM tries to start and the hypervisor attempts to allocate memory for the VM, it will always try to first get memory within the NUMA node for the processor that is being used for the virtual workload but sometimes that may not be possible due to other workloads blocking the memory.

For the most part, leaving NUMA Spanning enabled is totally fine but if you are really trying to squeeze performance from a system, a virtual SQL Server perhaps, NUMA Spanning would be something we would like to have turned off. NUMA Spanning is enabled by default in both VMware and Hyper-V and it is enabled at the host level but we can override this configuration on both a per hypervisor host level and a per VM level.

I am not for one minute going to recommend that you disable NUMA Spanning at the host level as this might impact your ability to run your workloads. If NUMA Spanning is disabled for the host and the host is not able to accommodate the memory demand of the VM within a single NUMA node, the power on request for the VM will fail and you will be unable to turn on the machine however if you have some VMs which have NUMA Spanning disabled and others with it enabled, you can have your host work like a memory based jigsaw puzzle, fitting things in where it can.

Having SQL Servers and performance sensitive VMs running with NUMA Spanning disabled would be advantageous to their performance and having NUMA Spanning disabled on VMs which are not performance sensitive allows them to use whatever memory is available and cross NUMA nodes as required giving you the best combination of maximum performance for your intensive workloads and the resources required to run those that are not.

Using VMM Hardware Profiles to Manage NUMA Spanning
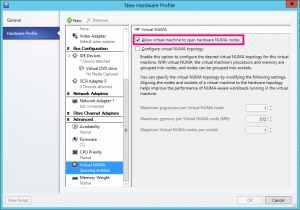
VMM Hardware Profile NUMA Spanning

So assuming we have a Hyper-V environment that is managed by Virtual Machine Manager (VMM), we can make this really easy to manage without having to bother our users or systems administrators with understanding NUMA Spanning. When we deploy VMs we can base our VMs on Hardware Profiles. A VMM Hardware Profile has the NUMA Spanning option available to us and simply, we would create multiple Hardware Profiles for our workload types, some of which would be for general purpose servers with NUMA Spanning enabled whilst other Hardware Profiles would be configured specifically to be used by performance sensitive workloads with the NUMA Spanning setting disabled in the profile.

The key to remember here is that if you have VMs that are already deployed in your environment you will need to update their configuration. Hardware Profiles in VMM are not linked to the VMs that we deploy so once a VM is deployed, any changes to the Hardware Profile that it was deployed from do not filter down to the VM. The other thing to note is that NUMA Spanning configuration is only applied at VM Startup and during Live or Quick Migration. If you want your VMs to update the NUMA Spanning configuration after you have changed the setting you will either need to stop and start the VM or migrate it to another host in your Hyper-V Failover Cluster.
SCOM Hyper-V Management Pack Extensions

If you’ve ever been responsible for the management or monitoring of a Hyper-V virtualization platform, you’ve no doubt wanted and needed to monitor it for performance and capacity. The go to choice for monitoring Hyper-V is System Center Operations Manager (SCOM) and if you are using Virtual Machine Manager (VMM) to manage your Hyper-V environment then you could have and should have configured the PRO Tips integration between SCOM and VMM.

With all of this said, both the default SCOM Hyper-V Management Pack and the monitoring improvements that come with the VMM Management Packs and integration are still pretty lacklustre and don’t give you all the information and intelligence you would really like to have.

Luckily for us all, Codeplex comes to the rescue with the Hyper-V Management Pack Extensions. Available for SCOM 2012 and 2012 R2, the Management Pack provides the following (taken from the Codeplex project page):

New features on release 1.0.1.282
Support for Windows Server 2012 R2 hyper-V
Hyper-V Extended Replica Monitoring and Dashboard
Minor code optimizations

Features on release 1.0.1.206
VMs Integration Services Version monitor
Hyper-V Replica Health Monitoring Dashboard and States
SMB Shares I/O latency monitor
VMs Snapshots monitoring
Management Pack Performance improvements

Included features from previous release
Hyper-V Hypervisor Logical processor monitoring
Hyper-V Hypervisor Virtual processor monitoring
Hyper-V Dynamic Memory monitoring
Hyper-V Virtual Networks monitoring
NUMA remote pages monitoring
SLAT enabled processor detection
Hyper-V VHDs monitoring
Physical and Logical Disk monitoring
Host Available Memory monitoring
Stopped and Failed VMs monitoring
Failed Live Migrations monitoring

The requirements to get the Management Pack installed are low which makes implementation really easy. If you keep your core packs updated there is good chance you’ve already got the three required packs installed, Windows OS 6.0.7061.0, Windows Server Hyper-V 6.2.6641.0 and Windows Server Cluster 6.0.7063.0.

The project suggests there is documentation but it seems to be absent so what you will want to know is what is the behaviour going to be upon installation? If you have a development Management Group for SCOM then install it here first to test and verify as you should always be doing. The Management Pack is largely disabled by default which is ideal but there are a couple of rules enabled by default to watch out for so check the rules and change the default state for the two enabled rules to disabled if you desire.

As is the norm with disabled rules in SCOM, create a group which either explicitly or dynamically targets your Hyper-V hosts and override the rules for the group to enable them. The rules are broken down into Windows Server 2012 and Windows Server 2012 R2 sets so you can opt to enable one, the other or both according to the OS version you are using for your Hyper-V deployments.

If you do have the VMM integration with SCOM configured and you are using Hyper-V Dynamic Memory, you will notice very quickly if you enable all the rules in the  Hyper-V Management Pack Extensions that you will start receiving duplicate alerts for memory pressure so make a decision where you want to get your memory pressure alerts from be it the VMM Management Pack or the Hyper-V Extensions Management Pack and override and disable alert generation for the one you don’t want.

There is still one metric missing even from this very thorough Hyper-V Extensions Management Pack and that is the collection of the CPU Wait Time Per Dispatch performance counter, the Hyper-V equivalent of the VMware vSphere CPU Ready counter. I’ll cover this one in a later post with a custom Performance Collection Rule.

You can download the Management Pack from Codeplex at http://hypervmpe2012.codeplex.com/. I hope it finds you well and enjoy your newly found Hyper-V monitoring intelligence.

Project Home Lab: Shopping List

Up until now, I’ve talked at length about the various factors dictating what I will be buying and why. In this post which is meant to be a high level overview of all the posts previous, I’m going to give you a shopping list of all of the components needed to make the build tick so that if you want to embark on your own project you can get a head start if you chose to go down the same route yourself.

This series will consist of the following posts. I will update the table of contents links in each post as I produce and publish the articles.

  1. Project Home Lab: Goals
  2. Project Home Lab: Existing Infrastructure
  3. Project Home Lab: Hardware Decisions
  4. Project Home Lab: Network Decisions
  5. Project Home Lab: Shopping List

Common Infrastructure

Storage Server

Disks for the server I’ve yet to purchase or confirm as these are pretty much a commodity item. I’ll update this post when I do select these but expect it to be a mixture of SSD and SATA disk.

With the SAS Multilane cables for connecting to the on-board SAS SFF-8087 ports, do make sure you get the cable with Sideband support, provided by an extra wire or two and an extra pin connection in the cable otherwise you won’t get the SGPIO disk failure and status indication through the disk backplane.

Hyper-V Server

Disks for the server I’ve yet to purchase or confirm as these are pretty much a commodity item. For the Hyper-V server, the disks need not be large or pretty as they will be used primary just for getting the host operating system online. A pair of SSDs in a RAID1 Mirror will be the most likely suspect.

With the SAS Multilane cables for connecting to the on-board SAS SFF-8087 ports, do make sure you get the cable with Sideband support, provided by an extra wire or two and an extra pin connection in the cable otherwise you won’t get the SGPIO disk failure and status indication through the disk backplane.

Next Up

With the shopping list crossed off and most of the hardware now ordered and some of it already in my hands, it’s time to get building. The next posts will show some of the builds, enjoy.

Project Home Lab: Network Decisions

So far in the series, I’ve talked about the goals and what hardware I want to use. In this post, I’m going to talk about how I plan to connect it all together and how I’m going to get it talking to the outside world via my existing production home network.

This series will consist of the following posts. I will update the table of contents links in each post as I produce and publish the articles.

  1. Project Home Lab: Goals
  2. Project Home Lab: Existing Infrastructure
  3. Project Home Lab: Hardware Decisions
  4. Project Home Lab: Network Decisions
  5. Project Home Lab: Shopping List

Hyper-V to Storage

I’ve got two new servers we know that much as planned so far. The data will be on one server, the processing power on another so I need a way to interconnect them. I also need to be conscious of ensuring that whatever I deploy for the interconnect can scale up with other areas if I elect to add another host later. Most importantly, I need to be sensitive to my existing network. Me hammering away with data transfers in the lab should not under any circumstances impact my home network as getting in trouble with the wife stopping her from being able to stream videos in Xbox Fitness or play the latest Facebook craze just isn’t worth it.

We know already that I am going to need three Ethernet ports, two gigabit and one 100Mbps for the two servers to operate the on-board network ports which I have said previously I will use for management and IPMI access. This leaves the most important aspect of getting data between the two. 100Mbps is gone, never to be seen again for anything other than out of band type connections so my options are 1GbE, 10GbE or Infiniband with RDMA.

As we know, this is a home project. Infiniband requires specialist knowledge, some of which I possess from work with Xsigo in a former role and whilst yes, 40Gb/s or more between the machines would be nice, the Infiniband host bus adapters (HBAs) are expensive and the Infiniband switches even more so. 10GbE is more common however as it is still pretty much at the pinnacle of Ethernet based networking with enterprises only really taking it by the horns today it too is also very expensive which leaves me with 1GbE.

Gigabit Ethernet has been around the block a few times, parts are common and reasonably affordable. Gigabit Ethernet can be run over standard Cat 5e or as I have, Cat 6 cable so I’m reusing my existing investment in cabling and tooling for producing cables. Gigabit Ethernet also means I’m working with a single connectivity medium throughout making the identification of faults and troubleshooting simpler.

I want to get good performance out this lab so after some discussion with @LupoLoopy, we came to the decision that I should use SMB Multi-Channel, the new feature in Windows Server 2012 R2. With four ports of Gigabit Ethernet I will get decent performance at a low price and it’s easy enough to add another card to the server to open up more ports if I need later. A quad port Intel PCI Express adapter comes in at between £50 and £100 on eBay used. I got both the cards for the Hyper-V server and the storage server for £50 so make sure to keep your eye on the available items for a bargain.

I will run my Hyper-V virtual networking over these ports also and using Storage QoS in Hyper-V I can ensure that I get the right amount of storage throughput at all times.

Switching

With it now decided I’m going to use four ports of Gigabit Ethernet for my SMB Multi-Channel storage traffic and three ports for management and IPMI, I need to provision seven Ethernet ports per server. With two servers right now, that’s 14 ports and if I allow an additional seven ports for a possible future expansion, that’s 21 ports, nearly a 24 port switch full.

My current core switch, a 24 port TP-Link TL-SG3424 has about 12 ports free right now so not enough for this project. Going back to my previous statements, I want to keep any of this traffic from harming my home network performance, therefore put two and two together and you can see I’ll need a new switch for this. I don’t want to have to replace my core switch as it works perfectly well, performs well, silent and so forth. As I want to completely isolate this lab, I’m going instead to add a second switch to my network for the lab and I will trunk the lab up to the core for internet access. With this leaf switch design for the network, the only traffic that needs to leave or enter the core switch to and from the lab is external access from myself or Internet access requests, containing the storage traffic and protecting my home interests.

I looked at all the options and came to the swift conclusion that I was going to be best placed to get another TP-Link TL-SG3424, the same as I have already for the leaf switch. 24 Gigabit Ethernet ports suit all my needs, I know it performs well, leaves me with enough ports free for an additional host in the future plus a few ports for uplinks into the core.

I wrote a review of the TP-Link TL-SG3210 I use as my access switch which has equal features and interfaces to the TL-SG3424 just it has 8 instead of 24 ports.

Access

Access into the lab will primarily be over Remote Desktop Protocol from the home network. To do this, I’m going to be accessing the lab across uplink ports that I will configure between the core and the lab switch. The lab will be in a separate VLAN to protect the home network from any broadcasts or such like going on in the lab. As my TP-Link switches are Layer 2, the Cisco ASA will be acting as my Layer 3 router between the home network and the lab which will allow me to place IP restrictions on who can traverse from the home network into the lab.

Costs

The cost for the new TP-Link switch is about £120. I’ve already got all the tools and cable I need to wire up the networking so there is no new costs there making this arguably, the cheapest part of the project. Time is actually going to be the biggest cost factor with the networking because of the time it’s going to take me to configure all of the new VLANs for the management, VM traffic and SMB Multi-Channel traffic, the sour side of using TP-Link over Cisco and not being able to use VLAN Trunking Protocol (VTP), a feature on Cisco which I love dearly.

Thankfully, VLAN configuration is a one time thing though, so although I’ll lose a couple of hours to all the network configuration initially, the cost of buying the switches and the low power consumption of the passive cooled TP-Link devices is worth it long term.

Next up, I will do a summary post in the form of a shopping list to get down everything I’m going to be using for the project and then I’ll be heading into build.

Project Home Lab: Goals

Since I’ve started working in consultancy, I have the constant need to challenge myself and spend more time working with the technologies that I promote. The only way to do this is learn and practice and the only way to learn and practice is to have equipment to do that on. I have embarked on a project to build myself a home lab and in this Project Home Lab series of blog posts, I’ll go through all that I am doing to produce my home lab.

This series will consist of the following posts. I will update the table of contents with the new page links in each post as I produce and publish the articles.

  1. Project Home Lab: Goals
  2. Project Home Lab: Existing Infrastructure
  3. Project Home Lab: Hardware Decisions
  4. Project Home Lab: Network Decisions
  5. Project Home Lab: Shopping List

Project Goals

In this first post, I will explain the goals of my home lab and what I want to be able to achieve with it.

The goal of the project is to allow me to work in an environment where I can break and fix, play, learn and explore the products I work with as a consultant, System Center primarily.

I need the project to provide me with a hardware platform which is well performing, not to the degree that an enterprise customer would expect it to be but enough to not make me want to hurt myself every time I do something in the lab due to a severe lack of performance. Functionally performing to summarise. I need the hardware I use to be cheap but suitable for the task, cost effective in other words. I also need it to be energy efficient where possible as I don’t want to be paying the earth to run this environment. Coupled to the energy efficient statement, I need it to not sound like a datacenter in my garage where I keep my kit so there may be a need for some post-work to add some sound deadening to the garage if things get too loud as noise output can’t be completely eradicated unless I spend a fortune on water cooling for it all.

Although my plans for the environment are small right now, I don’t want to be hamstrung in the future, stuck at the end of a garden path without options to either scale up or scale out the project. Virtualization is a given in this project and being that I work with the Microsoft technology stack, this is obviously going to be centred around Hyper-V. The primary goal is to run System Center in it’s entirety which will include some SQL Servers for databases. If I decide in three months time to add the Windows Azure Pack or in six months that adding Exchange or another enterprise application to the mix will help me understand the challenges that customers I work for have then I want to be able to deploy that without having to re-invent the wheel to do so but minor upgrades are to be expected: memory uplifts or more disks for increased IOPS perhaps.

Project Budget

To be honest, there is no real budget limit for this. I’m going to spend what is appropriate to make it work but the sky is not the limit. I’ve got a wife and three kids to feed so I need to make it all happen as cost effectively as possible which will likely mean the cost is spread with purchasing parts over a number of months.

Logical Network Creation Error in VMM 2012 R2

If you are working with System Center Virtual Machine Manager (VMM) and trying to configure Logical Networks on a Hyper-V host, here is an issue you need to be aware of.

If the display name of the network adapters on your host contain the square bracket characters (Eg. [ or ]) then the creation of the Logical Network on the host will fail with a rather spurious error message. Check the display name of all of the adapters on the host and ensure that they do not contain the square bracket characters before you go through any other troubleshooting. You could save yourself an hour or two.

Automatic Virtual Machine Activation with Windows Server 2012 R2

Previously, I have posted articles on updates released for KMS host to allow you to volume activate Windows 8.1 and Windows Server 2012 R2 and Windows 8 and Windows Server 2012. These have been two of my most popular posts so volume licensing and activation is clearly something people need and want to know about.

To help celebrate Valentines Day, I thought I would share some more licensing love with you all and introduce a new feature in Windows Server 2012 R2 called Automatic Virtual Machine Activation (AVMA). This new feature allows customers using Windows Server 2012 R2 Hyper-V virtualization and Windows Server 2012 R2 guest operating systems running as Hyper-V virtual machines to activate their guest operating systems not with a KMS host as normal but instead, by using the Hypervisor.

In essence, your Hyper-V server becomes your KMS host for your virtual machines. This allows you to keep, track and record all of your virtual machine licensing in your virtual environment. This is also great for hosters or companies running internal private clouds where you may have an infrastructure network consisting of an Active Directory Domain Services domain and KMS host for your servers but not for your customer servers, virtual guests on the Hyper-V servers which have no access to your hosting infrastructure.

The requirements for AVMA to work are as follows:

  • Windows Server 2012 R2 Server with the Hyper-V role installed
  • Windows Server Datacenter license applied to the Hyper-V host (either by a network KMS host or a MAK key)
  • Windows Server 2012 R2 guest operating system
  • Data Exchange Integration Service is enabled for the virtual guest

License the Hyper-V Host Server

If your environment is licensed using a Windows KMS host, you can enter the command cscript slmgr.vbs -ipk W3GGN-FT8W3-Y4M27-J84CP-Q3VJ9 to install the Windows Server 2012 R2 Datacenter KMS client key on the Hyper-V host. If you are using MAK keys for single activations then use the command cscript slmgr.vbs -ipk XXXXX-XXXXX-XXXXX-XXXXX-XXXXX and replace the X’s with your MAK key for Windows Server 2012 R2 Datacenter. If you use KMS licensing, please bear in mind that this KMS activation needs to be renewed quite frequently so the KMS host needs to remain on the network and online.

To verify the license status of the Hyper-V host server, you can use the command cscript slmgr.vbs -dlv to display the current license type and the activation status.

License the Virtual Guest Server

Manual Virtual Guest Activation

Once your host server is activated, you can start doing guest activations from the Hyper-V host server. To do this manually, enter the command cscript slmgr.vbs -ipk YYYYY-YYYYY-YYYYY-YYYYY-YYYYY and replace the Y’s with one of the follows AVMA client keys according to your guest operating system edition.

Windows Server 2012 R2 Datacenter Y4TGP-NPTV9-HTC2H-7MGQ3-DV4TV
Windows Server 2012 R2 Standard DBGBW-NPF86-BJVTX-K3WKJ-MTB6V
Windows Server 2012 R2 Essentials K2XGM-NMBT3-2R6Q8-WF2FK-P36R2

Once this is done, entering the command cscript slmgr.vbs -dlv will show you that the description for the licensing activation is Windows(R) Operating System, VIRTUAL_MACHINE_ACTIVATION and the Hyper-V hostname which performed the activation for the guest will be displayed further down the output.

Automated New Virtual Guest Activation

If you are in a new build greenfield environment then you can use the AVMA client keys shown above as part of your operating system build and deployment process. You can do this in a number of way such as manually as part of a GUI driven Windows Server 2012 R2 installation, via an unattend.xml file incorporated on your installation media be it manual, via Windows Deployment Services (WDS), System Center Configuration Manager (SCCM) Operating System Deployment or using the AVMA client key on a sysprep virtual machine template. If you are maximizing your investment in Hyper-V and Windows Server, you can use this license key in your System Center Virtual Machine Manager (SCVMM) VM Templates and Guest OS Profiles.

Automated Existing Virtual Guest Activation

If you’ve got existing virtual machines running Windows Server 2012 R2 that you want to move from KMS or MAK to AVMA licensing but you don’t want to do it manually either because you have too many systems to touch or because you want it done in a consistent and automated fashion then my colleague Craig Taylor has written a post on how he used the Windows Task Scheduler to deliver a single run task onto all of the virtual machines in a VMM managed environment to update the key and activate the machines. You can read Craig’s post over on his blog at Remote activation of Windows Server Licensing via PowerShell (sort of).

Unknown VMBUS Devices in Device Manager

If you deploy AVMA licensing into your environment, you may want to have a look at this post by Aidan Finn who has come across an issue whereby Unknown Device (VMBUS) appears in the Device Manager for some Windows Server 2012 R2 machines. There’s nothing to worry about as this is a byproduct of the AVMA process but something you will probably want to be aware of. His post is at KB2925727 – Unknown Device (VMBUS) In Device Manager In Virtual Machine For WS2012 R2 AVMA.

Deploying Server Core 2008 R2 for Hyper-V: Network Teaming

In our deployment, we are using servers with Intel network adapters, so the first thing is to install the manufacturer driver package because this enables the ANS (Advanced Network Services) functionality such as Teaming.

The new version of the Intel driver for Server 2008 R2 includes a command line utility for managing networks in Server Core known as ProsetCL, which operates with a syntax not too dissimilar from PowerShell.

The commands from ProsetCL I will be using in this post are:

  • ProSetCL Adapter_Enumerate
  • ProSetCL Team_Create

The full Intel documentation for ProsetCL can be found at http://download.intel.com/support/network/sb/prosetcl1.txt.

With all of the adapters nicely named from the previous post Deploying Server Core 2008 R2 for Hyper-V: Network Naming, this part is actually pretty easy.

The first step is to run an export of the current network adapters to a text file with ipconfig /all > C:Adapters.txt. Once you have this open the file with Notepad.exe C:Adapters.txt.

With the text file open, in the command line window, navigate to the directory C:Program FilesIntelDMIXCL which is where the ProsetCL utility is installed. You could register the directory into the PATH environment environment variable if it makes your life easier, but I didn’t do this personally.

Execute the command ProsetCL Adapter_Enumerate. This will output a list of the network adapters on the server into the command line. Sadly, the Intel utility and Windows order the network adapters differently which is why the text file is needed to marry the two up.

Once you have figured out which adapters need to be teamed together to form your various Client Access, Management, Heartbeat, CSV and Live Migration networks, you are ready to proceed.

You need to know at this point what type of teams you want to create also. The Intel adapters and utility support the following team types:

Team Type Team Function ProsetCL Shorthand
Switch Fault Tolerance Two adapters are connected to independent switches, with only one adapter active at any one time. In the event of a switch failure, the standby link will become active allowing communication to continue. SFT
Static Link Aggregation Two or more adapters are teamed in an always active manner. This mode allows you to achieve a theoretical speed equal to the sum of the speed of all the adapters in the team. To be used when LACP (Link Aggregation Control Protocol) is not available on your switch infrastructure. SLA
LACP (Link Aggregation Control Protocol) Similar to Static Link Aggregation, however the network adapter and the switch to which it is connected negotiate the aggregation using the LACP protocol. 802.3AD
Adapter Load Balancing Two or more adapters are teamed together, whereby the utility forces traffic to be routed out of each port in turn, equally sharing the load across the ports. ALB
Adapter Fault Tolerance Allows two or more ports to be connected in a team whereby the ports may have differing connection speeds (Eg. 1Gbps for the Primary Active adapter and 100Mbps for the Failover adapter). AFT

For full details and a more detailed explanation of each teaming mode, refer to the Intel ANS page at http://www.intel.com/support/network/sb/cs-009747.htm

Now that you know which adapters to be teamed together and which teaming mode you want to use for each, it is time to create the teams.

Enter the command as follows:

ProsetCL Team_Create 1,2 MAN_Team SFT

In this example, a team will be created using ports number one and two (the numbers as referenced by the previous Adapter_Enumerate command) with a team name of MAN_Team for the Management network using the Switch Fault Tolerance mode.

Following the command, you should receive a prompt that the team was successfully created. A new network adapter will now be present if you execute the ipconfig /all command named, sadly, Local Area Connection.

Assuming you named all your adapters from the default name using the previous post, the adapter will always be called Local Area Connection with no trailing numbers. If you run the netsh interface set interface name command after creating each team, it makes it much easier to name the teams as you go rather than doing them in a batch at the end.

In the next post, I will describe configuring the network binding order to ensure the correct cluster communication occurs out of the correct adapter.