Elgato EyeTV Netstream Sat Initial Setup
Network streamed TV is something I’ve long had an interest in due to the set top box lockdown imposed upon us in the UK by Sky and Virgin Media. Elgato EyeTV Netstream Sat is a DVB-S2 Freesat HD network attached TV tuner which allows you to escape the set top box lockdown and enjoy TV how you want on almost any device using your existing satellite dish and home network.
Recently, I tweeted (https://twitter.com/richardjgreen/status/395790001541496832) a picture of the new Elgato EyeTV Netstream Sat that arrived for me in the post. I got a chance last week to have a go at setting this up to see how well it all works. For this post, I’m just going to be installing the device and configuring it on my Windows 8.1 desktop PC to see if it works using the client software shipped with the device. Once I’ve got this all working, I’ll be moving up a gear to setting it up with Windows Media Center for my HTPC.
Where to Buy and What You Get
The EyeTV Netstream Sat sells on Amazon for just shy of £130, but head to eBay and you can pick up a new unit for an eBay shop as I did for £100.
The EyeTV Netstream Sat on it’s own is a single tuner device allowing you to stream a single channel of Freesat HD TV to your network devices. You can expand this with the EyeTV Sat Free which is identical in looks however lacks the Ethernet port and instead connects to the EyeTV Netstream Sat by a USB cable adding a second tuner capability.
For my needs, I’m looking at a final design consisting of two EyeTV Netstream Sat devices with two subordinate EyeTV Sat Free devices which will give me a total of four Freesat HD tuners on the network. Total cost for this is in the region of £300 but with my current Sky TV bill coming in at £39 a month, this will pay for itself in eight months due to the nature of subscription free Freesat.
Installing the EyeTV Netstream
Setup is really simple as it should be for a consumer device. Connect the EyeTV Netstream Sat to power, an Ethernet cable to the RJ-45 port and a Coaxial cable into the satellite input port. It goes without saying that for this to work you need an existing satellite dish on your house pointing to the right satellites. I’m currently a Sky customer which means I’ve already got the dish and it’s pointing at the right part of the sky to pick up the signals.
Once powered up and connected, the EyeTV Netstream Sat will pick-up an IP Address from DHCP on your router however with me and my overly complex home setup, I like to have my infrastructure devices on static IP addresses so that I can give them cute DNS names to access them. If you are going for a basic install, you can skip the following piece and head straight to software installation where the tuner will be automatically detected on the network however if you’re like me, then keep reading.
Configuring the EyeTV Netstream
My EyeTV Netstream picked up an IP Address out of my Windows Server 2012 Essentials DHCP scope which I pointed my browser to after which you are presented with the web interface. The initial page Status shows you the tuner signal strength which will probably show 0% at this point as it hasn’t been configured. Head straight to the Network tab to configure the static IP Address and DNS Server IPs.
You need to click the padlock icon in the right of the tab navigation bar to unlock the interface and allow you to edit the settings. The default PIN is 1234.
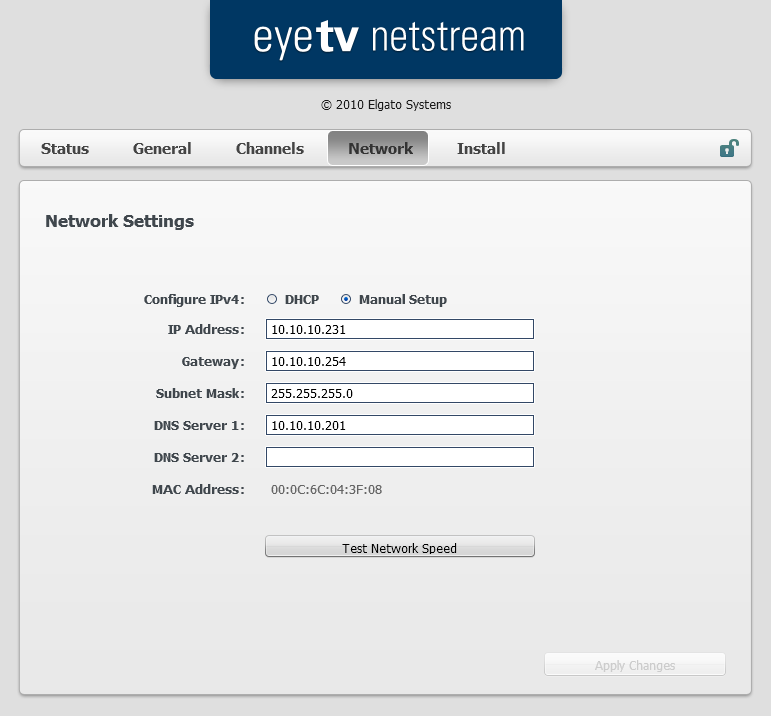
Change the default option from DHCP to Manual Setup and enter your network settings. As you can see, I’m a bit of a propeller-head and use a 10.10.10.0/24 network range for my home network. Nothing like simulating the office right? There is a Test Network Speed button at the bottom of the page which I fail to understand and we’ll ignore as this button tests your broadband internet speed which being we aren’t streaming IPTV here but receiving hardline satellite signals here, I don’t quite get it’s purpose?
My EyeTV Netstream shipped with quite an old firmware version. Elgato don’t seem to issue very frequent updates but each one does include good fixes and updates, so head over to http://www.elgato.com/en/eyetv/eyetv-netstream/support/update and download the latest (1.1.5 Build 423 at the time of writing) and use the Update button on the General tab to install this. The device will reboot after installing the update and mine took about two minutes to come back to life afterwards.

The General tab also let’s you assign a name to it so that if you have multiple EyeTV Netstream’s on your network you can identify which is which. I’d also recommend changing the PIN number on this page too from the default of 1234 to something personal to you. This PIN is what locks down the web interface to prevent unauthorized changes.
Installing the Windows PC Software
At this point, you’ve configured your EyeTV Netstream Sat on the network and if you followed the steps above, you’ve got it updated with the latest firmware and set yourself a custom PIN. Installing the Windows PC Software can be achieved using either the provided CD or from the web interface. As I was already in the web interface, I did the latter. Click the Install tab in the interface.

Here, you get links to all the various software options for accessing your Netstream. As you’ve probably gathered by now from the physical device’s appearance, the web interfaces look and feel and the fact that Mac OS X is listed top on this page, these EyeTV devices are really Mac biased but they work just as well for Windows and PC so don’t be put off by any of this. Click the link for TerraTec Home Cinema to download the software.
During the installation, you’ll be asked for an activation code. This is the code which is printed on a small card inside the product box. This is the reason I decided to buy new and not used as I was worried that the activation of a used product may not go down so well.
Scanning for Channels
Once you’ve got the software installed and running, you need to scan for channels. The scan interface should automatically pop-up on first run but if it doesn’t, you can access it from the Setup button on the black control console and then click the Scan tab.
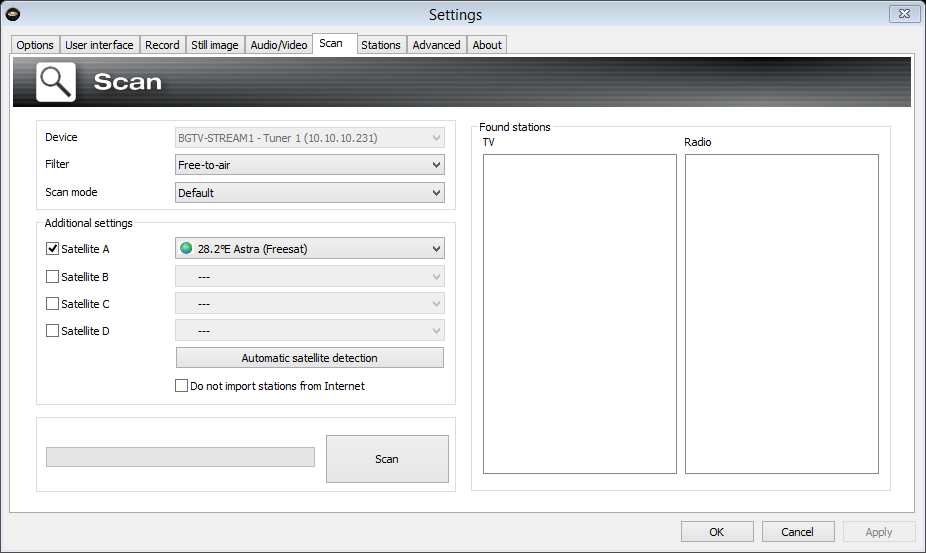
To find the channels, leave the Filter set to Free-to-Air as you don’t get a card interface with EyeTV Netstream Sat to allow you to access encrypted channels. Click the Automatic Satellite Detection button after which a new dialog will appear. This will use the dish to determine what satellites are visible to the dish. After the scan completed, I was told that I’m using the Astra Freesat 28.2 East satellite.
Once this is done, click the main Scan button to begin a search for channels.
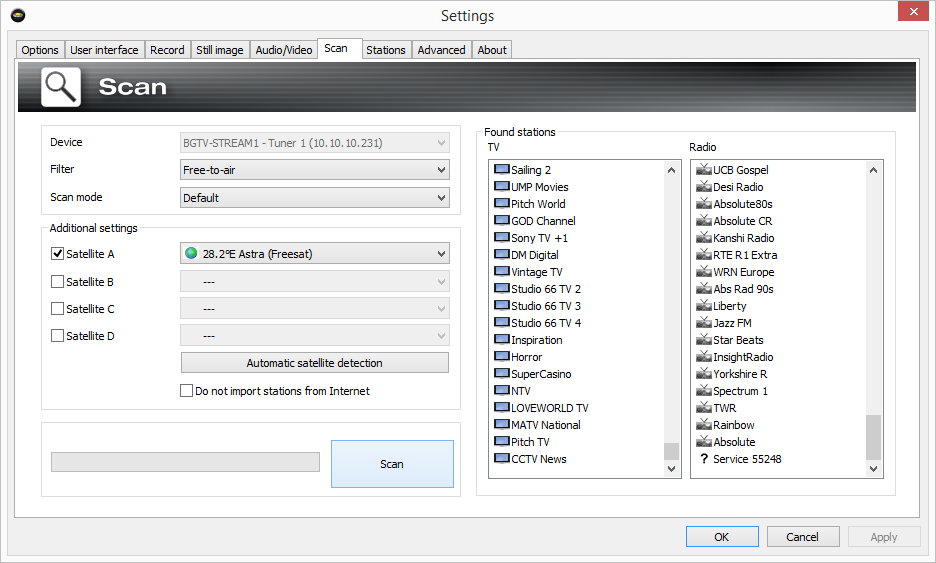
Viewing the Results
As you can see from the screenshot above, it found lots of channels and radio stations. Click OK and you should now be able to start viewing. Right-clicking in the TV viewing area gives you an option to select a channel. I went straight for BBC One HD, the highest bit rate channel on Freesat HD currently to stress test it.

I happened to try this at the time that the regional news was on so I only got a splash page but it worked none-the-less. I tried this in full-screen mode on my 22″ LCD and it looked great.

Here’s a screenshot of Channel 5 which is a non-HD channel and that considering, it still looks great even in full screen.
Channel switching is one area that people seem to have concerns and complaints with IPTV and streaming TV services. I tested this quite extensively, flicking between HD and SD channels, back and forth a number of times and I was quite happy with it to be honest. SD to SD channel switches happen in under a second. SD to HD channel switches take a fraction longer but that is to be expected as the EyeTV Netsream is having to start up a stream at a higher bitrate for the new channel.
I inspected the network usage whilst streaming and I was quite impressed with this too. A standard definition channel was stable at 4 Mbps (Megabits per Second) and a HD channel was stable at 10 Mbps. The EyeTV Netstream only has a 100 Mbps network adapter so whilst this is okay with a single tuner and in theory should be perfectly okay also with two, I’ll be interested to see how that coped with an EyeTV Sat Free connected via USB adding a second tuner with both tuners streaming a HD channel at the same time. I haven’t been able to test a wireless device yet as most of my home is wired with Gigabit Ethernet however as I have N 300Mbps wireless I’m pretty sure that’d work just fine and it should work okay over 54 Mbps G networks too.
In summary, I’m really happy with the results of the setup and streaming to my PC using the TerraTec software. The next step is to now configure the Windows Media Center HTPC in the living room to use the tuner and see how I get on with that. That for me is the biggest test also because this is how the wife and kids will interact with it. Unless it’s bulletproof, the wife and kids won’t be happy with it and I will probably have a hard time replacing Sky with this setup. I’ll be posting the Media Center setup steps in another post coming soon.