For a little while now, I have been buying Philips Hue light bulbs for home. I haven’t gone too overboard just yet but one of the starting factors was being able to set some coloured lighting in the living room and in the kitchen to be able to provide a bit of flashing light action […]
For a little while now, I have been buying Philips Hue light bulbs for home. I haven’t gone too overboard just yet but one of the starting factors was being able to set some coloured lighting in the living room and in the kitchen to be able to provide a bit of flashing light action for those long summer nights with a drink or two and friends.
At Christmas, I was able to get myself a Vera Edge Z-Wave controller as I really wanted to start making better use of the Hue bulbs and integrating it with Z-Wave to setup some nice home automation scenarios. After getting Vera online and getting the Hue2 plugin installed and control of the bulbs, I started to struggle. What I quickly noticed was that when trying to use Z-Wave Scenes in Vera to operate groups of Hue bulbs, I wasn’t able to and instead had to chain up actions which had an undesired effect of each bulb turning on in order with a second or so delay between each. Compared with Hue scenes where you press it and the whole room lights up, this wasn’t great.
Tonight however, I managed to find the answer and get it working just so with a little bit of effort here and there. I wasn’t able to find this information easily on the MiCaseVerde forums so I thought I would post it here in the hope that someones Google search turns it up for them.
Get the Hue v1 App
This sounds backward and daft but for the ability to turn off the lights, it’s important to have. The reason is that the Hue v2 app has a much nicer UX for using Hue but it removed the ability to create off scenes replacing that notion with virtual toggle switches on each room on the Hue bridge. it will give you some notifications about being old and that you should switch to the new v2 app but that’s fine, it still works.
Creating Your Off Scenes
Using the somewhat cumbersome feeling Hue v1 app, create scenes for each of your rooms and have the scene set the bulb states to off. Save the scene and give it a name like “Kitchen Off”. Make sure you include the room name in the scene name because when we get to configuring this in Vera later, Vera doesn’t show you the room name, so you would simply see a list of scenes called Off.
Once you’ve made all your off scenes we are done with the Hue v1 app. You can either uninstall it if you aren’t going to be expanding your Hue system ever or put it to the back of your app list for later use.
Creating Your On Scenes
I used the Hue v2 app to do this just because it has a nicer UX and makes me feel more at ease configuring the bulbs. In the Hue v2 app, we can get the room just how we want it and then simply hit the + button to create a scene based on the current settings which is ideal. As with the Hue v1 app, when saving your scenes, make sure you include the room name in the title. I also create multiple scenes for each room so therefore I have useful names like “Lounge Warm” or “Lounge Purple”.
Get the Scene IDs from the Hue Bridge
This is where I was struggling initially with Vera. I had tried to create Scenes calling upon a Hue Scene as an activity but it just kept failing. This was until I found out that the Hue2 plugin requires you to reference not the scene name but the Scene ID in the Z-Wave Scene. Getting the Scene IDs is easy though via Vera.
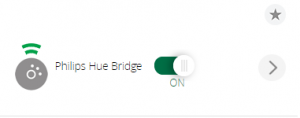
In your Vera controller interface, from the Devices page, click on your Hue Bridge which you will have already configured using the Hue2 plugin. With the device details open, scroll down and select the Advanced link and from the Advanced view, select the Variables tab as shown below.
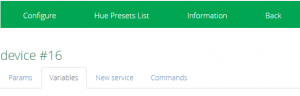
On the Variables tab, scroll down until you see the BridgeScenes variable. Copy the contents of this field, JSON as it happens to be and paste it into Notepad++ or such like. When viewing the JSON, you will see the syntax like the following example:
"3ca1daeba-off-0": { "lights": [ "6", "7", "8", "10", "12", "13" ], "version": 1, "name": "Kitchen Off" }
This is my Kitchen Off scene. Kitchen Off is the friendly name I set and you can see the light IDs in the string too which determines which lights it will control. For Vera, the important part is up front, the 3ca1daeba-off-0 in my case. This is the Scene ID. Repeat this, walking through all the scenes t]in the JSON to get all of the Scene IDs for all of your off scenes and any on scenes that you want to link to Z-Wave Scenes.
Create the Z-Wave Scene in Vera
With all the Hue Scene IDs now in hand, we can create the Vera scenes. Fire up the Vera scene creator wizard. Whether you create it as a manual scene or one which is triggered by a motion sensor is obviously up to you. I’m just testing this for now before I look at buying a motion sensor or seven so I’m just driving them manually for now.
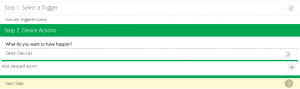
When you get to the Select Devices step, don’t add a device, simply click Next Step. Once you reach Step 3, select the Advanced Editor option and then click the Add First Action button.
![]()
![]()
Select your Philips Hue Bridge device from the devices list and then from the actions list, select RunHueScene. In the box, enter the Scene ID that we grabbed from the variables on the bridge and that’s it, we’re done. You can go ahead and add some extra smarts like lux metering or dawn or dusk control using some custom LUA code if you wish but for now, I’m happy with this for test. I found a really useful sticky on the MiCasaVerde forums for using LUA code as I just mentioned at http://forum.micasaverde.com/index.php/topic,18679.0.html if you are looking for something extra.