Posts from 2013

Windows Phone is Best for Business

In this post, I’m going to cover the contentious topic of smartphone selection and why I think that Windows Phone is best for business. For the purposes of this test, I’m going to pretend that Android doesn’t exist and compare Windows Phone against the Apple iPhone and to level the playing field, I’m going to pit the Nokia Lumia 925 against the Apple iPhone 5S 16GB.

Handset and Tariff Pricing

First thing first, I’m going to look at price as money is what makes businesses work. Using an O2 Business plan price, the cheapest way to get the Apple iPhone 5S 16GB handset free is on a 24 month contract at £39.17 per month giving you unlimited UK landline and mobile calls, 1GB mobile data and unlimited text messages. A plan over the same 24 month term with the same entitlement to unlimited calls and text with 1GB data for a free Nokia Lumia 925 handset is £30.83 a month, a saving of £8.34 per month per handset issued in the business. Over the 24 month term, that’s a saving of £200.16 per handset issued.

Some businesses don’t like leasing the handsets as part of the network contract and like to buy them SIM free so that they own the asset outright from day one which I can understand. Using consumer prices from Expansys, the iPhone 5S 16GB retails for £599.99 and the Nokia Lumia 925 for £399.99, a saving of £200 making it the same as the saving over the 24 month contract. For some business who like higher ROI (Return on Investment) and to sweat their assets, you could run either handset for 36 months or longer if you wanted.

Handset Specifications

Not such a point for the accountant but for the consumer of the device is specification. I carefully chose the iPhone 5S 16GB against the Lumia 925 because they both have 16GB of internal mass storage making them balanced on this point. The Nokia Lumia is slightly heavier than the iPhone at 139g verses the 112g of the iPhone but both of these phones are super light. I use a Nokia Lumia 820 currently which weighs in at 160g and is a smaller phone than the both of these two up for review.

The Nokia Lumia 925 has a 4.5″ screen with a 1280×768 resolution whilst the iPhone has just 4″ at 1136×640 resolution. This amounts to a 326 ppi (Pixels Per Inch) DPI on the iPhone whilst the Nokia Lumia has 334ppi making the Nokia better than even the much touted Retina display on the iPhone. The Nokia Lumia 925 uses an AMOLED screen which produces super vibrant colours and is easy to view in sunlight too whilst the iPhone uses an IPS LCD which does reproduce colour marginally more accurately than the Nokia but also consumes more power to run making the 2000 mAh (Milli Amp Hour) in the Lumia 925 even more desirable and the somewhat lacklustre 1570 mAh battery in the iPhone 5S less appealing. For consumer and business, this effectively means less electricity consumed charging the phone as you’ll need to charge it less often in the case of the Nokia Lumia.

The Nokia Lumia 925 can be upgraded with an official Nokia Qi wireless charging shell for £17 plus £32 for the Nokia desktop wireless charger. The iPhone 5S still doesn’t feature wireless charging and if you wanted it, you need to go down the third-party route which results in about the same cost to implement as the Nokia but is still third-party so don’t expect friendly support from Apple if something goes wrong with your battery as a result of using it with a Qi solution.

Business Use

As we’re comparing these handsets for their corporate and enterprise value, this is the main selling point. Firstly, Windows Phone is a great, simple and easy to operate interface. The interface is so great, that Apple event took some of the design cues in the latest iOS 7 from Windows Phone, flattening the interface, de-cluttering it’s previous 3D everywhere effects. Apple fans haven’t exactly been in love with the new style but us Windows Phone users have been enjoying it for several years now already.

For business users, Windows Phone gives you what I think is the best, least complicated to use email apps out there. You get conversation view, the ability to turn off, on and customize your out of office message (something that you cannot do with the iPhone as Apple don’t license this feature of Exchange ActiveSync) all making you life, triaging your inbox easier and faster to achieve. If your company makes used of Information Rights Management and users are sending and receiving RMS protected email messages and you use Exchange Server 2010 then you can read the protected messages on your phone too.

If you work in a Windows office environment then you will no doubt already be using Office and even if you are in a Mac environment then you will potentially be using Office for Mac 2011. Windows Phone gives you the full suite of Office applications including Word, Excel, PowerPoint and OneNote built-in allowing you to not only receive and read documents but in the cases of Word, Excel and OneNote, you can also author documents on the move.

If your company uses SharePoint Server for an intranet or document version control and storage solution then this can be published securely to the internet and accessible through the Office hub on Windows Phone. When configured correctly, Windows Phone can automatically translate internal document links sent to you via IM or email into the published address so that you can still access those documents while you are mobile and great quality Lync, Yammer and Skype apps allow you to stay in touch and collaborate and communicate with people in your company. All of this works perfectly whether you are an on-premise customer or an Office 365 tenant customer.

When it comes to apps, Windows Phone is based on the same code development languages as Windows 8. This means that if you have internal or contracted software development teams working to write apps for the desktop or even Windows RT tablets in your environment, modifying the code of those apps for a mobile experience is super quick, saving huge amounts of time and potential re-education compared with re-writing or converting apps into Objective C for Apple iOS. Instead of having to re-write the inter functions of the application, you only need to modify the interface to suit the mobile experience.

By registering your Windows Phone handsets with a company account under the settings menu, you can access a Windows Phone company app store that the company can publish to install available Windows Phone company apps too.

The Windows Phone Start screen is 100% customisable, not just moving standard, lifeless squares around like the iOS home screen. Windows Phone apps can have Live Tiles, icons that represent the apps showing highlight or latest information right there on your home screen, you can re-arrange and re-size those tiles to build an interface and style that suits your working needs giving you access to the apps you need faster and more informed before you even enter the app with the information from the Live Tile. Some apps, you don’t even need to launch because the information on the Live Tile could be all you need, like the weather or calendar apps or it could be a line of business app showing you daily sales or some other kind of important data or metric.

You can configure your most important apps to appear on your lock screen so that you can see notifications or even full data from your apps so you can decide if you even need to unlock your phone to dig deeper. A new feature added in the last update allows you to use the Glance feature so those of you using your smartphone as a watch don’t need to evenness the power button to see the time as it will appear on the screen automatically as you withdraw the phone from your pocket or bag.

Nokia Lumia phones include the fantastic Nokia Drive satellite navigation software which has really good mapping and directions so those road warriors in your corporations no longer need to worry about using and charging a separate device for getting around. Based in London? The excellent Bing Get Me There app allows you to get notifications of problems on the tubes and you can even get recommended alternate routes to avoid network issues.

Personal Use

Okay, I’ll admit it, this is where Windows Phone suffers slightly. The app eco-system for Windows Phone is continuously improving as Windows Phone develops more market share and software app writers start to take more notice of it and develop applications for it, but right now, it’s not where it should be really. I’m not a huge app user on my phone so this doesn’t bother me, but it may bother some people. Core essentials like Facebook, Twitter (although I’d recommend Rowi instead), Instagram and Angry Birds exist but some of the other apps you may be used to on iOS won’t exist. If you like games then Windows Phone is certainly great for you because of the integration with Xbox Live and you can even earn Xbox Live gamer points by playing a large number of the titles available via the Windows Phone Store.

This section is short not because I’m trying to avoid the topic but because this is a Windows Phone for Business post so the point of personal use, whilst important for companies that allow users of company mobile devices to do this, isn’t the point of the article. I’ll summarise here with Windows Phone has a lot of great apps; just not as may as Apple in their App Store right now.

Whilst this may not sound like a truly personal thing to say, but with the slightly lagging nature of the Windows Phone Store verses the Apple App Store, it actually means that you can use your business smartphone for business without the continual distraction of time-wasting apps that you’ve probably got installed on your iPhone if you have one right now. Yes, it’s nice to break up that work time sometimes, but if you pull out your phone to do something for work, you should stay on doing that something for work and not distracting yourself with a quick blast on Candy Crush or Farmville.

IT Management and Policy Enforcement

If you aren’t using anything in your business to manage mobile devices such as an MDM (Mobile Device Management) solution then you should probably take a look at one. If you are using Exchange ActiveSync device policies to manage your devices currently then Windows Phone is defiantly for you. Windows Phone is the only platform which truly honours a number of the device policies which you can apply as an administrator .

If you are using a full MDM solution such as Good Technology then you’re in luck as they provide their mobile app for Windows Phone too. If you are using Configuration Manager to manage your on premise device estate (the Gartner leader for Client Management may I add) then you would be wise to look into Windows Intune, a cloud based service, providing MDM for your BYOD (Bring Your Own Device) personal devices or even non-domain joined company owned CYOD (Choose Your Own Device) devices. Configuration Manager 2012 SP1 or even 2012 R2 combined with Intune give you a single pane of glass management viewport for your desktop and mobile devices and allow you to manage policies on both device types simultaneously. Whilst Intune does support Apple iPhones and iPads, to get the best from it right now, you want to be on Windows Phone.

Software Updates

Both Microsoft, the makers of Windows Phone and Apple, the makers of the iPhone release regular software updates. Both devices are able to download their updates OTA (Over the Air) without the need for a physical connection back to a PC with the relevant software installed. If I had to call it, I would say that Microsoft are generally more responsive at releasing security fixes for vulnerabilities found in the operating system but with this said, Apple have defiantly upped their game with respect to security so the two could become equal on this point before we know it.

Wrap up

I hope that this post has been informative in helping companies large or small who may be on the fence right now as to which direction to take their corporate mobile strategy. It’s been a whistle stop tour of comparing the cost of ownership of an iPhone (a 5S 16GB in this case) verses a Windows Phone (a Nokia Lumia 925), the specifications of the handsets and some of the many benefits for business of using Windows Phone with an existing Windows and Microsoft stack based environment.

Windows Phone is still fairly in it’s infancy compared with Apple’s story and I think that as time passes and the Windows Phone story will get better, stronger, more compelling, there will be even more benefits to using Windows Phone. With the recent purchase of Nokia by Microsoft, pending regulatory approval, there may even be some great new things to look forward to as the two companies become one hopefully harmonising the Windows, Surface and Windows Phone brands.

References

Just in the event that any of my maths over pricing or over specifications come under scrutiny here, here’s a list of links and sites I used for my fact finding:

Google Sitemaps XML Plugin on Windows Azure

On the blog here, I use the great Google Sitemaps XML plugin for WordPress by Arne Brachold (available from his site at http://www.arnebrachhold.de/projects/wordpress-plugins/google-xml-sitemaps-generator/) to automatically generate my sitemaps. Since moving to Windows Azure for my hosting I’d been having a problem with it automatically building the file on site changes. The fix was actually really simple but I completely overlooked it initially.

First off, this plugin is great for two reasons and credit to the author. It’s really customizable allowing you to configure what is included in the sitemap and what is not such as categories, tags, archives, search page and you can even specify individual post IDs. This is all so that you can match your sitemap.xml to your robots.txt configuration to help Google and Bing (and yourself for SEO) but more importantly longer term because it automatically rebuilds and notifies Google and Bing when it is updated by means of new or updated posts being published. As a blogger, all I have to worry about is finding the time amongst work and life to think of something awesome to post and for you all to read.

It goes without saying that Windows Azure web instances are running on IIS and in counter, the plugin is designed primarily for Apache installations. The reason I hadn’t thought of this previous before now is that my last host was running IIS too and I had no problems with it there.

Google Sitemaps XML Plugin Path

Head over to the settings panel for the XML-Sitemaps plugin in your WordPress admin site and scroll down to the area titled Location of your Sitemap File. The installation tries to select an automatic location from the web server paths. Credit to it, it got the paths right, but the direction of the slashes wrong and it turns out that this was the problem.

Change the setting to Custom Location and simply replace all of the forward slashes in the path with backslashes. Hit the Update Options button at the bottom and you’re done. I submitted a very short hello world post after the change to test it and once published, go to the XML-Sitemaps panel and I was given a message to show that the sitemap will be rebuilt in 10 seconds and sure enough after 10 seconds, it rebuilt and notified Google and Bing as designed of the changes.

Elgato EyeTV Netstream Sat Initial Setup

Network streamed TV is something I’ve long had an interest in due to the set top box lockdown imposed upon us in the UK by Sky and Virgin Media. Elgato EyeTV Netstream Sat is a DVB-S2 Freesat HD network attached TV tuner which allows you to escape the set top box lockdown and enjoy TV how you want on almost any device using your existing satellite dish and home network.

Recently, I tweeted (https://twitter.com/richardjgreen/status/395790001541496832) a picture of the new Elgato EyeTV Netstream Sat that arrived for me in the post. I got a chance last week to have a go at setting this up to see how well it all works. For this post, I’m just going to be installing the device and configuring it on my Windows 8.1 desktop PC to see if it works using the client software shipped with the device. Once I’ve got this all working, I’ll be moving up a gear to setting it up with Windows Media Center for my HTPC.

Where to Buy and What You Get

The EyeTV Netstream Sat sells on Amazon for just shy of £130, but head to eBay and you can pick up a new unit for an eBay shop as I did for £100.

The EyeTV Netstream Sat on it’s own is a single tuner device allowing you to stream a single channel of Freesat HD TV to your network devices. You can expand this with the EyeTV Sat Free which is identical in looks however lacks the Ethernet port and instead connects to the EyeTV Netstream Sat by a USB cable adding a second tuner capability.

For my needs, I’m looking at a final design consisting of two EyeTV Netstream Sat devices with two subordinate EyeTV Sat Free devices which will give me a total of four Freesat HD tuners on the network. Total cost for this is in the region of £300 but with my current Sky TV bill coming in at £39 a month, this will pay for itself in eight months due to the nature of subscription free Freesat.

Installing the EyeTV Netstream

Setup is really simple as it should be for a consumer device. Connect the EyeTV Netstream Sat to power, an Ethernet cable to the RJ-45 port and a Coaxial cable into the satellite input port. It goes without saying that for this to work you need an existing satellite dish on your house pointing to the right satellites. I’m currently a Sky customer which means I’ve already got the dish and it’s pointing at the right part of the sky to pick up the signals.

Once powered up and connected, the EyeTV Netstream Sat will pick-up an IP Address from DHCP on your router however with me and my overly complex home setup, I like to have my infrastructure devices on static IP addresses so that I can give them cute DNS names to access them. If you are going for a basic install, you can skip the following piece and head straight to software installation where the tuner will be automatically detected on the network however if you’re like me, then keep reading.

Configuring the EyeTV Netstream

My EyeTV Netstream picked up an IP Address out of my Windows Server 2012 Essentials DHCP scope which I pointed my browser to after which you are presented with the web interface. The initial page Status shows you the tuner signal strength which will probably show 0% at this point as it hasn’t been configured. Head straight to the Network tab to configure the static IP Address and DNS Server IPs.

You need to click the padlock icon in the right of the tab navigation bar to unlock the interface and allow you to edit the settings. The default PIN is 1234.

EyeTV Netstream Network Settings

Change the default option from DHCP to Manual Setup and enter your network settings. As you can see, I’m a bit of a propeller-head and use a 10.10.10.0/24 network range for my home network. Nothing like simulating the office right? There is a Test Network Speed button at the bottom of the page which I fail to understand and we’ll ignore as this button tests your broadband internet speed which being we aren’t streaming IPTV here but receiving hardline satellite signals here, I don’t quite get it’s purpose?

My EyeTV Netstream shipped with quite an old firmware version. Elgato don’t seem to issue very frequent updates but each one does include good fixes and updates, so head over to http://www.elgato.com/en/eyetv/eyetv-netstream/support/update and download the latest (1.1.5 Build 423 at the time of writing) and use the Update button on the General tab to install this. The device will reboot after installing the update and mine took about two minutes to come back to life afterwards.

EyeTV Netstream General Settings

The General tab also let’s you assign a name to it so that if you have multiple EyeTV Netstream’s on your network you can identify which is which. I’d also recommend changing the PIN number on this page too from the default of 1234 to something personal to you. This PIN is what locks down the web interface to prevent unauthorized changes.

Installing the Windows PC Software

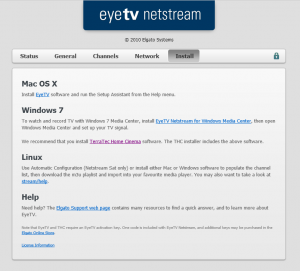
At this point, you’ve configured your EyeTV Netstream Sat on the network and if you followed the steps above, you’ve got it updated with the latest firmware and set yourself a custom PIN. Installing the Windows PC Software can be achieved using either the provided CD or from the web interface. As I was already in the web interface, I did the latter. Click the Install tab in the interface.

EyeTV Netstream Install Links

Here, you get links to all the various software options for accessing your Netstream. As you’ve probably gathered by now from the physical device’s appearance, the web interfaces look and feel and the fact that Mac OS X is listed top on this page, these EyeTV devices are really Mac biased but they work just as well for Windows and PC so don’t be put off by any of this. Click the link for TerraTec Home Cinema to download the software.

During the installation, you’ll be asked for an activation code. This is the code which is printed on a small card inside the product box. This is the reason I decided to buy new and not used as I was worried that the activation of a used product may not go down so well.

Scanning for Channels

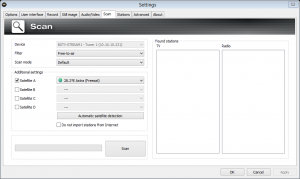
Once you’ve got the software installed and running, you need to scan for channels. The scan interface should automatically pop-up on first run but if it doesn’t, you can access it from the Setup button on the black control console and then click the Scan tab.

TerraTec Scan for Channels

To find the channels, leave the Filter set to Free-to-Air as you don’t get a card interface with EyeTV Netstream Sat to allow you to access encrypted channels. Click the Automatic Satellite Detection button after which a new dialog will appear. This will use the dish to determine what satellites are visible to the dish. After the scan completed, I was told that I’m using the Astra Freesat 28.2 East satellite.

Once this is done, click the main Scan button to begin a search for channels.

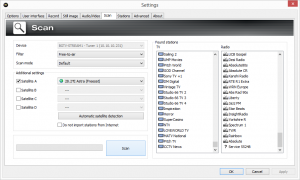
TerraTec Found Channels

Viewing the Results

As you can see from the screenshot above, it found lots of channels and radio stations. Click OK and you should now be able to start viewing. Right-clicking in the TV viewing area gives you an option to select a channel. I went straight for BBC One HD, the highest bit rate channel on Freesat HD currently to stress test it.

TerraTec BBC One HD

I happened to try this at the time that the regional news was on so I only got a splash page but it worked none-the-less. I tried this in full-screen mode on my 22″ LCD and it looked great.

TerraTec Channel 5

Here’s a screenshot of Channel 5 which is a non-HD channel and that considering, it still looks great even in full screen.

Channel switching is one area that people seem to have concerns and complaints with IPTV and streaming TV services. I tested this quite extensively, flicking between HD and SD channels, back and forth a number of times and I was quite happy with it to be honest. SD to SD channel switches happen in under a second. SD to HD channel switches take a fraction longer but that is to be expected as the EyeTV Netsream is having to start up a stream at a higher bitrate for the new channel.

I inspected the network usage whilst streaming and I was quite impressed with this too. A standard definition channel was stable at 4 Mbps (Megabits per Second) and a HD channel was stable at 10 Mbps. The EyeTV Netstream only has a 100 Mbps network adapter so whilst this is okay with a single tuner and in theory should be perfectly okay also with two, I’ll be interested to see how that coped with an EyeTV Sat Free connected via USB adding a second tuner with both tuners streaming a HD channel at the same time. I haven’t been able to test a wireless device yet as most of my home is wired with Gigabit Ethernet however as I have N 300Mbps wireless I’m pretty sure that’d work just fine and it should work okay over 54 Mbps G networks too.

In summary, I’m really happy with the results of the setup and streaming to my PC using the TerraTec software. The next step is to now configure the Windows Media Center HTPC in the living room to use the tuner and see how I get on with that. That for me is the biggest test also because this is how the wife and kids will interact with it. Unless it’s bulletproof, the wife and kids won’t be happy with it and I will probably have a hard time replacing Sky with this setup. I’ll be posting the Media Center setup steps in another post coming soon.

Windows Server 2012 Deduplication Real World

Recently, in my post entitled Storage Spaces You’re My Favourite, I promised to show the world some real life data on how much you can actually save in storage consumption with Windows Server 2012 deduplication, and here it is.

Real-World Deduplication Savings

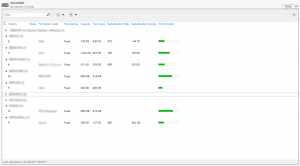
This screenshot was taken from a production file server cluster running Windows Server 2012 using SAN attached fibre storage. As you can see from the image, I’ve obscuficated the names of the drives and shares but left the good stuff visible, the savings.

The data is broken across a number of volumes, some of switch aren’t doing deduplication (the cluster Quorum or the DFS Namespace for example) but those that are, are showcasing some impressive numbers. Data is broken across a number of volumes because we had to keep it this way to maintain a few legacy elements and also to keep some of the more confidential data structures separate in the event of someone getting a bit too liberal with the ACLs on the more generic volumes.

As you can see from the screenshot though, on our main storage volume, the E: drive, we are currently saving 1.44TB which is 41% of the total storage of that volume, 48% on one of the smaller volumes and 69% on another. All of these savings added together means that are net savings are 1.96TB compared with the previous Windows Server 2003 based file server solution. We aren’t storing less data, we aren’t telling users to change how they store or compress their data or making any changes to the way anybody does their job. All of this is being achieved just by enabling a feature in Windows Server 2012, a feature that is available in Standard edition may I hasten to add.

If I was a financially oriented man, I’d probably want to know what this actually means in monetary terms? On a previous project, we calculated that roughly speaking, our internal storage costs are in the region of £2.50 per gigabyte per annum. This £2.50 bakes in the cost of our underlying storage array hardware, supporting fibre channel network and the cost of disks and all. Based on this £2.50 per gigabyte, the deduplication feature in Windows Server 2012 is therefore saving us around £5,000 a year.

Looking back then, it’s clear to see that deduplication in Windows Server 2012 really does work not only on a feature level but also on a financial level. For us as an enterprise to move to Windows Server 2012 for our file server solution cost us nothing aside from some time because we are permitted to upgrade from Windows Server 2003 to Windows Server 2012 under our SA (Software Assurance) rights from our EA (Enterprise Agreement) but in return, it’s going to save us £5,000 a year in storage costs.

If it wasn’t due to the fact that we keep some of this data logically separated in different volumes then we probably could see an uplift on these savings. With deduplication, less is more and by this I mean volumes. The less volumes you have, the more you will save. This is because deduplication is done at a volume level. Minimising the number of volumes you have and consolidating your data into larger volumes will increase the return from deduplication.

Bring on Elgato EyeTV Netstream

I’m not the biggest fan of Sky TV even though I’ve been a customer of theirs for about eight years now. The way that you are locked into their eco-system and how you watch media the way they want you and not what is most applicable to you to doesn’t appeal to me. Sky Go and other new features have helped the situation for a number of people but it doesn’t help me using a Windows Phone or Windows 8 devices as none of their apps are available on these platforms (for clarification, by Windows 8, I mean impressive UI native Windows 8 apps and not desktop apps). I’ve long wanted to break into the IPTV and streaming TV markets, originally with SiliconDust’s HDHomeRun product and now Elgato’s EyeTV Netstream and now is the time to strike.

Me and @NickyCGreen got an email from Sky at the weekend to tell us that our bill was going from a promotional rate to the standard rate, almost doubling to £40 a month. I was happy enough to pay for Sky at £20 a month and actually, I didn’t even consider this was a promotional rate. Just because something is easy though isn’t justification for buying it, certainly when it’s £40 a month. All we really watch on TV these days is FTA (Free to Air) content like BBC One, BBC Two, Channel 4 and the kids watch a little bit of kids TV too like Pop and CBeebies. We don’t have sports or movies add-ons and we don’t have any other services like Sky Go, broadband or phone from them, this is just for basic TV with HD.I  was pretty staggered that Sky will expect me to pay £40 for this basic service so I decided that now was the time to strike the IPTV drum.

I’ve long courted SiliconDust and their HDHomeRun product line but they have let the European products stagnate and not updated them to meet the x2 standards such as DVB-T2 (Freeview HD) or DVB-S2 (FreeSat HD) which means that you can only get the SD (Standard Definition) variants of Freeview or FreeSat on the HDHomeRun. On my search for other products, I came across Elgato and their EyeTV product line. On first inspection, it looks quite Apple focused with a lot of detail on Mac OS X software, AirPlay support along with mobile device support for iOS iPhone and iPad devices but they do support Windows and Windows Media Center also which is enough for me to be happy.

Elgato EyeTV Netstream Sat

I decided to dip my toes into the line-up today by ordering an Elgato EyeTV Netstream Sat, a single tuner DVB-S2 FreeSat network tuner. For those of you who don’t know what any of that means, it basically means that I can connect one of the satellite feeds from my Sky MiniDish into the box of tricks from Elgato and it will output those FreeSat HD pictures onto my home network to be consumed by any device I choose.

I’ve gone with a single tuner to start with as a proof of concept to the wife and kids, I’m going to be configuring this single feed on the Windows Media Center PC in the living room to test out the Media Center Live TV interface, that basics like live TV and channel switcing all work as planned and also that none of the codec changes I’ve made to support .mkv playback effect the TV experience. Once I can get this working and other basics like the EPG (Electronic Programme Guide), I can start to experiment a bit more like. Tricks like the MCL (My Channel Logos) plugin to add the UK channel icons to the EPG are nice additions and make the experience much sweeter.

Aside from watching live TV and optimising that experience, the next thing I’m going to be playing with is the Windows Server 2012 Essentials integration with Media Center. A feature has existed since the days of the first Windows Home Server which allowed the server to move TV recordings to a share on the server and replace that recording with a stub on the Media Center. For me, this is the best feature of Windows Media Center and Windows Server 2012 Essentials coming together. The HTPC (Home Theatre PC) records a programme from the network tuner as normal and once the recording completes, the server moves the recording to the backend Recorded TV share. The result is that the recording then is available anywhere I can access the server from. For me, this means any other Windows PC in the house, my Windows Phone using the My Server app or any internet enabled device which supports Silverlight. Windows Server 2012 Essentials (and notably R2 with it’s tablet and touch device improvements) allow you to use Silverlight Adaptive Streaming to deliver video and audio content from the server to any device you can think of (so long as it supports Silverlight).

Isn’t that a much better way to be able to consume your media? Exactly how you want, wherever you want on whatever device you want and not paying a penny for a subscription service in the process?

I tried, as I always do with product purchases to o a tonne of research before laying down the money but nearly all of the videos I can find on YouTube for Elgato EyeTV Netstream are in German which doesn’t really help me. I’ll be sure to post up a nice review of how setting up the EyeTV Netstream and getting it to play with Windows Media Center goes. If the test goes well, I’ll be sending some more of my money Elgato’s way to beef that single tuner into a dual tuner with their EyeTV Sat Free extender for the Netstream and I’ll then be doubling down to give me four network tuners throughout the house so that I don’t have to worry about recording conflicts or scheduling problems.

If the excitement of unboxing the product doesn’t overwhelm me (these things normally do) then I may even try and get a video on YouTube to get some English language demo’s of the product out there.


Making the Blog Better and Faster

After moving the blog to Azure, I was really happy with the performance, but I decided this weekend I wanted more so I set off on a personal mission to improve to make the blog better and faster. This post is a quick update on the changes I’ve made to the site to get it to where it is now.

So What Have I Done?

Lots of people recommend YSlow as a Firefox plugin for assessing website performance. I use the Internet Explorer Developer Tools normally for my needs, but YSlow outputs nice reports which tells you what you need to do to get results where as unfortunately, the developer tools only tell you what you’ve got currently.

CSS Removal and Compressing

YSlow identified a number of issues with the site which I’ve worked on resolving to varying degrees. Firstly, it wasn’t happy with the number of CSS stylesheets I referenced due to the theme colour switcher. As I figured this was a gimmick added at the time and nobody would actually really use this, I’ve removed it which allowed me to drop 19 stylesheets from the HEAD section of the site.

Once I’ve removed these stylesheets, I used a plugin called Dust-Me which scans the site and finds unused CSS styles in the stylesheets. When a stylesheet is only 2KB, ever little helps. Dust-Me found about 10 styles across my CSS which I was able to remove and marginally reduce the filesize.

Compressing happened by using a great website, CSS Drive. Their CSS Compressor tool. You copy and paste your CSS into their site and it outputs a shrunken version of it with a large chunk of whitespace removed and where possible is reduces the length of colour codes and converts your CSS into shorthand. Doing that saved me about 20% on the size of my stylesheets, dropping the colour specific sheets from 856 bytes to 777 bytes and dropping the main stylesheet from 6,686 bytes to 5,636 bytes.

Whilst this may not sound like a lot, the smaller the page, the faster it appears to the user and the less load it also puts on the server delivering the page so it’s a double win.

Image Resizing

All of the images on the site which make up the page layout I have designed with high DPI users in mind. This means that users who are operating their displays at 125% or 150% aren’t penalized for doing so and get the same high resolution images and people set to 100%. I realized this weekend that my images where actually scaled to about 225% which is way bigger than high DPI users need so I’ve resized all of the images which make up the standard site page. This has had a big impact on the page weight for the site as a whole. The images which have been updated include all of the logos in the header section on the tiles and all of the images in the sidebar for the navigation.

Page Bloat Removal

I’ve never been 100% happy with my pages on the blog. I do what I can to tweak it when I have time and this weekend, I had time. I’ve made a whole load of changes to the site which will work to improve it’s usability, some of which I’ll list below.

  • Updated page TITLE attribute to include the post title.
  • Removed a JavaScript and some CSS references from the page HEAD to speed things up.
  • Removed the messy looking pagination links at the bottom of singular post pages.
  • Removed a load of bloat and fluff from my about me personal page.
  • Used a WordPress function to HTTP 301 redirect the author archives to my about me page as there isn’t any point in having author archives on a single author website.
  • Added a plugin to manage my sitemap.xml file for Google and Bing search indexing.
  • Created myself a Google+ account and setup author verification for the site so that Google can show my face against results from this blog.

New Picture Time

I figured this weekend that I’d been using the same boring head and shoulders shot of myself for my social presence for nearly eighteen months now and I wanted a change. I’ve got myself a nice new image for all of my social sites. The picture was taken on our holiday to Spain in 2011. With me always being the person taking the pictures in our family, it’s rare find a picture of me and even rarer to find one that I like. With a little bit of Adobe Lightroom magic, what was a wide angle shot including me and some flowers because a lovely little super-crop of me and the flowers with an Instragram-esque vignette and black and white filter to finish the look.

The Results

When I started the journey of updates this weekend, the page weight for the site was about 210KB which was pulled together by nearly ~75 HTTP requests. After all of the work this weekend, the page weight is now down to 140KB (50KB per page saving) and the number of HTTP requests is down to 25 (~50 per page saving). Yes, all of this has taken me quite some time to achieve over this weekend, but the results are really worthwhile and goes to show that even a well performing website has room for improvement.

My current Pingdom score is 88 and my current YSlow small website/blog score is grade B (86). If I change YSlow to the YSlow 2 test pattern then my score drops to grade C (74) but that’s still a pretty good score in my view. I think I could probably get my score up to 90 for the small website/blog category with a little bit more effort in the coming weeks.

On my radar for future changes and updates to the blog are going to be going back through my historical posts and updating them all to use the Azure BLOB Storage for the image hosting and correctly some of the ASCII character errors which where caused by using Windows Live Writer to upload my posts on a previous iteration of the site which didn’t have the UTF-8 encoding set properly.

The Case of the Missing Windows 8.1 Right-Click Shortcuts

When Windows 8.1 first went RTM on TechNet, I downloaded it in a heartbeat and updated my home desktop machine from Windows 8 Pro to Windows 8.1 Pro. A problem that’s been plaguing me since the upgrade but I’ve not had time to look into was that my right-click shortcuts menu (Win+X keyboard shortcut) has been missing. Right-clicking in the bottom left to activate the menu just did nothing. This is what the menu should look like but on my machine it was as if I haven’t even clicked the mouse. Pressing Win+X did nothing either.

Windows 8.1 Start Menu Right-Click

With a little time to look at this today, and with a little help from the community, I found the cause and the resolution.

This shortcut menu is driven by items located in a folder called WinX in your user profile, organised into sub-folders to make up the groups that appear in the menu. When I looked in my user profile for the path %LocalAppData%MicrosoftWindowsWinX, the folder which contains the data for this menu, it wasn’t there. I double and triple checked that I had show hidden files and system files enabled which I did but the folder just didn’t exist which went a long way to explain why I didn’t get the menu.

The solution for me was to break into the default user profile from C:UsersDefault and then navigate the default profile to AppDataLocalMicrosoftWindows and copy the WinX folder into my own profile. Doing this alone doesn’t fix the issue right away though as you need to log out of the machine and in again as this folder appears to be read at login to build the Windows Explorer interface.

To make this easier for people out there, I’ve zipped up the WinX folder default state and uploaded it to my SkyDrive account which you can download from here. Just extract this .zip file into your %LocalAppData%MicrosoftWindows folder if you have this issue also and Bob’s your uncle.


Lync 2013 App for Windows Phone 8 Updated

I’ll admit that I’m not totally on time with this post but I only noticed that update for the Lync 2013 app today – Better late than never they say right?

http://www.windowsphone.com/en-gb/store/app/lync-2013/d85d8a57-0f61-4ff3-a0f4-444e131d8491

It appears that Microsoft have listened to the feedback of the many and added some new features to the Lync 2013 app, most notably, the ability to use the app to join a Lync Online Meeting without needing be a Lync user yourself.

This is something I asked for in my feedback on the app when it was first launched so it’s great to see. I use Lync daily in the office for IM and presence, however we haven’t got as far as a fully edge published solution for external online meeting capability which means I’ve previously not been able to sign in and use the Lync app. Thanks to this latest update, you can now use the app to join an online meeting as a guest attendee.


Storage Spaces You’re My Favourite

I got asked today what my favourite feature of Windows Server 2012 was. For me, that’s a really tough question because there are loads of new features in Windows Server 2012. There are many existing features which have been improved and don’t even get me started on Windows Server 2012 R2, due for official release very soon although already available via MSDN, TechNet and VLSC.

I thought about it for a minute or so but it was obvious to me that Storage Spaces is the coolest and favourite feature of mine in Windows Server 2012 because for Windows Server, it’s a huge reboot on what we can do with storage natively, super easy to setup and operate and it has no additional costs to use as it’s included in Standard edition.

What are Storage Spaces?

Storage Spaces can be boiled down to a simple idea. Imagine that you have a server and with that server, you’re given a ‘pick and mix’ bag of disks and these disks that you have are all of varying capacities and even types (SAS, SATA and even USB) and you want to use these disks in the cheapest and most efficient fashion. Storage Spaces is made for you.

With conventional RAID setups, the above example just isn’t viable because RAID needs you to have matching disk types, capacities, firmware and various other parameters. Imagine then, that you could install these assorted drives into your server, configure them into one or more pools of storage resource and carve out chunks of that storage however you liked? A simple drive (a la JBOD), data that you want to protect and need fast write speeds (like RAID1) and data that you want to protect and need fast read speeds (think RAID5).

You can do all of this through an interface that’s common to you, the Windows Server GUI or PowerShell if you prefer? What’s more, you don’t have the capital expense of expensive storage solutions for your server like DAS (Direct Attached Storage) cages or SAN (Storage Area Network) arrays.

Surely That’s Not All It Does?

Of course not, Storage Spaces aren’t just as simple as my example above because it offers much more.

Think how you have a RAID set configured on a conventional RAID controller: Your server has six bays and you configure two as a mirror to the Windows Server 2012 installation and you decide to put the remaining four into a RAID5 stripe to store and protect your user and application data. Everything works fine but then, two months’ from now, you decide that you need another application or service on that server that would really benefit from a RAID1 Mirror and its higher write speeds. Your options are limited to put it on the sub-optimal RAID5 Stripe or extend the server with an expensive DAS cage because you are out of free disk slots on the server.

With conventional RAID, an entire physical disk and its capacity is assigned to the logical drive. In Storage Spaces, you create drives within one or more Storage Pools, the logical grouping of all of your physical drives and you then create Storage Spaces from those Storage Pools.

Storage Spaces Real-World

The screenshot above shows what a real-world Storage Pool with several configured Storage Spaces could look like, taken from my Windows Server 2012 Essentials machine, and as you can see, I’ve each one configured differently.

When you create a Storage Space inside a Pool, you get a set of options which allow you to configure all of the attributes of that Storage Space such as protection type, drive letter and capacity. You can even allocate more capacity to a storage space than you physically have. Because of these capacity and protection type options, you really can maximize the value you get from your set of disks and use then exactly how you need them.

Storage Space Create

This is one of the really cool things about Storage Spaces. The idea is so simple but yet really effective. In my image above, you can see my Windows Server 2012 Essentials server has a pool capacity of 19.0 TB (yes, I spent a lot of money on disks) and the available capacity right now is 7.82 TB, yet I’ve told Windows that I want the new Storage Space to be 25 TB.

Welcome to Thin Provisioning

It goes without saying that you can’t actually use more than you have as the data would have nowhere to be stored, but the principal is that you plan and configure your storage space sizes in advance to meet your long-term need and not what you currently have. You use capacity up to what you have currently and add more disk over time to give you additional physical capacity, spreading your capital expenditure over time. Best of all, adding more disk to a Storage Pool is simply a couple of clicks.

Storage Spaces doesn’t need to be limited to just one server like my simplistic example either. Windows Server 2012 likes to share so lets you use Storage Spaces in any way that you might want to use a normal disk. You can use a Storage Space to store a Hyper-V virtual machine .vhd file or an iSCSI target presented out to another server.

How to Find Out More

Hopefully this post has got you really interested and thinking about some of the possibilities with Storage Spaces. We saw a number of new features in recently for Storage Spaces too. Hopefully I’ll get to replace my home solution with R2 before too long, pending wife approval of course so I look forward to being able to share what I experience with that.

As there is more to Storage Spaces than I could force anyone to read in a single post, I’d highly recommend heading over to TechNet for a read of more of the features such as Failover Clustered Storage Spaces, Hot Spares, ReFS File System support and more and not forgetting, the Storage Spaces Overview page.

Somebing Isn’t Right

Pardon the pun in the title there, but I get the feeling something isn’t quite right with Bing this evening. I’ve been trying to do some searches online with respect to a feature in Windows Azure and an error I’m seeing. Every variation of the search I tried came up with no results. I know Bing gets a bashing from those Google types, but surely I’m not the only person to have ever thought of using a feature in Azure to the point that there isn’t a single post on it?

To test it out, I did the most basic search imaginable – “Facebook”. Here’s a screenshot of what I got back.

Bing Search No Results

Let’s hope this is just a transient thing which gets resolved soon.