Service Manager

Update Rollup 6 for System Center Service Manager

On the 28th April 2015, Microsoft are going to make available Update Rollup 6 for System Center Service Manager 2012 R2. Microsoft have provided the details of the update in a blog post at http://blogs.technet.com/b/servicemanager/archive/2015/04/22/it-39-s-time-for-ur6.aspx.

This update heavily focuses on performance enhancements including improvements to the AD and SCCM connectors as well as improvements to the MPSyncJob, one of the many Data Warehouse jobs which causes no end of problems in my experience. For non-US customers, this update also includes the previously released hotfix to address SQL Nvarchar errors that I blogged about at http://richardjgreen.net/nvarchar-data-type-error-with-scsm-2012-r2-update-rollup-5/.

It seems from the post that the Service Manager team are also starting to put a lot of focus on performance and addressing the speed and performance problems that people experience using Service Manager once it is actually loaded up with data, connectors and ITIL related incidents, requests and changes. I’m looking forward to see what comes out of this team over the coming updates and see how they can improve the usability of Service Manager as it’s a key piece in the System Center puzzle that does indeed need a bit of work to make it more usable.

Changing SQL Server Instance Collation

Working in my home lab over the last couple of evenings, I have been installing some additional SQL Server instances ready for me to install System Center Service Manager. As anyone who has worked with System Center 2012 or 2012 R2 knows, getting your SQL instance collation right is critical. To compound matters, when you think you’ve got an instance setup right, you could end up finding that although one product has the correct collation, another does not.

In my case with Service Manager, making sure you use the correct collation not only effects Service Manager but also potentially your ability to integrate it with other parts of the suite such as Operations Manager. There is a really helpful blog post at http://blogs.technet.com/b/servicemanager/archive/2012/05/24/clarification-on-sql-server-collation-requirements-for-system-center-2012.aspx which not only talks through the SQL collations for System Center but additionally offers up a table of interoperable collations.

Needless to say, I got the collation wrong when installing Service Manager in my lab and I really didn’t want to have to go to the trouble of uninstalling it and re-installing it as not only is that time consuming driving a SQL installation but because I have two instances, one for the Management database and another for the Data Warehouse database I would have had to do it twice.

Luckily for me, I found that it is possible to change the collation of a SQL Server instance after installation. I want to point out that although this is possible to do, I’m not sure I would recommend it for someone in a production environment and I would definitely tell you to back anything relating to that instance up first. Doing this not only drops any user databases but because it causes the master database to be rebuilt, it will lose any customisations or setting changes you have made to that instance since install.

With everything backed up and ready, use the following command to change the collation of the instance.

Z:\setup.exe /QUIET /ACTION=REBUILDDATABASE /INSTANCENAME=SCSM /SQLSYSADMINACCOUNTS=RJGLAB\Administrator /SQLCOLLATION=Latin1_General_CI_AS

To break the command down, Z:\setup.exe is the path to the SQL Server setup executable on my server. the INSTANCENAME parameter is where you specify the instance you want to modify the collation for. SQLSYSADMINACCOUNTS is where you specify who will be make a sysadmin on the instance after the rebuild (as remember our master database is going to be reset) and SQLCOLLATION is where you specify the new collation to use.

If your instance is running in Mixed Mode Authentication, you can also provide the SAPWD parameter to specify the password that will be used for the sa account however my instance is in Windows Authentication mode so I don’t need to set or use the sa account.

Nvarchar Data Type Error with SCSM 2012 R2 Update Rollup 5

If you are running System Center 2012 R2 in your environment and you have installed Update Rollup 5 but you are based outside of the USA then this post may well be for you.

Update Rollup 5 is the latest of the regular maintenance updates for Service Manager 2012 R2 and includes a wave of updates but it also comes with a nasty bug up it’s sleeve.

I was working with a customer this week trying to get to the bottom of an issue whereby the Data Warehouse jobs where failing. The MPSyncJob was completing successfully but the next jobs in the Data Warehouse job order, the Extract jobs where failing and reviewing the event log on the Data Warehouse server had an error message “The conversion of a nvarchar data type to a datetime data type resulted in an out-of-range value”.

The error message itself isn’t particularly helpful unless you happen to know a bit about SQL and that nvarchar and datetime are both SQL data types for storing row data. I looked back through the logs and found that the jobs started failing the day after we installed an updated version of a custom management pack I had written for them so we uninstalled the MP and I re-ran all of the warehouse jobs which this time succeeded so we knew it was the custom pack at fault.

I reviewed my code in Visual Studio and was happy that everything was as it should be so I turned to the TechNet forums to see what others had to say and sure enough, there where quite a few people on there complaining that after installing Update Rollup 5, they started to see these same Data Warehouse job failures.

It transpires that there is a bug in Update Rollup 5 which only effects systems which use a System Locale that results in a change to the date and time format. US systems store their date and time in the MM/DD/YY format however here in the UK and many other countries, we store the date as DD/MM/YY. The bug in Update Rollup 5 meant that SCSM isn’t able to understand how a month could possibly have more than 12 days as it isn’t able to understand international date formatting with the days and months transposed.

Microsoft have released a hotfix for Service Manager 2012 R2 Update Rollup 5 which updates the Microsoft.EnterpriseManagement.Orchestration.dll file and fixes the issue.

You can obtain the update from http://www.microsoft.com/en-gb/download/details.aspx?id=46368. Once downloaded, apply the update to your Service Manager Management Servers and your Data Warehouse Management Servers. Although not noted as a requirement in the update release notes, I chose to restart the servers just to be certain. After installing the update, Microsoft.EnterpriseManagement.Orchestration.dll will be updated from 7.5.3079.315, the UR5 version, to 7.5.3079.344 to reflect the hotfix installation.

After applying the hotfix, I re-imported the management pack I had written, re-imported the data for the management pack using a CSV Import and I manually triggered the MPSyncJob and the Extract jobs and they all ran without issue and the Data Warehouse is now functional again.

One important note regarding this update is that it states that your Data Warehouse must have completed at least one successful synchronisation before installation. If you are using an existing deployment of SCSM 2012 R2 then this shouldn’t be a problem however if you are working with a new installation then you should pair the Management Group and the Data Warehouse Management Group and complete a sync before you start installing third-party management packs that could trigger the issue. Once the jobs have completed overnight at least once, then install the hotfix and proceed with installing your custom management packs.

Error Configuring the Service Manager Exchange Connector

Here’s a quick one to answer a problem that I had recently and one that you may bump into if you are trying to setup System Center Service Manager 2012 R2 with the Exchange Connector 3.0.

From the installation instructions for the Exchange Connector 3.0, you must copy the Microsoft.SystemCenter.ExchangeConnector.Resources.dll and the Microsoft.SystemCenter.ExchangeConnector.dll files from the extracted file location into your Service Manager installation location.

Once you have copied these two files, you import the ServiceManager.ExchangeConnector.mpb Management Pack Bundle into Service Manager. Once this is done, you need to copy the Microsoft.Exchange.WebServices.dll file into the Service Manager installation directory. The instructions provided with the management pack aren’t very clear on this but you can obtain this file from an installation of the Microsoft Exchange Web Services Managed API.

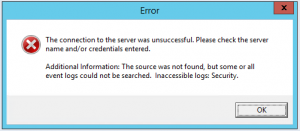
Once you have done all of this, you can then finally you create your Exchange Connector. When testing the connection to Exchange to create the connector, you may receive the following error message:

SCSM Exchange Connector Error

“The connection to the server was unsuccessful. Please check the server name and/or credentials entered.
Additional Information: The source was not found, but some or all event logs could not be searched. Inaccessible logs: Security.”

If you receive this error, you need to read the Exchange Connector 3.0 documentation a little more carefully before heading to the Microsoft Download Center to download the Microsoft Exchange Web Service Managed API. You must be using version 1.2 of the API .dll file for Service Manager to work correctly. If you downloaded and used the later 2.0 version of the API, you will receive this error. This applies to all versions of Exchange including Office 365 or Exchange Online.

Simply install the correct version of the API and replace the Microsoft.Exchange.WebServices.dll file in your Service Manager installation directory. You will need to have all instances of the Service Manager console closed in order to replace this file as the console being open will put a lock on the file.

If you are unsure which version of the file you have, look in your Service Manager installation directory for the Microsoft.Exchange.WebServices.dll file. The API version 1.2 file has a file version of 14.3.32.0 and the API version 2.0 file has a file version of 15.0.516.14.

Making SCSM Custom Lists Visible in the Console

This week, I have been working on a custom management pack for System Center Service Manager to add new classes for Mobile Phone and SIM Card Configuration Items. Once of the requirements for this was to include some lists which can be updated via the console and used to store values abut these two CIs.

Creating the properties in each of the new CIs was no problem and setting their Enumeration Type to a list was no problem either but getting the lists to actually display in the Service Manager Console I found rather challenging. I was able to do it using Service Manager Authoring Tool okay but the Authoring Tool seems to make a horrible mess of generating IDs for objects and it uses Aliases for no reason everywhere. I made the switch from the Authoring Tool to Visual Studio Authoring Extensions for System Center 2012 but Visual Studio doesn’t automatically create the code required to make the lists visible.

To fuel the frustration, I was only able to find a helpful solution after many failed online searches, clearly using the wrong keywords. I was only able to find the answer in the end by creating a list in Service Manager in an unsealed management pack, exporting the Management Pack and viewing the XML to reverse engineer it. From the XML I was able to find the name of the proper name for the code value which then turned up a helpful article on TechNet Blogs.

Using Service Manager Authoring Console

If you are attempting to complete this using the Service Manager Authoring Console then you’re on easy street and you don’t need to do anything in the following sections. Simply create your Enumeration List in the custom Configuration Item Class and the list will automagically be made visible for you. If you saw what I saw which is that the Authoring Console makes a right old mess of your management pack and you decide to use Visual Studio with the Authoring Extensions to create your management packs then read on.

Adding the References

In Visual Studio with the Authoring Extensions (VSAE) add two new references to your solution. The references we need to add are  Microsoft.EnterpriseManagement.SerivceManager.UI.Authoring and Microsoft.EnterpriseManagement.ServiceManager.UI.Console. You can find the SCSM 2012 R2 RTM versions of these system management packs in the Service Manager Authoring Console installation directory at C:\Program Files (x86)\Microsoft System Center 2012\Service Manager Authoring\Library. By default these references have Aliases of !MUSEA and !MUSEC respectively but in my project I have changed these to !Authoring and !Console to make them more intuitive for anyone reading the code.

Making the Lists Visible

With our references added, we need to add the code to make the lists visible in the console. You can either add these lines to the Management Pack Fragment which contains your list definitions (which I have done) or you may wish to have a separate Management Pack Fragment for elements which you are publishing into the UI. Either way, they will be included in the compiled project it’s just your choice about how you structure your project and the code for development.

<Categories>
   <Category ID="Class.List" Target="Class.EnumerationTarget" Value="Authoring!Microsoft.EnterpriseManagement.ServiceManager.UI.Authoring.EnumerationViewTasks" />
   <Category ID="Class.List.Visible" Target="Class.EnumerationTarget" Value="System!VisibleToUser" />
</Categories>

As you can see from the code sample above, we add the Categories section to the fragment and inside that section, we add two Category elements each with unique IDs. The first of the code lines will make the Enumeration List that was declared in the custom Configuration Item class accessible and the second line as you can probably guess from the code makes this visible in the console to end-users.

Unlike most things in Service Manager management pack development, these two Category IDs appear not to require Language Pack Display Strings to be declared so we’re done here. Save your changes, build the project and import the management pack.

Adding List Items to Sealed Management Packs

If you are developing this management pack for a production system then you should be sealing your management pack for import. If you are providing the end-users with an empty list to which they can add their own custom list items then when the first list item is added, you will need to define an unsealed management pack for the list entries to be stored in. Alternatively, if you want to provide a set of default options, you can include these in the sealed management pack as default options using EnumerationValue as part of your EnumerationTypes. These default options will then be included in the sealed management pack and any new entries added will be stored in the unsealed management pack.
System Center Service Manager 2012 R2 Data Warehouse Reports Unavailable

Late last week, I had the pleasure of deploying and configuring a System Center Service Manager 2012 R2 Data Warehouse. I got informed today that none of the reports were available in the Reporting tab in SCSM so I had a look at what the problem might be.

With the SCSM Data Warehouse, the most important job during setup is one of the Data Warehouse Jobs named MPSyncJob. The MPSyncJob has the purpose of deploying all of the management packs from SCSM into the reports folders in SQL Reporting Services (SSRS).

When I looked at this job in the Data Warehouse Jobs tab under Data Warehouse in the SCSM Console, 175/181 has the status Associated but 6 of them were stuck with the status Pending Association and these were all the reporting management packs with this status. Viewing the Management Packs tab under Data Warehouse in the SCSM Console, I could see that these same 6 management packs had a Deployment Status of Failed which is obviously not good.

I logged on to the SCSM Data Warehouse server and poked into the Operations Manager log which is where SCSM records all it’s events and there were a number of critical alerts in the log with the Event Source Deployment and the message went along the lines of insufficient permissions to complete the requested operation so I knew immediately there was a permissions issue with SSRS. I headed over to the SSRS Report Manager URL which normally looks like https://SERVERNAME.domain.suffix/Reports_InstanceName and logged in as myself.

Viewing the permissions on the System Center and Service Manager report folders, I quickly could see that the account that I specified during the setup of the SCSM Data Warehouse was missing, the installer had not properly assigned the permissions to the account.

I manually added the permissions to the account and restarted the deployment of the management packs in a failed state and the Operations Log has now reported that they have successfully been deployed, happy days. Now I just need to wait for SCSM to complete all of the other jobs in the appropriate order to get the full functionality through from our Data Warehouse.


Automating SharePoint Online with System Center Orchestrator

Recently, I’ve been working with a customer who uses Office 365 SharePoint Online and were looking to automate the creation of new sub sites in SharePoint Online with System Center Orchestrator. In addition to the requirement for automating the creation of the sub sites, the customer wanted this to be available as a self-service offering which they can make available to their users.

The customer asked me to put together a video on how we achieved this. This has been put up on YouTube as a four part video series.

You can see the series in the Automating SharePoint Online with System Center Orchestrator playlist at https://www.youtube.com/playlist?list=PLAKHPB7NYKVWBHi778g3LoQmtZ-cBMgsb or with the embedded video below.

The four parts are broken down as follows:

Part 1: Introduction and Prerequisites
Part 2: System Center Orchestrator Configuration
Part 3: System Center Service Manager Configuration
Part 4: Finished Product Demonstration