scup

Extending SCUP with the Patch My PC Catalog

If you read my two previous posts, Preparing Certificates and GPOs for System Center Update Publisher and Setting Up System Center Update Publisher, you will have already a working SCUP installation and integration with Configuration Manager and you will have the certificates and Group Policy Object settings in place for your clients to trust the updates distributed by SCUP. The downfall to the work done with SCUP up to now is that the out of the box catalogs that Microsoft give you access to are subject to that provided to Microsoft by the software vendors. Adobe, Dell, Fujitsu and HP all provide catalogs however none of these are complete and cover their entire product line but the gesture is most welcome none-the-less.

Where SCUP becomes really powerful is when we look beyond these out of the box catalogs and look at starting to patch other third-party software that doesn’t get delivered through Windows Updates normally and the primary reason is security.

Third-party applications as much as we need them can be the bain of an administrators life and the need to keep them up to date, especially when you look at heavily updated applications like Adobe Flash Player or Google Chrome. We need to keep pace with these updates to make sure that the vulnerabilities and CVEs addressed by the updated versions get into the hands of our users but it is a balance between time, effort and cost as are all things in business. Depending on the sector or organisation you work for, you might have a requirement to keep pace too. UK bodies that use the Public Services Network (or PSN) or organisations accepting credit card payments required to comply with PCI DSS all have compliance requirements to maintain applications within a certain number of versions of the latest available release.

Another reason for considering SCUP for these third-party updates is consistency and efficiency. Google Chrome and Adobe Flash Player for example, both have automatic update engines built into them designed to keep the products up to date however these systems aren’t designed with the enterprise in mind and as a result we not only can find ourselves in a scenario where we start to find divergent versions of software across the estate but also we find a large amount of internet connection bandwidth being consumed by downloading these software updates for each and every client. Yes there are workarounds to this such as caching the updates on a proxy server but that doesn’t really resolve the root issue.

Home Brew Updates and Detectoids

The brave amongst you may be looking around the SCUP console and have realised that you can import your own updates from a Local Update Source and that you can write your own detectoid rules to locate installed software at specific versions but that is time consuming work, requires a lot of testing and prone to error: I tried myself to write custom detectoids for patching Oracle Java in a previous life and it didn’t go so well even though I followed instructions somebody else claimed to have worked.

If we look back to the statement I made about balancing time, effort and cost, creating custom updates in SCUP uses all three of those although the cost is born out of man-hours spent on the endeavour and not a real cost like buying something. Therefore, this isn’t an effective solution so we need to find something else.

Patch My PC SCUP Catalog

As we already know, SCUP provides some out of the box catalogs for getting third-party updates but the list of products and vendors is extremely limited. To my mind, the worst offenders like Oracle with Java and Google with Chrome should be doing more to help enterprises with services like SCUP catalogs but they don’t sadly. Luckily for us though, the market answers our needs and here is where I introduce a company called Patch My PC who have a product simply named SCUP Catalog.

What Patch My PC provide is a subscription based catalog that we can import into our SCUP console and they do all the hard work for you of creating the detectoids, pulling together the update files and crucially, the testing. Unlike most enterprise software that costs the earth, Patch My PC is priced simply and fairly: $1 per managed client per year. There is a minimum order of 250 managed clients so even if you have only 100 devices, you need to license 250 still but at $1 per client, per year, I fail to see how any organisation could manage the patching of third-party applications more cheaply.

Before I get any further into the details on this post, I just want to make one thing clear. As are all of my posts on this blog, nobody is paying me to write a favourable review for a product or say anything nice about their company in exchange for favours. I approached Patch My PC to request the NFR license for my lab so that I could blog about it to show you all the value of the software, not because I’m making revenues of advertising their product for them. There are other products on the market which can perform a similar job to Patch My PC SCUP Catalog but none of them are able to do it with the simplicity that we can here today nor do any of them come even remotely close on value for money and price. As we all know enterprise IT is squeezed year-on-year for budgets, if we can achieve something more effectively and more cost consciously then it is good thing.

Add Patch My PC SCUP Catalog

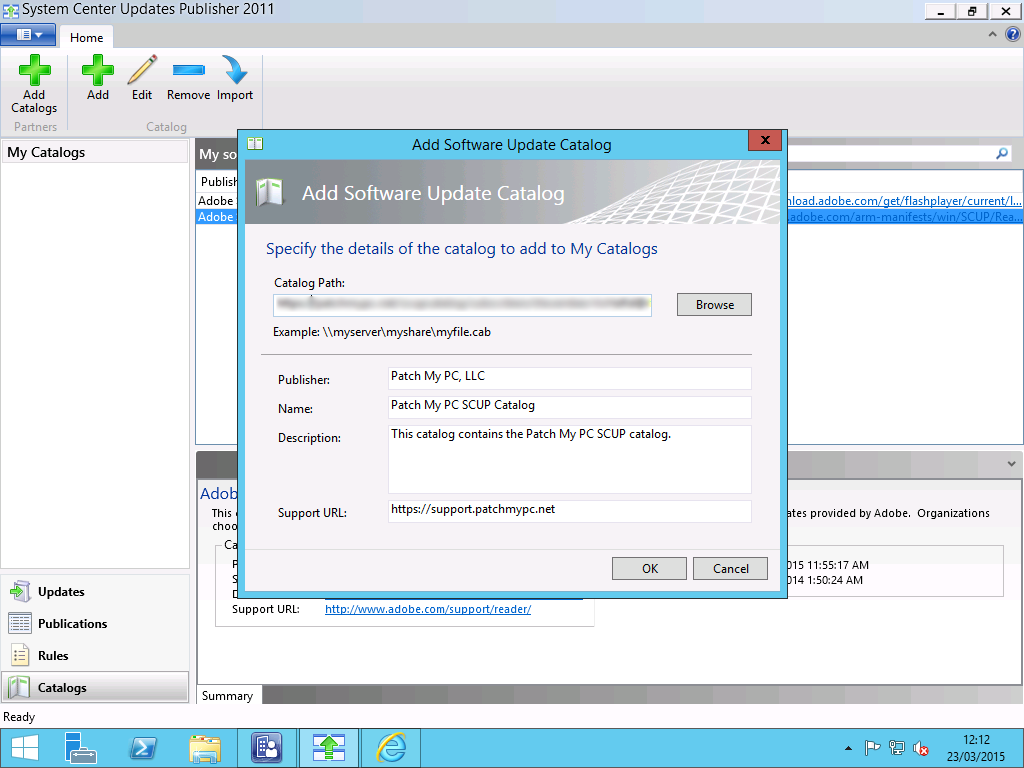
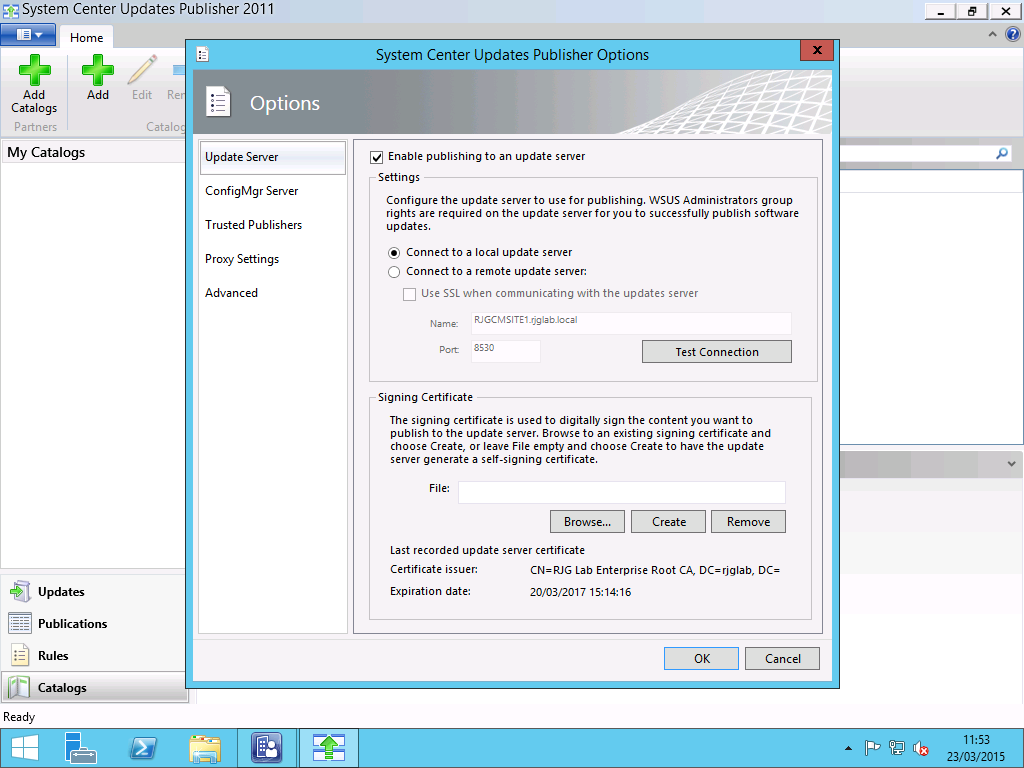
After registration and payment, you will be emailed a URL to a .cab file. You don’t need to download this file as this file is updated frequently by the team at Patch My PC with the latest updates. In the SCUP Console, on the Catalogs page, select the Add Catalog link in the Ribbon. In the wizard, enter the URL given to you for your unique catalog and enter the details for Patch My PC as shown into the various form fields.

Import Patch My PC SCUP Catalog

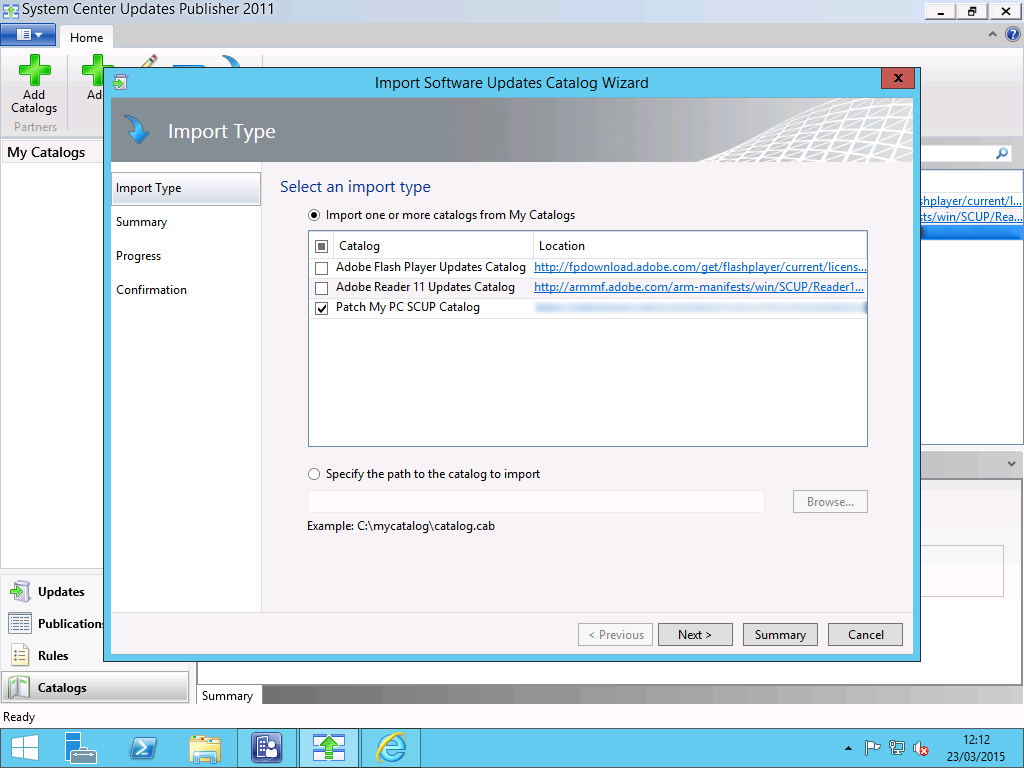
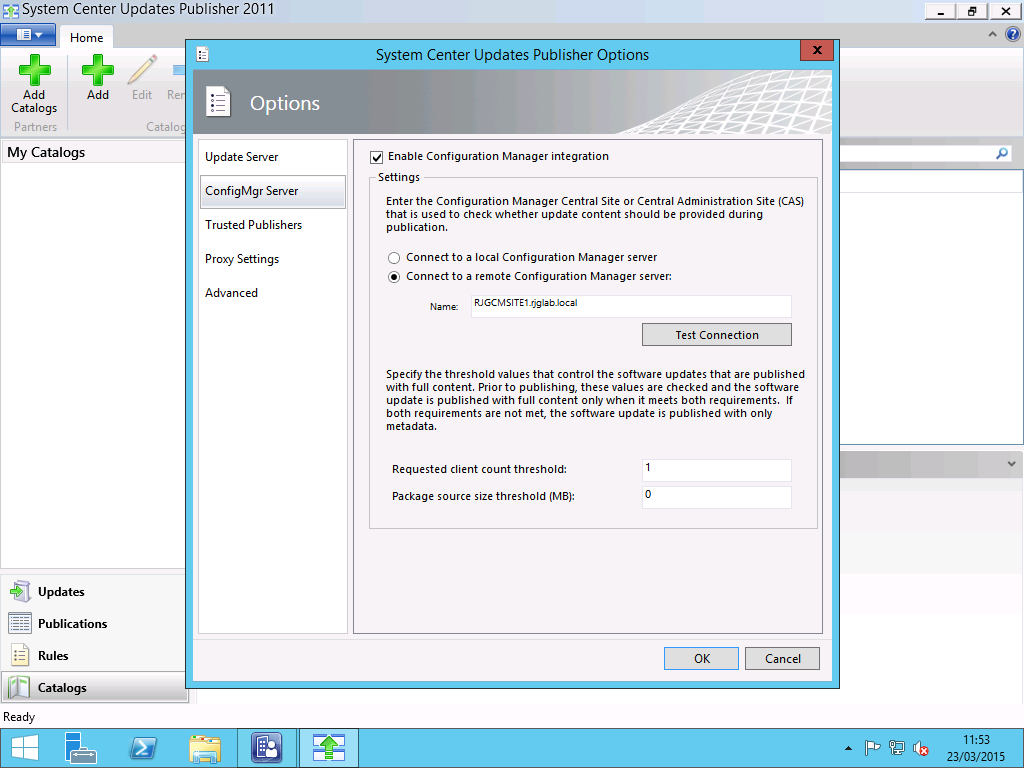
Once you have added the catalog, you need to import it. Still on the Catalog page in the console, select the Import button and select the Patch My PC catalog to import it. Unlike the out of the box catalogs I showed in my previous posts, this will take a lot longer to import as there is a lot more here but it shouldn’t take more than a minute or two.

Publish Patch My PC Updates to WSUS

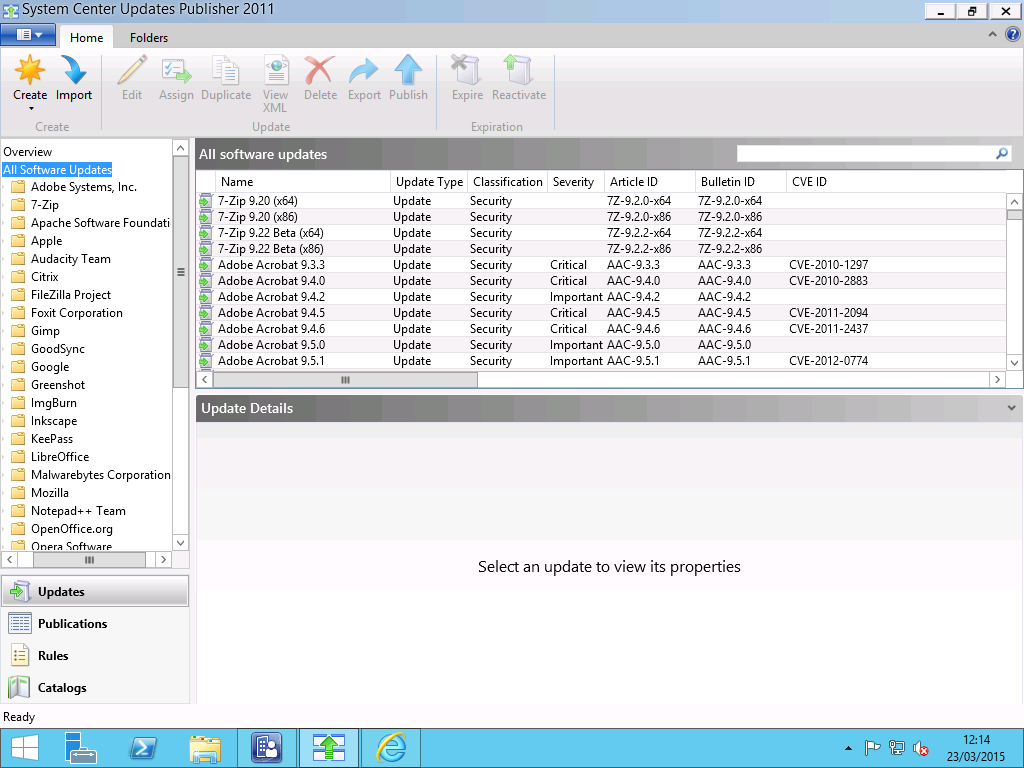
With the catalog imported, head over to the Updates page and take a look at the list of products and updates that the catalog has added to SCUP. The list of products includes too many products for me to mention directly here but you can look at the list they maintain at https://patchmypc.net/supported-products-scup-catalog. To deploy an update to clients, we need to publish it to WSUS. Select the update(s) you want to deploy and select the Publish option from the Ribbon.

Once you have published the updates they will be inserted into WSUS and we now need to make a quick change in Configuration Manager for the remainder of the process to work.

Add Products to SCCM SUP Point

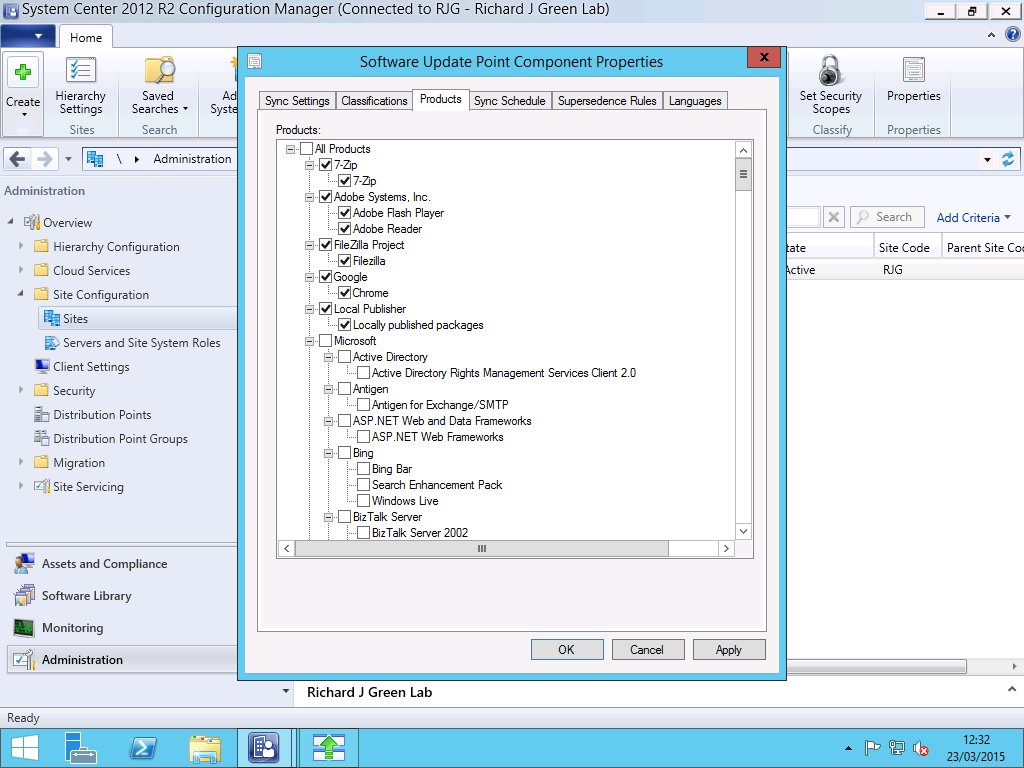
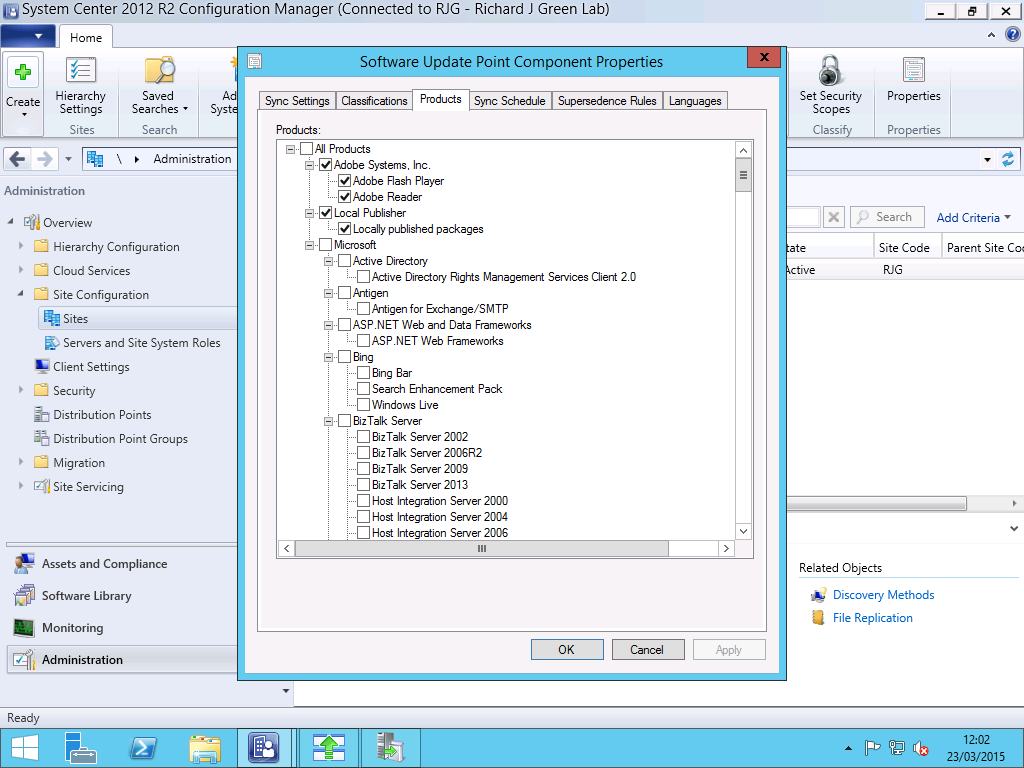
In your Configuration Manager Administration Console, navigate to the Administration page and expand the Site Configuration folder followed by Sites. In the main area, right-click your Configuration Manager site and select the Configure Site Components menu item followed by Software Update Point. In the SUP settings, select the Products tab and check the boxes for all of the products you just published into WSUS as they will currently not be enabled.

SCCM Software Updates with Patch My PC

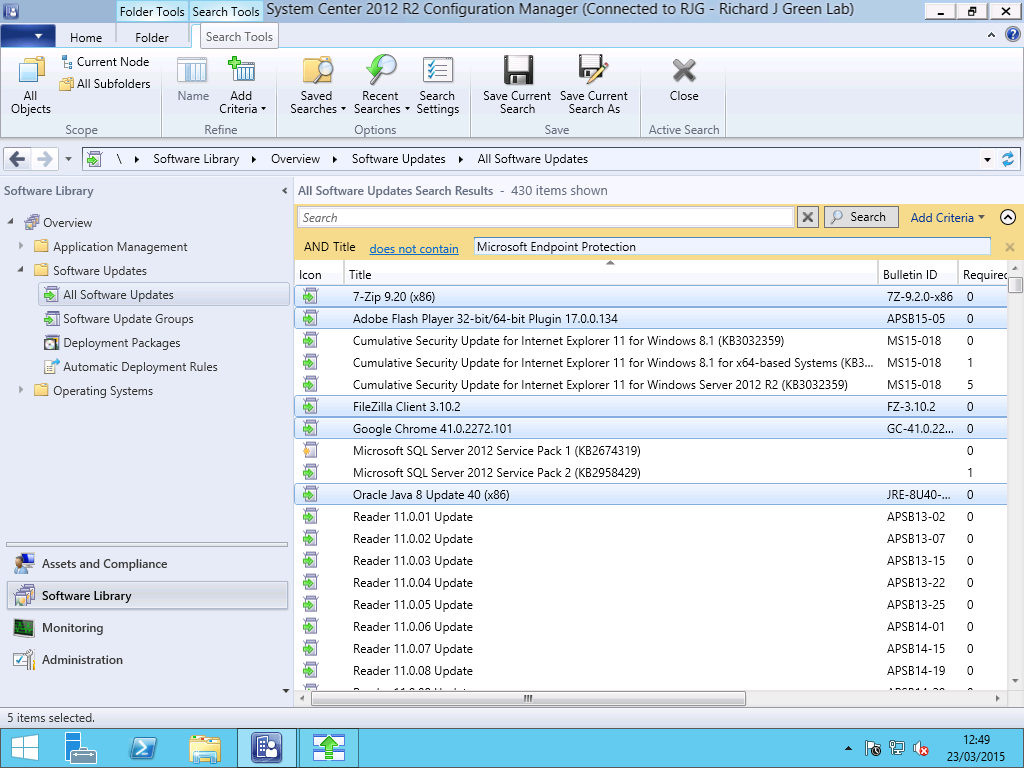
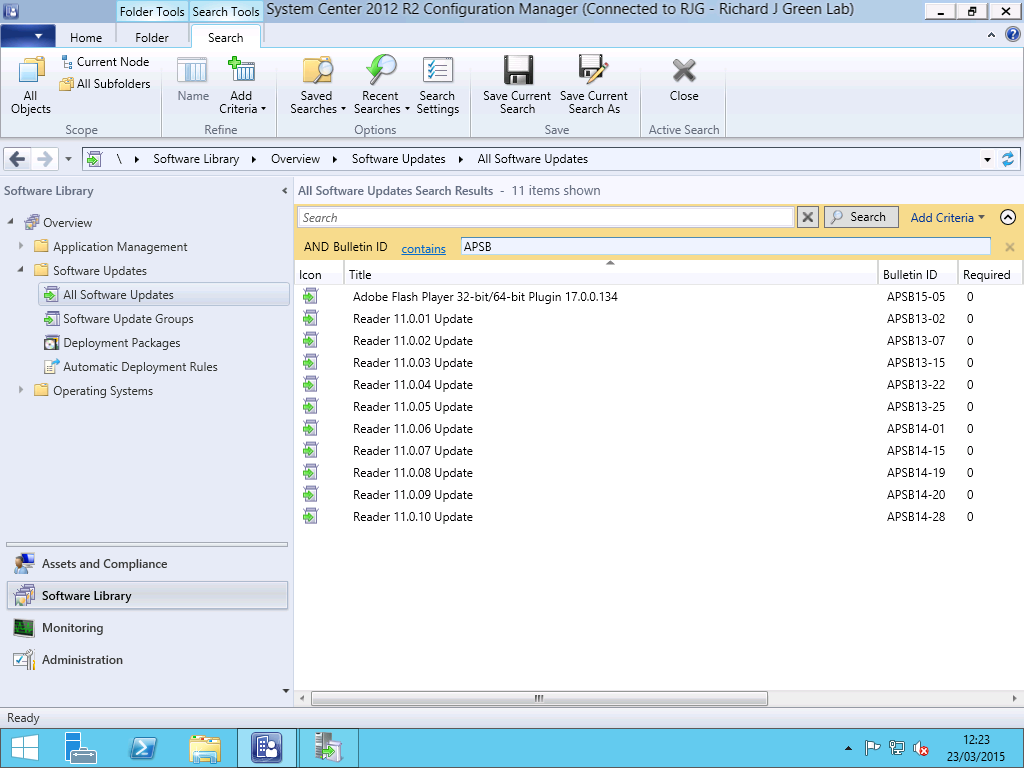
Once you have done this, the next time your Software Update Point WSUS server performs a synchronisation either automatically on the schedule or if you force one, the updates for the recently added products will appear in the All Software Updates view of the console and will be available for you to deploy to your clients following your normal software update process.

As you can see, with Patch My PC, we can use SCUP to quickly get third-party software updates published into WSUS and made available to Configuration Manager for us to deploy to clients extremely quickly and easily without having to create our own custom updates or detection rules. Furthermore, we no longer need to manually create Software Packages in Configuration Manager for the updated products and Device Collections to locate machines on the network with particular software versions installed to target the deployment of these updates.

The whole process took me in my lab no more than 30 minutes to get setup with a working Update Publisher deployment already in place and now that it is done, it would take less than ten minutes each month to add approvals for the products I am interested in and get them into Configuration Manager to the point that I would be ready to roll them out to clients and to be able to achieve this level of simplicity in third-party patch management for $1 per device per year is frankly amazing.

Setting Up System Center Update Publisher

In my earlier post Preparing Certificates and GPOs for System Center Update Publisher, I showed you how you can prepare your environment with the appropriate certificate and Group Policy Object to support a System Center Update Publisher installation. With all of this installed and configured, the time is upon us to now install and configure System Center Update Publisher.

I am not going to go through the installation process for SCUP here because it is literally a Next, Next, Finish installation. What I will tell you though is that the latest version of SCUP is 2011 and you can download it from http://www.microsoft.com/en-gb/download/details.aspx?id=11940. The steps in this post can be applied to Configuration Manager 2007 or Configuration Manager 2012 and 2012 R2 but all of my screenshots for the Configuration Manager side of things will be in SCCM 2012 R2.

Configure SCUP Options

Once you have got SCUP installed, you want to open the console, ensuring that you use the Run As Administrator option. If you don’t elevate the console when you launch it, a number of the options and settings will prevent you from changing them. Once open, click the blue icon in the first position on the Ribbon and select Options to get to the settings.

SCUP Configure WSUS Server

First, we want to configure the WSUS Server settings tab. On this tab, you can either specify the hostname for a remote WSUS server or if you are running the SCUP console locally on your WSUS server you can select the option for Connect to a Local Update Server. An important note here is that if you are connecting to a remote WSUS server, the connection must be over SSL on either Port 443 or Port 8531 in order to be able to configure the Signing Certificate settings.

Once you have specified the server, select the Browse button in the Signing Certificate area and locate the .pfx file that has the exported Code Signing certificate including the private key that was exported in the Preparing Certificates and GPOs for System Center Update Publisher post. Once you have located the file and the path is shown in the field, select the Create button and this will publish the certificate into WSUS. You will be prompted to enter the password for the .pfx file at this point.

SCUP Configure SCCM Server

With the WSUS settings configured, we now need to head to the ConfigMgr Server tab. Here, specify whether to connect to a local Configuration Manager server if you are running the SCUP console on your Primary Site Server, otherwise enter the remote server name.

In the fields in the lower part of the screen, you can specify the behaviour of SCUP for transitioning updates between Metadata only and Full Content publishing status according to the required client count. In a nutshell, you can have SCUP publish only the metadata for an update into SCCM to allow you to determine if clients require the update. Once a defined number of clients report the update as required, SCUP will change the status of the update to Full Content and will download the files such as .msp or .exe files for the update.

Adding Catalogs to SCUP

SCUP works by using catalogs which are lists of updates published by manufacturers and included in these catalogs are the update definitions which are called detectoids, working to determine if a client meets the requirements for an update as well as defining the URL where SCUP can download the update from.

In the SCUP console, select the Catalogs button from the left navigation and then hit the Add Catalogs button from the Ribbon.

SCUP Add Catalogs

After clicking the Add Catalogs button, you will be presented with the list of partner catalogs supported by SCUP. These are out of the box and are at no cost to use. To my mind, the Adobe Reader and Adobe Flash Player are the most important. As you can see from the screenshot, I have added these two catalogs from the list of partner catalogs to include in my SCUP catalogs to be used.

Once you have added catalogs to SCUP, we aren’t quite finished as that only adds them to the list of catalogs that can be used however it does not automatically start getting update information. Now, we need to Import the Catalogs. Select the Import button from the Ribbon to access the Import Software Updates Catalog Wizard and here, select one, some or all of the catalogs you just added. Doing this may take a few moments and you might receive a security warning asking you to accept some certificates in the process so go ahead and allow this.

Publishing Updates from SCUP

With the update catalogs added to SCUP and the updates in those catalogs imported, now it is time to look at some actual updates. Head over to the Updates view in the console with the button in the lower-left corner. and expand one of the folders to view a subset of the updates.

SCUP Updates List

Here we can see the name of the updates, if there are any relevant article IDs or CVEs that they address as well as the date the update was released and whether or not it is expired. As you can see for Adobe Flash Player, many of the updates are expired because they have been superseded by later updates. Highlight an update that has not been superseded and select the Publish button in the Ribbon. Click through the wizard to download the update files if required and the update will be published into WSUS ready for SCCM to use.

Configuring SCCM Software Update Point Products

With the updates now published into WSUS for Configuration Manager use, we need to make sure that Configuration Manager will be able to detect the updates. As part of installing and configuring Configuration Manager you will have setup the products and classifications for which you want to download updates and we need to add to this the products that we just published with SCUP.

In the Configuration Manager Administration Console, navigate to the Administration page and then expand the Site Configuration followed by the Sites view. Right-click on your site and then select the Configure Site Components menu item followed by Software Update Point.

SCCM SUP Products

As you can see in the screenshot above, after publishing the Adobe updates into WSUS, there is now some additional products listed for Adobe Systems Inc including Flash Player and Reader. There is also a new product called Local Publisher which is the product SCUP updates for any updates you create manually. Check all of the new products you want to be able to deploy to clients and then save the changes to the Software Update Point role.

Viewing the SCUP Updates in SCCM

SCCM Adobe Updates Available

With the updates now published to WSUS for Configuration Manager and with Configuration Manager’s SUP role configured to accept updates for these products we’re all set. You can either wait for the WSUS server to perform a scheduled synchronisation or you can force it from the Software Updates area of the Software Library page in the console. Once a synchronisation has occurred Configuration Manager will be able to list the new updates for the new products.

As you can see in the screenshot above, I used a criteria to filter the search results for Bulletin ID contains APSB which is the prefix Adobe uses for all of their security updates much like Microsoft use KB to prefix their updates. I can now follow the normal process of downloading the updates into Deployment Packages and approving the updates for distribution to collections.


Preparing Certificates and GPOs for System Center Update Publisher

If you are using Configuration Manager to manage and patch your client estate then you already know that it’s great to have your Software Updates in the same console as your Application Delivery and the way in which Configuration Manager 2012 R2 manages Software Updates is a big leap on usability over Configuration Manager 2007 however the missing piece of the puzzle for many is managing non-Microsoft updates and for that, we need to enlist the help of a free product from Microsoft called System Center Update Publisher.

Before we start anything with Configuration Manager, WSUS or SCUP however, we do have the small matter of prerequisites to cover off and in this case it requires a certificate and a Group Policy setting or two. The certificate we are interested in is a Code Signing certificate which unless you are familiar with signing PowerShell scripts that you author, you may not have come across previously and your internal CA may not be setup to issue. You can buy these certificates for Code Signing from an external third-party CA if you wish but it is easiest and best done internally as after all, the code you are going to be signing is for updates to your internal clients.

Creating the Code Signing Certificate Template

On your Certificate Authority, we need to configure it to issue a Code Signing certificate. You can either use the native Code Signing template or you can create a custom template just for SCUP so that you can limit the scope of the certificate template to selected users or a group of users accordingly. If you want to create a new template then duplicate the existing Code Signing certificate for the purpose.

Once you have decided on the template to use, configure the CA to issue the certificate. In my lab, my template is called SCUP Code Signing and the security on the template limits users in an Active Directory Group called SCUP Code Signing Users to being able to Enroll the certificate which prevents users, malicious or otherwise from requesting the certificate.

SCUP Code Signing CA Template

Request the Code Signing Certificate

Once you have configured everything on the CA, you need to request a certificate based on this template. Using the Certificates MMC snap-in for your user account, you can request to enrol the certificate from your Active Directory Enrollment Policy.

SCUP Code Signing Certificate Request

If you based your new Certificate Template on the Code Signing template or you used the Code Signing template, you don’t need to enter additional information and the request will be built from Active Directory user attributes. Once you have created the certificate, you need to export it twice. For the first export, export the certificate only in .cer format and do not export the private key. This portion of the certificate will be used in the Group Policy Object shortly. The second export is required to be in .pfx format and include the private key and is used in SCUP for configuring it once installed.

Configure the Trusted Publishers Group Policy Setting

Once you have issued the certificate and you have exported it twice; once as a .cer file and once as a .pfx file, we need to configure the Group Policy for the Trusted Publishers. Put simply, in order for your client PCs to install updates that are not signed by Microsoft, the clients need to trust the updates. In order for the updates to be trusted, they need to be signed with a certificate that the clients trust. Having a certificate from your internal CA isn’t enough for this though. Once you have a certificate, a client will trust it as it is from a Trusted Root Certification Authority but it will not be trusted for code signing unless added to the appropriate certificate store.

Using ether a new Group Policy Object or an existing object which contains your other Certificate Services related settings, we need to add the .cer certificate exported earlier to the policy.

Trusted Publishers GPO Setting

Within the Group Policy Object, expand the Computer Configuration folder and then drill into Security Settings followed by Public Key Policies. Within the Public Key Policies folder, open the Trusted Publishers folder. In here, you need to import the Code Signing certificate .cer file that was previously exported. Doing this allows your clients to trust updates signed with this certificate for the publishing of software and applications.

Make sure you use the .cer export and not the .pfx export here as we only want the clients to have and trust the public key portion of the certificate. Distributing the .pfx would give these clients the private key also and that would be bad to have sent throughout the entire environment on every machine linked with the GPO.

Next, we need to change one setting in relation to the Windows Update Agent on the clients. In the same GPO or in another GPO if you have one dedicated to Windows Update related settings, navigate to Computer Configuration, Administrative Templates, Windows Components, Windows Update. Here, you need to change the status of the Allow signed updates from an intranet Microsoft update service location setting from Not Configured to Enabled. This second setting allows the Windows Update Agent to actually detect and download updates from your WSUS and SCCM environment if they are not signed by Microsoft and this setting is paired with the Trusted Publisher certificate above to make non-Microsoft updates trusted on the client.

With these all the above completed, you are now set and ready to deploy System Center Update Publisher and a follow-up post I will be publishing soon will cover the SCUP installation and setup.