IIS

Delta CRLs are Not Accessible via HTTP When Hosted on IIS

If you are running a Microsoft PKI in your environment then chances are you will have (or at least you should have) configured at least one HTTP based distribution point (CDP) for your Certificate Revocation Lists. If you are only publishing full CRLs then you will have no problems however if you are publishing Delta CRLs, the smaller, faster to process kind which list only certificates revoked since the last full publish then you may encounter an issue if you are using an IIS website to publish these.

The problem lies in the filename used for the CRLs. In my lab for example, my Certificate Authority issues a CRL file name rjglab-CA.crl and the delta files are named the same as the full CRL but they are appended with the plus character making the file name rjglab-CA+.crl. In it’s native configuration, IIS does not permit the use of the plus character because that character falls into the realms of IIS Request Mapping and the request handler.

HTTP Error Downloading Delta CRL

We can see in the screenshot above what the error code and message given by IIS is when we try to download the Delta CRL in the default configuration.

For an IIS webserver hosting your CRL and Delta CRL, we need to change the behaviour of IIS to allow this plus character to be permitted which luckily is easily done. First off, open IIS Manager on the server which is hosting and making available to clients your Delta CRL file. From the server home in IIS, open the Request Filtering page and from this page, select the Edit Feature Settings button in the Actions bar.

Request Filtering Settings in IIS

On the Edit Request Filtering Settings page under the General section, by default, Allow Double Escaping is disabled. Enable this option and then press OK.

Once you have made the change, try to download the Delta CRL file and you should find that the file is available and you can successfully download it.

Delta CRL Downloaded OK

Windows Azure Website DIPR Dynamic IP Restrictions

Last week, I posted about Windows Azure Websites Always On as a means to keep your website hot and ready for guest access. Today, I’m going to cover how to make your website more secure in the fight against Denial of Service (DoS) and Distributed Denial of Service (DDoS) attacks.

DoS and DDoS attacks are becoming more and more commonplace on the internet and as a site grows more successful and out there in the public eye, the greater your chances of being attacked. If you are running your web site on Windows Azure then the good news is that you are largely already covered as Microsoft employ various security products and technologies to protect the Windows Azure environment. You can find out more about what Microsoft do to protect Azure at the Windows Azure Trust Center at http://www.windowsazure.com/en-us/support/trust-center/security/.

What is Dynamic IP Restrictions

With the above in mind regarding in-built protection in Windows Azure, you can still do more to help yourself with the help of an IIS extension called Dynamic IP Restrictions or DIPR for short. DIPR is available on the Windows Azure Web Sites platform without any plugin or module installationon your part. All you need to do as a site owner or administrator is enable it for use on your site and configure some thresholds. All of this is done through the web.config file for your site.

Configure Dynamic IP Restrictions

To access the Windows Azure Web Site web.config file, use FTP or FTPS to access your wwwroot web site path using your deployment credentials and your favourite FTP client. If you don’t know or remember these then you can view the username in use and reset the password from the Windows Azure Management Portal at https://manage.windowsazure.com.

To enable Dynamic IP Restrictions for your site, add the following lines to your web.config file.

<system.webServer>
   <security>
      <dynamicIpSecurity>
         <denyByRequestRate enabled="true" maxRequests="500" requestIntervalInMilliseconds="5000"/>
      </dynamicIpSecurity>
   </security>
</system.webServer>

The system.webServer node will already exist in your web.config file and there is a chance that the security node may exist already too so check for these and add appropriate lines in the correct place otherwise you risk bringing your site crashing down due to a bad configuration file.

With the lines installed in the file, you need to configure the denyByRequestRate node of dynamicIpSecurity with an appropriate rate limit. maxRequests determines the number of requests a given client IP address may send to the site and requestIntervalInMilliseconds determines the timeframe over which the DIPR extension for IIS will count the number of requests.

Change the Restriction Response Code

When a client breaches the threshold given, the default posture of DIPR is to present the client with a HTTP 403 Forbidden code however you can customise this with any of the following codes:

  • AbortRequest 0
  • Unauthorized 401
  • Forbidden 403
  • NotFound 404

To customise the response, amend the dyanmicIpSecurity node with the denyAction parameter as follows. Just exchange the option inside the denyAction quotation marks with the response you want to use.

<dynamicIpSecurity denyAction="AbortRequest">

Setting the rate for the maxRequests and requestIntervalInMilliseconds is the hardest part here as you need to balance security over functionality. If your site was particularly popular with one company who uses a proxy appliance to route their internet traffic then you could see a high volume of connections coming from a single public IP address which means you may need to raise your limits. Having the limit too high though means that you will be allowing potential attackers the freedom of a head-start against the site before DIPR cuts in to fend them off.

Protect an On-Premise IIS Web Server

My closing remark on this is that although I’ve spoken about DIPR with respect to Windows Azure Web Sites, you can also install this extension for IIS on Windows Server and use it to protect internal corporate sites against disgruntled employees or to protect IIS on Windows Server running in a DMZ segment to protect your on-premise hosted publicly accessible websites. You can download and install DIPR by using the Web Platform Installer (Web PI) from Microsoft at http://www.microsoft.com/web/downloads/platform.aspx.

Controlling Configuration Manager Clients Across WAN Links

At work this week, we encountered an issue when a package I created for Adobe Reader 10 went mandatory in Configuration Manager. We service retail stores connected via slow WAN links back to our head offices. When I first joined the company, on a monthly basis when new Windows Updates were released into the wild, our network team would come down upon our team, fire wielding whilst we raped and pilaged the lines to stores.

Configuration Manager gives you the power to create BITS (Background Intelligent Transfer Service) policies to throttle the bandwidth that will be consumed by SCCM client transfers for packages and patches, however the problem with Configuration Manager is that it’s policy is not granular, it is singular which means to apply a policy of 32KB/s which we needed to do to facilitate stores, you would also be limiting the speed of head office clients connected to 100 Megabit or 1 Gigabit high speed LAN connections.

Group Policy also gives you the ability to configure BITS throttling policies and in actual fact, Group Policy gives you more options to control the granularity plus the fact that you can link Group Policies to OUs and not just entire domains, or sites, allows us to control the speeds in a more appropriate way.

In a Group Policy Editor window from Group Policy Management Console (GPMC), navigate to Computer Configuration, Administrative Templates, Network, Background Intelligent Transfer Services (BITS). From here, enable the Limit the Maximum Network Bandwidth for BITS Background Transfers setting and configure the speeds and times as you need. You can also configure an out of hours policy which we make use of, limiting the store clients to 32KB/s between 8am and 6pm daily, but allowing them to expand to 256KB/s overnight when the store is closed, not making VoIP calls or trying to transact credit cards.

This worked great and the next time we deployed patches we had no complaints from the stores, but instead, we had a problem at the head office. The problem had not been manifested previously as we had to delay patch deployments before the packages reached everyone, but the issue we experienced now was that due to the length of time a Configuration Manager client was connected to the Distribution Point downloading packages, we were now seeing prolonged connections to the IIS site on the Distribution Point and lots of 64KB/s connections makes lots of bandwidth – We were now actually consuming all of the bandwidth at the head office site, causing inter-site applications between our two head offices to crawl.

We found a solution to this problem in IIS. The solution probably isn’t recommended by Microsoft or any System Center consultants out in the wild, but it works for us and causes no side-effects that we’ve witnessed in the year or so that it has been in place, so it has withstood the test of time.

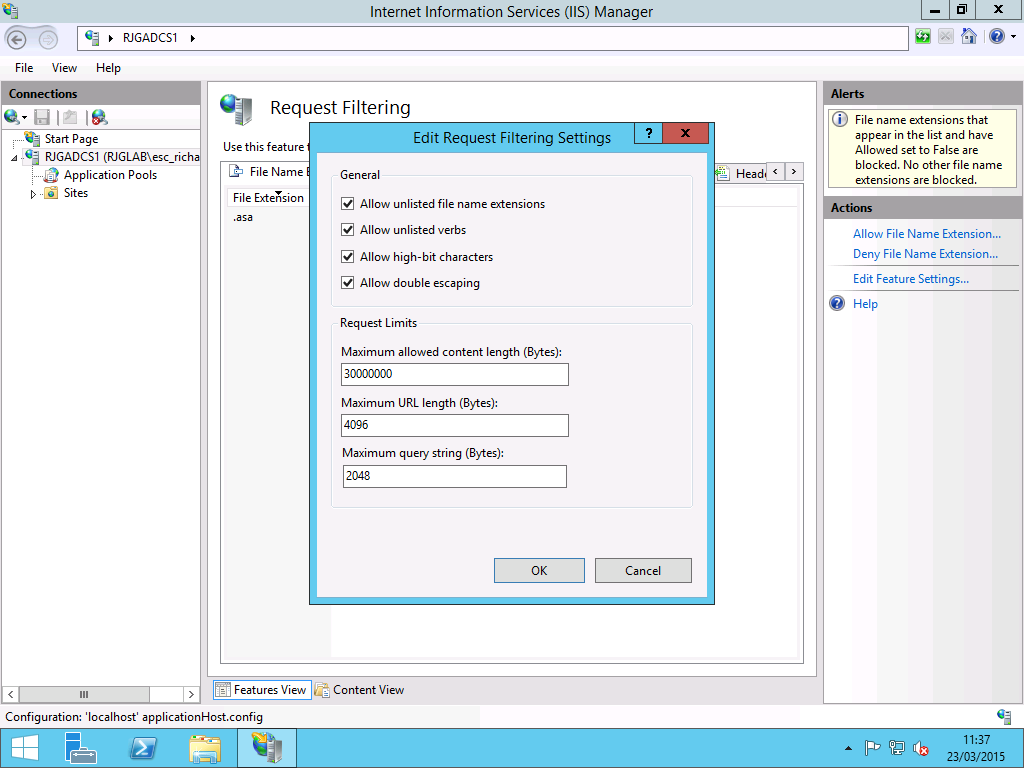
Using IIS Manager on the Distribution Point server, expand the Default Web Site. From the Actions pane on the right hand side of the interface, select Advanced Settings. From the Advanced Settings dialog, expand the Connection Limits group under the heading Behaviour. By default, IIS accepts a number of connections so large is may as well be infinite. We calculated that based on our free capacity on our link at the head office, taking into account the traffic required for LoB applications, we could handle about 20Mbps of client traffic. We divided the 20Mbps into 64KB/s BITS setting out which gave us a number of 320. Setting the IIS connection limit to 320 and restarting the site in IIS, we saw an instant reduction in Distribution Point server network activity and also the drop we needed on the site link.

As I have mentioned above, this was done over a year ago. In this time, we’ve had not a single complaint from stores, head office users or our network team that there are network contention issues due to SCCM traffic, nor have we seen any apparent SCCM client issues such as clients never properly reporting due to connection retry limits being reached. This isn’t to say that this fix is for everyone: You would need to factor in things like how many total clients do you have in an SCCM site, and if a client was back of the IIS queue, would it be waiting for a connection for so long that it would timeout, or do you need to be able to rapidly deploy high threat updates regardless of the impact to other LoB applications?

Since implanting these changes, we’ve had two Microsoft SCCM RAP assessments and neither have produced red or amber health status problems due to the changes to BITS and IIS, so I think we found ourselves a winner.

FTP 7.5 Upgrade for Windows Server 2008

Well I’m not entirely sure how I managed miss this one? Perhaps it was through a haze of Windows Server 2008 R2 release excitement, but I recently discovered that Microsoft have a patch available for Windows Server 2008 to upgrade the existing FTP 7 to FTP 7.5, the version found in the R2 release of Server 2008.

This is good news for users of Server 2008 because it adds support for the biggest feature on FTP for years gone by – FTP over SSL (FTPS). This means that your previously plain-text unencrypted FTP transmissions can now be protected by the same certificates and public keying process and your online banking transactions.

You can get the download from the Microsoft Download Center in both 32-bi and 64-bit versions:

Microsoft FTP Service 7.5 for IIS7.0 (x86)
Microsoft FTP Service 7.5 for IIS 7.0 (x64)

Redirecting Non-HTTPS Traffic to HTTPS for SharePoint 2007

Like any sensible SharePoint 2007 deployment, I’m keeping the one I am working on currently currently strictly HTTPS (SSL). The reason for this is that we have opened up the SharePoint deployment to the web. Not a public facing web with anonymous access for internet users, but accessible without VPN on the web for our field employees to use.

One of the problems I have faced up until now is that when SharePoint is configured for HTTPS connections the Non-HTTPS connections are dropped and faced with a 404 Not Found error, the least helpful of all HTTP error codes.

Struggling for a solution to such a simple request –Redirect non-secured traffic to the secure protocol I searched online and found after a little digging this helpful article from a SharePoint blog at http://www.os.com/blog/capture-and-redirect-http-to-https-with-sharepoint-2007/. Here’s the crux of it:

  1. Configure the SharePoint AAM (Alternate Address Mapping) so that HTTPS is the default protocol for the public URL.
  2. Edit the IIS Site for SharePoint and either change the HTTP port to a random number, or do as I did and delete the binding for the HTTP port.
  3. Create a New IIS Site called SharePoint Redirect
  4. Assign the New Site to HTTP on Port 80
  5. Add a Host Header to the New Site Matching the URL of the Site (Eg. sharepoint.company.com)
  6. Using HTTP Redirects, Create a Permanent (HTTP 301) to the HTTPS URL of the SharePoint deployment.

Done

PS: Don’t forget to allow HTTP and HTTPS through the external firewall though otherwise users will never hit the redirect rule.

Mix ’08 and My Thoughts

Late last night, I watched some interesting content from the Mix ’08 show from Microsoft. I took the time to watch the two keynote presentations, firstly introducing Microsoft’s new web technologies and the second being an interview with Steve Ballmer.

Whilst I am not a developer, there are some things which do realy excite me when it comes down to web development and the new functionality which people are driving through sites like social networking and the demand for richer, faster and more integrated web experiences, and for me, a lot of the things that came up in the Mix ’08 keynotes did it for me.

Read more…